
はじめに
MDNの紹介を引用します。
IndexedDBは、SQLベースのRDBMSに似たトランザクション型データベースシステムです。しかし、固定リストを使用するRDBMSとは異なり、IndexedDBはJavaScriptベースのオブジェクト指向データベースです。IndexedDBでは、キーでインデックス付けされたオブジェクトを保存および取得できます。structured clone algorithmがサポートするあらゆるオブジェクトを保存できます。データベーススキーマを指定し、データベースへの接続を開き、一連のトランザクションでデータを取得および更新するだけです。
IndexedDBは、大量の構造化データ(ファイル/BLOBを含む)をクライアント側で保存するための低レベルAPIです。このAPIは、インデックスを使用してそのデータに対する高性能な検索を実現します。Web Storageは少量のデータを保存するのに役立ちますが、より大量の構造化データを保存するには、この方法はあまり有用ではありません。IndexedDBが解決策を提供します。
違い
WebStorageとIndexedDBの違いをまとめたものです。もし問題があればご指摘ください。 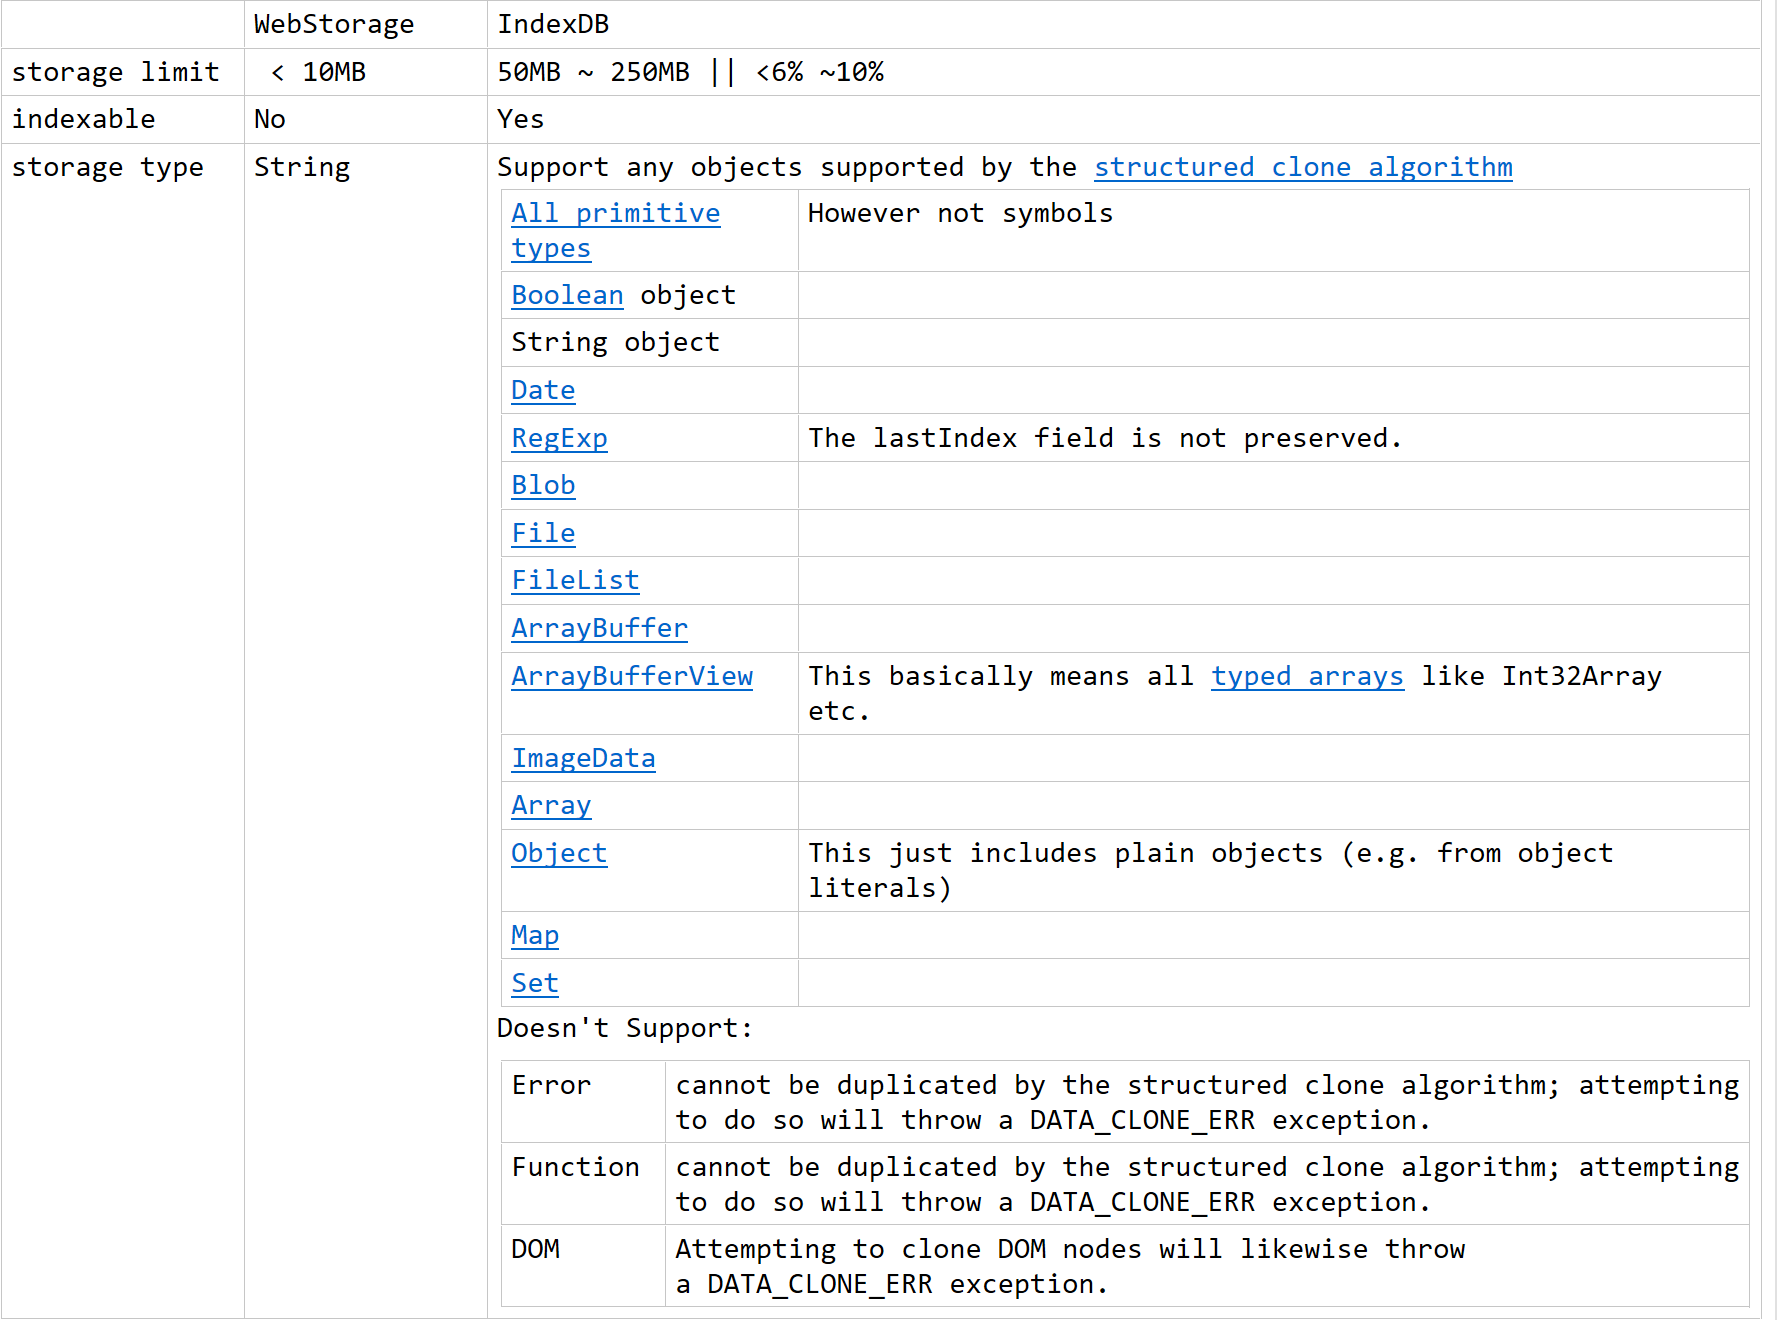
使い方
1. データベースを開く
const DB_NAME = "Netease";
const DB_VERSION = 1;
const OB_NAMES = {
  UseKeyPath: "UseKeyPath",
  UseKeyGenerator: "UseKeyGenerator",
};
/**
 * NOTE:
 * 1. 第一次打开可能会提示用户获取 indexedDB 的权限
 * 2. 浏览器隐身模式不会存在本地,只会存储在内存中
 */
const request = window.indexedDB.open(DB_NAME, DB_VERSION);indexedDB.openは、データベース名とバージョンの2つの引数を受け取り、IDBOpenDBRequestオブジェクトを返します。その結果は、DOMイベントのようにsuccessとerrorをリッスンすることで取得できます。IndexedDBに対するほとんどすべての非同期操作は、このようにイベント駆動型で行われ、結果またはエラーを持つIDBRequestオブジェクトを返します。ここで、openメソッドの結果はIDBDatabaseのインスタンスです。
2番目の引数はデータベースのバージョンです。バージョンはデータベースのスキーマ、つまり内部に保存されるオブジェクトストアとその構造を決定します。openメソッドでデータベースを初めて開くとき、onupgradeneededイベントがトリガーされ、ここで(そしてここでしか)データベーススキーマを設定できます。データベースがすでに存在し、より高いバージョンで開く場合も、同様にonupgradeneededイベントがトリガーされ、データベーススキーマを更新するために使用されます。
処理メソッドの追加
success、error、およびupgradeneededイベントをリッスンすることで、対応する操作を実行できます。
request.onerror = function (event) {
  // Do something with request.errorCode!
  console.error("open request failed", event.target.error);
};
request.onsuccess = function (event) {
  // Do something with request.result!
  // console.log('open request success', event)
  var db = event.target.result;
  db.onerror = function (e) {
    console.error("Database error: ", e.target.error);
  };
  db.onclose = (e) => {
    console.error("Database close:", e.target.error);
  };
};successイベント内でdbオブジェクトを取得できます。これはその後の操作の主体となります。
エラー処理
DOMイベントモデルに基づいているため、すべてのエラーはバブリングします。つまり、特定のrequestで発生したエラーは、トランザクション、そしてdbオブジェクトへと順にバブリングしていきます。 エラー処理を簡素化するために、dbオブジェクトに直接エラーハンドラを追加することもできます。
db.onerror = function (e) {
  // 可以处理这个数据库上所有的错误
  console.error("Database error: ", e.target.error);
};
2. データベースバージョンの作成または更新
前述の通り、データベースのバージョンを作成または増やすと、onupgradeneededイベントがトリガーされます。このイベント内で、dbオブジェクトを取得してオブジェクトストアを作成または更新できます。具体的な方法は以下の通りです。
request.onupgradeneeded = function (event) {
  /**
   * NOTE:
   * 1. 创建新的 objectStore
   * 2. 删除旧的不需要的 objectStore
   * 3. 如果需要更新已有 objectStore 的结构,需要先删除原有的 objectStore ,然后重新创建
   */
  // The IDBDatabase interface
  console.log("onupgradeneeded", event);
  var db = event.target.result; // Create an objectStore for this database
  const objectStore = db.createObjectStore(OB_NAMES.UseKeyPath, {
    keyPath: "time",
  });
};
3. データベースの構築
IndexedDBは、テーブル構造ではなくオブジェクトストアとしてデータを保存します。1つのデータベースには任意の数のオブジェクトストアを保存できます。オブジェクトストアに値を保存するたびに、キーと関連付ける必要があります。オブジェクトストアがキーパスを使用するかキー生成器を使用するかによって、キーを提供するいくつかの方法があります。
それらの違いをMDNの表で見てみましょう。
| Key Path (keyPath) | Key Generator (autoIncrement) | Description |
|---|---|---|
| No | No | This object store can hold any kind of value, even primitive values like numbers and strings. You must supply a separate key argument whenever you want to add a new value. |
| Yes | No | This object store can only hold JavaScript objects. The objects must have a property with the same name as the key path. |
| No | Yes | This object store can hold any kind of value. The key is generated for you automatically, or you can supply a separate key argument if you want to use a specific key. |
| Yes | Yes | This object store can only hold JavaScript objects. Usually a key is generated and the value of the generated key is stored in the object in a property with the same name as the key path. However, if such a property already exists, the value of that property is used as key rather than generating a new key. |
出典: https://developer.mozilla.org/en-US/docs/Web/API/IndexedDB_API/Using_IndexedDB
保存する値がプリミティブ型ではなくJavaScriptオブジェクトの場合、オブジェクトストアにインデックスを作成することもできます。これにより、インデックスプロパティを介して特定のオブジェクトを検索できるようになります。さらに、インデックスは保存するオブジェクトにある程度の制約を設けることもできます。インデックス作成時に一意の識別子を設定することで、同じインデックス値を持つオブジェクトが複数保存されないように保証できます。 以下のログデータを保存する必要があると仮定した例を見てみましょう。
const TestData = [
  {
    event: "NE-TEST1",
    level: "warning",
    errorCode: 200,
    url: "http://www.example.com",
    time: "2017/11/8 下午4:53:039",
    isUploaded: false,
  },
  {
    event: "NE-TEST2",
    msg: "测试2",
    level: "error",
    errorCode: 1000,
    url: "http://www.example.com",
    time: "2017/11/8 下午4:53:042",
    isUploaded: false,
  },
  {
    event: "NE-TEST3",
    msg: "测试3",
    level: "info",
    errorCode: 3000,
    url: "http://www.example.com",
    time: "2017/11/8 下午4:53:043",
    isUploaded: false,
  },
  {
    event: "NE-TEST4",
    mgs: "测试4",
    level: "info",
    url: "http://www.example.com",
    time: "2017/11/8 下午4:53:0423",
    isUploaded: false,
  },
];
ここでは、キーパスとキー生成器の2つの保存方法があります。
function obUseKeypath(db) {
  const objectStore = db.createObjectStore(OB_NAMES.UseKeyPath, {
    keyPath: "time",
  });
  objectStore.createIndex("errorCode", "errorCode", { unique: false });
  objectStore.createIndex("level", "level", { unique: false });
}

function obUseKeyGenerator(db) {
  const objectStore = db.createObjectStore(OB_NAMES.UseKeyGenerator, {
    autoIncrement: true,
  });
  objectStore.createIndex("errorCode", "errorCode", { unique: false });
  objectStore.createIndex("time", "time", { unique: true });
  objectStore.createIndex("level", "level", { unique: false });
}
4. データの追加、削除、更新、検索 (CRUD)
この部分の内容を説明しやすくするために、前節のコードをラップして、今後の例の説明を容易にします。
function openindexedDB() {
  // The call to the open() function returns an IDBOpenDBRequest object with a result (success) or error value that you handle as an event.
  return new Promise((resolve, reject) => {
    /**
     * NOTE:
     * 1. 第一次打开可能会提示用户获取 indexedDB 的权限
     * 2. 浏览器隐身模式不会存在本地,只会存储在内存中
     */
    const request = window.indexedDB.open(DB_NAME, DB_VERSION);
    request.onerror = function (event) {
      // Do something with request.errorCode!
      console.log("open request failed", event);
      console.error(event.target.error);
    };
    request.onsuccess = function (event) {
      // Do something with request.result!
      // console.log('open request success', event)
      var db = event.target.result;
      db.onerror = function (e) {
        console.error("Database error: ", e.target.error);
        reject(e.target.error);
      };
      db.onclose = (e) => {
        console.error("Database close:", e.target.error);
        reject(e.target.error);
      };
      resolve(db);
    };
    request.onupgradeneeded = function (event) {
      /**
       * NOTE:
       * 1. 创建新的 objectStore
       * 2. 删除旧的不需要的 objectStore
       * 3. 如果需要更新已有 objectStore 的结构,需要先删除原有的 objectStore ,然后重新创建
       */
      // The IDBDatabase interface
      console.log("onupgradeneeded", event);
      var db = event.target.result; // Create an objectStore for this database
      obUseKeypath(db);
      obUseKeyGenerator(db);
      /**
       * NOTE:
       * transaction
       * 三个事件:
       * 1. error
       * 2. abort
       * 3. complete
       * 两个方法:
       * 1. abort
       * Rolls back all the changes to objects in the database associated with this transaction. If this transaction has been aborted or completed, then this method throws an error event.
       * 2. objectStore
       * Returns an IDBObjectStore object representing an object store that is part of the scope of this transaction.
       */
      db.transaction.oncomplete = function (e) {
        console.log("obj create success", e);
      };
    };
  });
}
function obUseKeypath(db) {
  const objectStore = db.createObjectStore(OB_NAMES.UseKeyPath, {
    keyPath: "time",
  });
  objectStore.createIndex("errorCode", "errorCode", { unique: false });
  objectStore.createIndex("level", "level", { unique: false });
}
function obUseKeyGenerator(db) {
  const objectStore = db.createObjectStore(OB_NAMES.UseKeyGenerator, {
    autoIncrement: true,
  });
  objectStore.createIndex("errorCode", "errorCode", { unique: false });
  objectStore.createIndex("time", "time", { unique: true });
  objectStore.createIndex("level", "level", { unique: false });
}これにより、データベース操作が必要な場合はいつでもopenindexedDBメソッドを呼び出すだけで済みます。
トランザクション
データベースに対するすべての操作は、トランザクションに基づいて行われます。トランザクションにはreadonly、readwrite、versionchangeの3つのモードがあります。 データベースの構造であるスキーマを変更するには、versionchangeモードである必要があります。読み取りと変更は、他の2つのモードに対応します。 IDBDatabase.transactionを介してトランザクションを開きます。これはstoreNamesとmodeの2つの引数を受け取ります。 データベースに対するすべての操作は、以下のフローに従います。
- データベースオブジェクトを取得する
- データベース上でトランザクションを開く
- トランザクション上でオブジェクトストアを開く
- オブジェクトストアに対して操作を実行する
トランザクション操作を高速化する:
- スコープを定義する際(scope)、必要なオブジェクトストアのみを定義します。これにより、重複しないスコープ上で複数のトランザクションを並行して実行できます。
- 必要な場合にのみ
readwriteトランザクションを開始します。なぜなら、重複するスコープ上では複数のreadonlyトランザクションを並行して実行できますが、readwriteトランザクションは1つしか実行できないからです。
追加
方法は以下の通りです。
- まず
dbオブジェクトを取得します。 - 次に
readwriteトランザクションを開きます。 - トランザクションを介してオブジェクトストアオブジェクトを取得します。
- データ追加操作を実行します。
/**
 * 添加数据
 * @param {array} docs 要添加数据
 * @param {string} objName 仓库名称
 */
function addData(docs, objName) {
  if (!(docs && docs.length)) {
    throw new Error("docs must be a array!");
  }
  return openindexedDB().then((db) => {
    const tx = db.transaction([objName], "readwrite");
    tx.oncomplete = (e) => {
      console.log("tx:addData onsuccess", e);
      return Promise.resolve(docs);
    };
    tx.onerror = (e) => {
      e.stopPropagation();
      console.error("tx:addData onerror", e.target.error);
      return Promise.reject(e.target.error);
    };
    tx.onabort = (e) => {
      console.warn("tx:addData abort", e.target);
      return Promise.reject(e.target.error);
    };
    const obj = tx.objectStore(objName);
    docs.forEach((doc) => {
      const req = obj.add(doc);
      /**
       * NOTE:
       * request
       * 两个事件:
       * 1. success
       * 2. error
       */ // req.onsuccess = e => console.log('obj:addData onsuccess', e.target)
      req.onerror = (e) => {
        console.error("obj:addData onerror", e.target.error);
      };
    });
  });
}上記のTestDataをキー生成器とキーパスの両方の方法でデータベースに保存する場合、方法は以下の通りです。
addData(TestData, OB_NAMES.UseKeyGenerator).then(() =>
  addData(TestData, OB_NAMES.UseKeyPath),
);
削除
フローは追加と同じです。
/**
 * 删除指定 key 的数据
 * @param {string} objName 仓库名称
 * @param {*} key 要删除数据的 primary key 值
 */
function deleteData(objName, key) {
  return openindexedDB().then((db) => {
    const tx = db.transaction([objName], "readwrite");
    const obj = tx.objectStore(objName);
    const req = obj.delete(key);
    req.onsuccess = (e) => {
      console.log(`readData success. key:${key},result:`, e.target.result);
      return Promise.resolve(e.target.result);
    };
    req.onerror = (e) => {
      console.error(`readData error. key:${key},error: ${e.target.errorCode}`);
      return Promise.reject(e.target.error);
    };
  });
}UserKeyGenerator内のキーが1の値を削除する場合、以下のようになります。
deleteData(OB_NAMES.UseKeyGenerator, 1).then((doc) => console.log(doc));検索
方法:
/**
 * 读取给定 key 的数据
 * @param {string} objName 仓库名称
 * @param {*} key 要读取数据的 primary key 值
 */
function readData(objName, key) {
  return openindexedDB().then((db) => {
    const tx = db.transaction([objName]);
    const obj = tx.objectStore(objName);
    const req = obj.get(key);
    req.onsuccess = (e) => {
      console.log(`readData success. key:${key},result:`, e.target.result);
      return Promise.resolve(e.target.result);
    };
    req.onerror = (e) => {
      console.error(`readData error. key:${key},error: ${e.target.errorCode}`);
      return Promise.reject(e.target.error);
    };
  });
}
例:
readData(OB_NAMES.UseKeyGenerator, 1);更新
方法:
/**
 * 更新指定 key 的数据
 * @param {string} objName 仓库名称
 * @param {*} key 指定的 key
 * @param {object} changes 要修改的属性值
 */
function updateData(objName, key, changes) {
  return openindexedDB().then((db) => {
    return new Promise((resolve, reject) => {
      const tx = db.transaction([objName], "readwrite");
      const obj = tx.objectStore(objName);
      const req = obj.get(key);
      req.onsuccess = (e) => {
        let doc = e.target.result;
        let newDoc = Object.assign(doc, changes);
        const req = obj.put(newDoc);
        req.onsuccess = (e) => {
          console.log(`updateData success, newDoc:`, newDoc, e);
          resolve(e.target.result);
        };
        req.onerror = (e) => {
          resolve(e.target.result);
        };
      };
      req.onerror = (e) => {
        reject(e.target.error);
      };
    });
  });
}
例:
updateData(OB_NAMES.UseKeyGenerator, 1, { time: "123" })
  .then((doc) => console.log(doc))
  .catch(console.error);
カーソル (cursor) の使用
getメソッドを使用するには、事前にキーを知っている必要があります。オブジェクトストア全体をステップ実行する必要がある場合は、カーソルを使用できます。
/**
 * 通过 cursor 获取制定仓库下的所有数据
 * @param {string} objName 仓库名称
 * @param {function} [cb] 回调函数,对每次得到的 cursor 进行操作
 * @returns {Promise.<array.<object>} 包含所有数据的数组
 */
function getAllByCursor(objName, cb) {
  return openindexedDB().then((db) => {
    const arr = [];
    const tx = db.transaction([objName]);
    const obj = tx.objectStore(objName);
    return new Promise((resolve) => {
      obj.openCursor().onsuccess = (e) => {
        const cursor = e.target.result;
        if (cursor) {
          arr.push(cursor.value);
          cb && cb(cursor);
          cursor.continue();
        } else {
          return resolve(arr);
        }
      };
    });
  });
}openCursor()メソッドは複数の引数を受け取ります。
- 最初の引数には、取得する値の範囲を制限するためのキー範囲オブジェクトを渡すことができます。
- 2番目の引数には、イテレーションの方向を設定できます。
成功コールバック関数のresult値はカーソル自体であり、現在走査中の値はカーソルオブジェクトのkeyとvalue値から取得できます。さらに走査を続けるには、カーソルのcontinue()メソッドを呼び出します。走査が終了すると、カーソル、つまりevent.target.resultの値はundefinedになります。 UseKeyGeneratorストアのすべての値を取得するには、次のようにします。
getAllByCursor(OB_NAMES.UseKeyGenerator).then(console.log);openCursor()の他に、openKeyCursor()を使用してすべての保存オブジェクトの主キー値を取得することもできます。使用方法はopenCursor()と同じです。
インデックス (index) の使用
オブジェクトストアを構築する際にインデックスを作成した場合、そのインデックスを使用して特定のプロパティの値を検索できます。
function getByIndex(objName, indexName, key) {
  return openindexedDB().then((db) => {
    const index = db.transaction(objName).objectStore(objName).index(indexName);
    return new Promise((resolve) => {
      index.get(key).onsuccess = (e) => {
        console.log("getByIndex", e.target.result);
        return resolve(e.target.result);
      };
    });
  });
}例えば、levelがinfoのログを検索したい場合、次のようにします。
getByIndex(OB_NAMES.UseKeyGenerator, "level", "info").then((doc) =>
  console.log(doc),
);
範囲 (range) とカーソル (cursors) の方向の設定
カーソルの走査範囲を設定する必要がある場合は、IDBKeyRangeオブジェクトを使用し、それをopenCursor()またはopenKeyCursor()の最初の引数として渡します。 キー範囲の値は、開区間または閉区間になり得る区間と考えることができます。いくつかの例を見てみましょう。
/**
 * NOTE:
 * 只包括给定的值
 */
getWithRangeByCursor(
  OB_NAMES.UseKeyGenerator,
  "errorCode",
  IDBKeyRange.only(1000),
)
  .then(console.log)
  .catch(console.error);
/**
 * NOTE:
 * 默认是闭区间
 */
getWithRangeByCursor(
  OB_NAMES.UseKeyGenerator,
  "errorCode",
  IDBKeyRange.lowerBound(1000),
)
  .then(console.log)
  .catch(console.error);
/**
 * NOTE:
 * 设置第二个可选参数为 true,则为开区间
 */
getWithRangeByCursor(
  OB_NAMES.UseKeyGenerator,
  "errorCode",
  IDBKeyRange.lowerBound(1000, true),
)
  .then(console.log)
  .catch(console.error);
/**
 * NOTE:
 * 闭区间,如果索引是数字,那么按照数字大小决定升序
 */
getWithRangeByCursor(
  OB_NAMES.UseKeyGenerator,
  "errorCode",
  IDBKeyRange.bound(1000, 2000),
)
  .then(console.log)
  .catch(console.error);
/**
 * NOTE:
 * 左闭右开区间:如果索引是字符串,那么安装 array.sort() 的方式决定升序
 */
getWithRangeByCursor(
  OB_NAMES.UseKeyGenerator,
  "time",
  IDBKeyRange.bound(
    "2017/11/8 下午4:53:042",
    "2017/11/8 下午4:53:043",
    false,
    true,
  ),
)
  .then(console.log)
  .catch(console.error);
降順イテレーション
デフォルトでは、イテレーションの方向は昇順です。降順ルールでイテレーションする必要がある場合は、openCursor()の2番目の引数としてprevを渡すだけで済みます。
getWithDescendingByCursor(OB_NAMES.UseKeyGenerator, "time")
  .then(console.log)
  .catch(console.error);