
Reactプロジェクト開発中に、初めてReactDOM.renderを呼び出すとき、何が起こっているのでしょうか? 今日は、ソースコードの観点からこの問題を追跡してみましょう(主にフローに焦点を当て、詳細には深入りしません)。
ReactDOMStackEntry
まず、ReactDOMのエントリファイルであるReactDOMStackEntry.jsからrenderメソッドを見つけることができます。renderメソッドはReactMountコンポーネントによって提供されていることがわかります。
var ReactDOMStack = {
  findDOMNode: findDOMNode,
  render: ReactMount.render,
  unmountComponentAtNode: ReactMount.unmountComponentAtNode,
  version: ReactVersion,

  /* eslint-disable camelcase */
  unstable_batchedUpdates: ReactGenericBatching.batchedUpdates,
  unstable_renderSubtreeIntoContainer: ReactMount.renderSubtreeIntoContainer,
  /* eslint-enable camelcase */

  __SECRET_INTERNALS_DO_NOT_USE_OR_YOU_WILL_BE_FIRED: {
    // For TapEventPlugin which is popular in open source
    EventPluginHub: require("EventPluginHub"),
    // Used by test-utils
    EventPluginRegistry: require("EventPluginRegistry"),
    EventPropagators: require("EventPropagators"),
    ReactControlledComponent: require("ReactControlledComponent"),
    ReactDOMComponentTree,
    ReactDOMEventListener: require("ReactDOMEventListener"),
    ReactUpdates: ReactUpdates,
  },
};
ReactMount.render
  render: function(nextElement, container, callback) {
    return ReactMount._renderSubtreeIntoContainer(
      null,
      nextElement,
      container,
      callback,
    );
},さらに_renderSubtreeIntoContainerメソッドが呼び出されます。このメソッドの主要な内容は以下の通りです。
ReactMount._renderSubtreeIntoContainer
_renderSubtreeIntoContainer: function(
    parentComponent,
    nextElement,
    container,
    callback,
  ) {
    callback = callback === undefined ? null : callback;
    if (!React.isValidElement(nextElement)) {
      ...
    }
    // 创建下一个 wrapped 元素
    var nextWrappedElement = React.createElement(TopLevelWrapper, {
      child: nextElement,
    });

    var nextContext = getContextForSubtree(parentComponent);
    // 拿到当前的顶层容器组件
    var prevComponent = getTopLevelWrapperInContainer(container);
    // 对于第一次 render 来说,prevComponent 为 null
    if (prevComponent) {
      var prevWrappedElement = prevComponent._currentElement;
      var prevElement = prevWrappedElement.props.child;
      if (shouldUpdateReactComponent(prevElement, nextElement)) {
        var publicInst = prevComponent._renderedComponent.getPublicInstance();
        var updatedCallback =
          callback &&
          function() {
            validateCallback(callback);
            callback.call(publicInst);
          };
        ReactMount._updateRootComponent(
          prevComponent,
          nextWrappedElement,
          nextContext,
          container,
          updatedCallback,
        );
        return publicInst;
      } else {
        ReactMount.unmountComponentAtNode(container);
      }
    }

    var reactRootElement = getReactRootElementInContainer(container);
    var containerHasReactMarkup =
      reactRootElement && !!internalGetID(reactRootElement);
    var containerHasNonRootReactChild = hasNonRootReactChild(container);

    var shouldReuseMarkup =
      containerHasReactMarkup &&
      !prevComponent &&
      !containerHasNonRootReactChild;
    var component = ReactMount._renderNewRootComponent(
      nextWrappedElement,
      container,
      shouldReuseMarkup,
      nextContext,
      callback,
    )._renderedComponent.getPublicInstance();
    return component;
  },
ここにはいくつかのメソッドがあります。それらは以下の通りです。
getTopLevelWrapperInContainershouldUpdateReactComponent_renderNewRootComponent
getTopLevelWrapperInContainer
このメソッドは、既存のトップレベルコンテナコンポーネントを取得するために使用されます。関連コードは以下の通りです。
function getTopLevelWrapperInContainer(container) {
  var root = getHostRootInstanceInContainer(container);
  return root ? root._hostContainerInfo._topLevelWrapper : null;
}
function getHostRootInstanceInContainer(container) {
  var rootEl = getReactRootElementInContainer(container);
  var prevHostInstance =
    rootEl && ReactDOMComponentTree.getInstanceFromNode(rootEl);
  return prevHostInstance && !prevHostInstance._hostParent
    ? prevHostInstance
    : null;
}getReactRootElementInContainerとReactDOMComponentTree.getInstanceFromNodeの2つのメソッドが呼び出されます。
getReactRootElementInContainer
function getReactRootElementInContainer(container) {
  if (!container) {
    return null;
  }

  if (container.nodeType === DOCUMENT_NODE) {
    return container.documentElement;
  } else {
    return container.firstChild;
  }
}
ReactDOMComponentTree
このモジュールには3つのメソッドがあります。それらは以下の通りです。
precacheChildNodesDOMノードに対応するReactインスタンスを格納しますgetNodeFromInstanceインスタンスから対応するDOMノードを取得しますgetInstanceFromNodeDOMノードから対応するインスタンスを取得します
shouldUpdateReactComponent
コンポーネントの更新が必要かどうかを判断します。
function shouldUpdateReactComponent(prevElement, nextElement) {
  var prevEmpty = prevElement === null || prevElement === false;
  var nextEmpty = nextElement === null || nextElement === false;
  if (prevEmpty || nextEmpty) {
    return prevEmpty === nextEmpty;
  }

  var prevType = typeof prevElement;
  var nextType = typeof nextElement;
  if (prevType === "string" || prevType === "number") {
    return nextType === "string" || nextType === "number";
  } else {
    return (
      nextType === "object" &&
      prevElement.type === nextElement.type &&
      prevElement.key === nextElement.key
    );
  }
}
ロジックは以下のようになっています。
- 前後の要素が両方とも
nullの場合、trueを返します textComponentの場合、直接更新します- それ以外の場合、DOM要素またはReact要素であり、かつ
typeとkeyが同じであればtrueを返し、更新を実行します
ReactMount._renderNewRootComponent
このメソッドは_renderSubtreeIntoContainerの核となる部分であり、新しいコンポーネントをDOMにマウントするために使用されます。
  _renderNewRootComponent: function(
    nextElement,
    container,
    shouldReuseMarkup,
    context,
    callback,
  ) {
    // 通过 instantiateReactComponent 拿到 React Component 组件实例
    var componentInstance = instantiateReactComponent(nextElement, false);

    if (callback) {
      componentInstance._pendingCallbacks = [
        function() {
          validateCallback(callback);
          callback.call(
            componentInstance._renderedComponent.getPublicInstance(),
          );
        },
      ];
    }

    // The initial render is synchronous but any updates that happen during
    // rendering, in componentWillMount or componentDidMount, will be batched
    // according to the current batching strategy.
    ReactUpdates.batchedUpdates(
      batchedMountComponentIntoNode,
      componentInstance,
      container,
      shouldReuseMarkup,
      context,
    );

    var wrapperID = componentInstance._instance.rootID;
    instancesByReactRootID[wrapperID] = componentInstance;

    return componentInstance;
  },
instantiateReactComponent
渡された引数に基づいて異なるReactコンポーネントを生成します。主要なコードは以下の通りです。
  if (node === null || node === false) {
    instance = ReactEmptyComponent.create(instantiateReactComponent);
  } else if (typeof node === 'object') {
    var element = node;
    var type = element.type;
    if (typeof type !== 'function' && typeof type !== 'string') {
      ...
    }

    // Special case string values
    if (typeof element.type === 'string') {
      instance = ReactHostComponent.createInternalComponent(element);
    } else if (isInternalComponentType(element.type)) {
      // This is temporarily available for custom components that are not string
      // representations. I.e. ART. Once those are updated to use the string
      // representation, we can drop this code path.
      instance = new element.type(element);

      // We renamed this. Allow the old name for compat. :(
      if (!instance.getHostNode) {
        instance.getHostNode = instance.getNativeNode;
      }
    } else {
      instance = new ReactCompositeComponentWrapper(element);
    }
  } else if (typeof node === 'string' || typeof node === 'number') {
    instance = ReactHostComponent.createInstanceForText(node);
  } else {
    invariant(false, 'Encountered invalid React node of type %s', typeof node);
}コードからわかるように、element.typeの違いに応じて、3つの異なるReactコンポーネントインスタンスを生成する3つのメソッドがあります。それらは以下の通りです。
- ReactHostComponent.createInternalComponent(element)
- new ReactCompositeComponentWrapper(element)
- ReactHostComponent.createInstanceForText(node);
読者の中には、isInternalComponentType(element.type)が成立する場合のinstance = new element.type(element);というコードが無視されていることに気づくかもしれません。これは、Reactがカプセル化した内部コンポーネントが文字列で表現されない場合の解決策であり、我々が気にする必要はありません。 上記の3つのメソッドを見てみましょう。そのうち2つのメソッドはReactHostComponentモジュールを呼び出しています。
ReactHostComponent
主要なコード:
var ReactHostComponentInjection = {
  // This accepts a class that receives the tag string. This is a catch all
  // that can render any kind of tag.
  injectGenericComponentClass: function (componentClass) {
    genericComponentClass = componentClass;
  },
  // This accepts a text component class that takes the text string to be
  // rendered as props.
  injectTextComponentClass: function (componentClass) {
    textComponentClass = componentClass;
  },
};

function createInternalComponent(element) {
  invariant(
    genericComponentClass,
    "There is no registered component for the tag %s",
    element.type,
  );
  return new genericComponentClass(element);
}

/**
 * @param {ReactText} text
 * @return {ReactComponent}
 */
function createInstanceForText(text) {
  return new textComponentClass(text);
}
これはコンポーネントを作成するための2つのメソッドを提供していますが、そのうち2つのコンポーネントクラスの実装は他のモジュールから注入されています。では、具体的にどこから注入されているのでしょうか? 調査の結果、ReactDOMStackInjection.jsで注入されていることがわかりました。コードを見てみましょう。
var ReactComponentEnvironment = require("ReactComponentEnvironment");
var ReactComponentBrowserEnvironment = require("ReactComponentBrowserEnvironment");
var ReactDOMComponent = require("ReactDOMComponent");
var ReactDOMComponentTree = require("ReactDOMComponentTree");
var ReactDOMEmptyComponent = require("ReactDOMEmptyComponent");
var ReactDOMTextComponent = require("ReactDOMTextComponent");
var ReactDefaultBatchingStrategy = require("ReactDefaultBatchingStrategy");
var ReactEmptyComponent = require("ReactEmptyComponent");
var ReactGenericBatching = require("ReactGenericBatching");
var ReactHostComponent = require("ReactHostComponent");
var ReactReconcileTransaction = require("ReactReconcileTransaction");
var ReactUpdates = require("ReactUpdates");

var findDOMNode = require("findDOMNode");
var getHostComponentFromComposite = require("getHostComponentFromComposite");

ReactGenericBatching.injection.injectStackBatchedUpdates(
  ReactUpdates.batchedUpdates,
);

ReactHostComponent.injection.injectGenericComponentClass(ReactDOMComponent);

ReactHostComponent.injection.injectTextComponentClass(ReactDOMTextComponent);

ReactEmptyComponent.injection.injectEmptyComponentFactory(
  function (instantiate) {
    return new ReactDOMEmptyComponent(instantiate);
  },
);

ReactUpdates.injection.injectReconcileTransaction(ReactReconcileTransaction);
ReactUpdates.injection.injectBatchingStrategy(ReactDefaultBatchingStrategy);

ReactComponentEnvironment.injection.injectEnvironment(
  ReactComponentBrowserEnvironment,
);

findDOMNode._injectStack(function (inst) {
  inst = getHostComponentFromComposite(inst);
  return inst ? ReactDOMComponentTree.getNodeFromInstance(inst) : null;
});このモジュールがReactHostComponent.injectionを通じてReactDOMComponentとReactDOMTextComponentを注入していることがわかります。また、他のいくつかのモジュールも注入されており、これらは後で再び使用します。 ここで、ReactDOMComponentとReactDOMTextComponentが実際にDOMマークアップを生成するモジュールです。内容は多岐にわたりますが、コードは比較的シンプルなので、ここでは詳しく説明しません。要するに、これら2つのモジュールのmountComponentメソッドを呼び出すと、DOMマークアップが生成されます。違いは、ReactDOMComponentが以下の構造のマークアップを生成する点です。
{
  node: node,
  children: [],
  html: null,
  text: null,
  toString
}一方、ReactDOMTextComponentは、DOM内にレンダリングされるString型のテキストを直接生成します。
ReactCompositeComponent
最後の種類のコンポーネントはReactCompositeComponentWrapperであるはずですが、instantiateReactComponent内のこれら2つのコードを見てみましょう。
var ReactCompositeComponentWrapper = function (element) {
  this.construct(element);
};

Object.assign(
  ReactCompositeComponentWrapper.prototype,
  ReactCompositeComponent,
  {
    _instantiateReactComponent: instantiateReactComponent,
  },
);this.constructが呼び出されると、やはりReactCompositeComponentが呼び出されます。これがユーザー定義のコンポーネントです。
ReactUpdates.batchedUpdates
function batchedUpdates(callback, a, b, c, d, e) {
  ensureInjected();
  return batchingStrategy.batchedUpdates(callback, a, b, c, d, e);
}ReactUpdates内では、batchingStrategyを通じてbatchedUpdateが呼び出されていることがわかります。そして、batchingStrategyも前述のReactDOMStackInjectionによって注入されています。
ReactUpdates.injection.injectReconcileTransaction(ReactReconcileTransaction);
ReactUpdates.injection.injectBatchingStrategy(ReactDefaultBatchingStrategy);
ReactUpdatesには、ReactReconcileTransactionとReactDefaultBatchingStrategyの2つのモジュールが注入されています。 まずReactDefaultBatchingStrategyを見てみましょう。ReactReconcileTransactionについては後で触れるとして、そのコードを見てみましょう。
var ReactUpdates = require("ReactUpdates");
var Transaction = require("Transaction");

var emptyFunction = require("fbjs/lib/emptyFunction");

var RESET_BATCHED_UPDATES = {
  initialize: emptyFunction,
  close: function () {
    ReactDefaultBatchingStrategy.isBatchingUpdates = false;
  },
};

var FLUSH_BATCHED_UPDATES = {
  initialize: emptyFunction,
  close: ReactUpdates.flushBatchedUpdates.bind(ReactUpdates),
};

var TRANSACTION_WRAPPERS = [FLUSH_BATCHED_UPDATES, RESET_BATCHED_UPDATES];

function ReactDefaultBatchingStrategyTransaction() {
  this.reinitializeTransaction();
}

Object.assign(ReactDefaultBatchingStrategyTransaction.prototype, Transaction, {
  getTransactionWrappers: function () {
    return TRANSACTION_WRAPPERS;
  },
});

var transaction = new ReactDefaultBatchingStrategyTransaction();

var ReactDefaultBatchingStrategy = {
  isBatchingUpdates: false,

  /**
   * Call the provided function in a context within which calls to `setState`
   * and friends are batched such that components aren't updated unnecessarily.
   */
  batchedUpdates: function (callback, a, b, c, d, e) {
    var alreadyBatchingUpdates = ReactDefaultBatchingStrategy.isBatchingUpdates;

    ReactDefaultBatchingStrategy.isBatchingUpdates = true;

    // The code is written this way to avoid extra allocations
    if (alreadyBatchingUpdates) {
      // 如果当前 updates 已经完成,那么直接调用 callback
      return callback(a, b, c, d, e);
    } else {
      // 通过事务的方式去调用 callback
      return transaction.perform(callback, null, a, b, c, d, e);
    }
  },
};前述のReactUpdates.batchUpdatesの呼び出しが、実際にはここのbatchedUpdatesを呼び出していることがわかります。その内部ロジックも非常にシンプルです。 ここではtransactionメソッドが使われています。これを私は「トランザクション」と理解しています。つまり、現在更新が進行中の場合、このコールバックはトランザクション方式で呼び出されます。
transaction
transactionはReactのソースコードで非常に広く使用されており、その役割はメソッドをトランザクション方式で呼び出すことです。
1つまたは複数のラッパーでメソッドをラップし、メソッドの呼び出し前と呼び出し後に順次実行します。トランザクションは、実行するメソッドが成功しても失敗しても、ラッパーのinitializeメソッドとcloseメソッドが必ず実行されることを保証します。そのソースコードの解説を見れば、非常に明確になります。
 * <pre>
 *                       wrappers (injected at creation time)
 *                                      +        +
 *                                      |        |
 *                    +-----------------|--------|--------------+
 *                    |                 v        |              |
 *                    |      +---------------+   |              |
 *                    |   +--|    wrapper1   |---|----+         |
 *                    |   |  +---------------+   v    |         |
 *                    |   |          +-------------+  |         |
 *                    |   |     +----|   wrapper2  |--------+   |
 *                    |   |     |    +-------------+  |     |   |
 *                    |   |     |                     |     |   |
 *                    |   v     v                     v     v   | wrapper
 *                    | +---+ +---+   +---------+   +---+ +---+ | invariants
 * perform(anyMethod) | |   | |   |   |         |   |   | |   | | maintained
 * +----------------->|-|---|-|---|-->|anyMethod|---|---|-|---|-|-------->
 *                    | |   | |   |   |         |   |   | |   | |
 *                    | |   | |   |   |         |   |   | |   | |
 *                    | |   | |   |   |         |   |   | |   | |
 *                    | +---+ +---+   +---------+   +---+ +---+ |
 *                    |  initialize                    close    |
 *                    +-----------------------------------------+
 * </pre>
ここで、先ほどのReactDefaultBatchingStrategyに戻りましょう。コードには2つのラッパーがあります。
var RESET_BATCHED_UPDATES = {
  initialize: emptyFunction,
  close: function () {
    ReactDefaultBatchingStrategy.isBatchingUpdates = false;
  },
};

var FLUSH_BATCHED_UPDATES = {
  initialize: emptyFunction,
  close: ReactUpdates.flushBatchedUpdates.bind(ReactUpdates),
};それらのinitializeメソッドはどちらも空の関数で、closeメソッドはそれぞれ以下の通りです。
- 現在の更新状態を
falseに設定します flushBatchedUpdatesこのメソッドは比較的複雑なので、ここでは詳しく説明しませんが、主にすべてのコンポーネントが正しく更新されることを保証します(flushBatchedUpdates->ReactUpdates.runBatchedUpdates->ReactCompositeComponent.performUpdateIfNecessary)
さて、上記のコードに戻りましょう。
ReactUpdates.batchedUpdates(
  batchedMountComponentIntoNode,
  componentInstance,
  container,
  shouldReuseMarkup,
  context,
);ここでbatchedMountComponentIntoNodeが呼び出され、その後の処理が行われることがわかります。
function batchedMountComponentIntoNode(
  componentInstance,
  container,
  shouldReuseMarkup,
  context,
) {
  var transaction = ReactUpdates.ReactReconcileTransaction.getPooled(
    /* useCreateElement */
    !shouldReuseMarkup,
  );
  transaction.perform(
    mountComponentIntoNode,
    null,
    componentInstance,
    container,
    transaction,
    shouldReuseMarkup,
    context,
  );
  ReactUpdates.ReactReconcileTransaction.release(transaction);
}
ここの最初の代入文では、上記でReactUpdatesに注入されたもう1つのモジュール、ReactReconcileTransaction、つまりReactのスケジューリングトランザクションモジュールが使用されています。
var SELECTION_RESTORATION = {
  initialize: ReactInputSelection.getSelectionInformation,
  close: ReactInputSelection.restoreSelection,
};

/**
 * Suppresses events (blur/focus) that could be inadvertently dispatched due to
 * high level DOM manipulations (like temporarily removing a text input from the
 * DOM).
 */
var EVENT_SUPPRESSION = {
  initialize: function() {
    var currentlyEnabled = ReactBrowserEventEmitter.isEnabled();
    ReactBrowserEventEmitter.setEnabled(false);
    return currentlyEnabled;
  },
  close: function(previouslyEnabled) {
    ReactBrowserEventEmitter.setEnabled(previouslyEnabled);
  },
};

/**
 * Provides a queue for collecting `componentDidMount` and
 * `componentDidUpdate` callbacks during the transaction.
 */
var ON_DOM_READY_QUEUEING = {
  initialize: function() {
    this.reactMountReady.reset();
  },
  close: function() {
    this.reactMountReady.notifyAll();
  },
};
...
var TRANSACTION_WRAPPERS = [
  SELECTION_RESTORATION,
  EVENT_SUPPRESSION,
  ON_DOM_READY_QUEUEING,
];
function ReactReconcileTransaction(useCreateElement) {
  this.reinitializeTransaction();
  this.renderToStaticMarkup = false;
  this.reactMountReady = CallbackQueue.getPooled();
  this.useCreateElement = useCreateElement;
}
...
var Mixin = {
  getTransactionWrappers: function() {
    return TRANSACTION_WRAPPERS;
  },
  ...
}
Object.assign(ReactReconcileTransaction.prototype, Transaction, Mixin);

PooledClass.addPoolingTo(ReactReconcileTransaction);
ここもトランザクション方式で呼び出され、3つのラッパーがあります。
- Selection Restoration 更新中にユーザーの選択範囲(selection range)を可能な限り妨げないようにします
- Event Suppression 一時的に
input要素を削除することによって発生するblurイベントなど、不要なイベントディスパッチを抑制します - On DOM Ready Queueing トランザクション実行中に、
componentDidMountとcomponentDidUpdateコールバック関数のキューを提供します
後続のgetPooledメソッドは、インスタンスプールを利用して不要なGCを回避するためのメソッドですが、これ以上の説明はしません。 続いて、このトランザクション方式でmountComponentIntoNodeを呼び出します。このメソッドを詳しく見てみましょう。
mountComponentIntoNode
function mountComponentIntoNode(
  wrapperInstance,
  container,
  transaction,
  shouldReuseMarkup,
  context,
) {
  var markup = ReactReconciler.mountComponent(
    wrapperInstance,
    transaction,
    null,
    ReactDOMContainerInfo(wrapperInstance, container),
    context,
    0 /* parentDebugID */,
  );

  wrapperInstance._renderedComponent._topLevelWrapper = wrapperInstance;
  ReactMount._mountImageIntoNode(
    markup,
    container,
    wrapperInstance,
    shouldReuseMarkup,
    transaction,
  );
}ここで重要な変数markupの操作が見られます。これが最終的にDOMにレンダリングするオブジェクトです。ReactReconciler.mountComponentメソッドを通じてmarkupを取得します。ReactReconciler.mountComponentのソースコードは以下の通りです。
  mountComponent: function(
    internalInstance,
    transaction,
    hostParent,
    hostContainerInfo,
    context,
    parentDebugID, // 0 in production and for roots
  ) {
    var markup = internalInstance.mountComponent(
      transaction,
      hostParent,
      hostContainerInfo,
      context,
      parentDebugID,
    );
    if (
      internalInstance._currentElement &&
      internalInstance._currentElement.ref != null
    ) {
      transaction.getReactMountReady().enqueue(attachRefs, internalInstance);
    }
    return markup;
},さらにinternalInstance.mountComponentが呼び出されます。ここのinternalInstanceは、実際には前述のinstantiateReactComponentを通じて得られたReactコンポーネントインスタンスです。
// _renderNewRootComponent
var componentInstance = instantiateReactComponent(nextElement, false);ここのnextElementは、レンダリングされるReactルート要素です。
// _renderSubtreeIntoContainer
var nextWrappedElement = React.createElement(TopLevelWrapper, {
  child: nextElement,
});TopLevelWrapperの実装です。そのrenderメソッドに注目してください。
var TopLevelWrapper = function () {
  this.rootID = topLevelRootCounter++;
};
TopLevelWrapper.prototype.isReactComponent = {};
TopLevelWrapper.prototype.render = function () {
  return this.props.child;
};
TopLevelWrapper.isReactTopLevelWrapper = true;そのrenderメソッド内で返されるthis.props.childはnextElementであり、これはプロジェクトコードのエントリポイントであるReactDOM.render(<App/>,document.getElementById('root'))内の<App/>に相当します。 ReactReconciler.mountComponent内のinternalInstance.mountComponentに戻りましょう。前述のinstantiateReactComponentを通じて、返されるコンポーネントには3つの種類があることがわかります。
- ReactDOMComponent
- ReactDOMTextComponent
- ReactCompositeComponent
最初の2つのカテゴリは非常にシンプルで、どちらもDOM自体の要素であり、最終的にそれらに対応するマークアップがレンダリングされます。一方、ReactCompositeComponentはより複雑なので、主要なコードのみを見てみましょう。
//ReactCompositeComponent.mountComponent
    var Component = this._currentElement.type;

    var updateQueue = transaction.getUpdateQueue();

    // Initialize the public class
    var doConstruct = shouldConstruct(Component);
    var inst = this._constructComponent(
      doConstruct,
      publicProps,
      publicContext,
      updateQueue,
    );
    var renderedElement;
    if (!doConstruct && (inst == null || inst.render == null)) {
      renderedElement = inst;
      inst = new StatelessComponent(Component);
      this._compositeType = ReactCompositeComponentTypes.StatelessFunctional;
    } else {
     。...
    }
      markup = this.performInitialMount(
        renderedElement,
        hostParent,
        hostContainerInfo,
        transaction,
        context,
);まずinstを取得します。instを取得する呼び出しスタックは以下の通りです。this._constructComponent -> this._constructComponentWithoutOwner
// this._constructComponentWithoutOwner
...
   var Component = this._currentElement.type;

    if (doConstruct) {
      if (__DEV__) {
        return measureLifeCyclePerf(
          () => new Component(publicProps, publicContext, updateQueue),
          this._debugID,
          'ctor',
        );
      } else {
        return new Component(publicProps, publicContext, updateQueue);
      }
    }
..._currentElement.typeに基づいてコンポーネントインスタンスを生成します。currentElement.typeは、React.Componentを継承したクラス、または純粋なレンダリングコンポーネント関数です。 次にrenderElementを宣言します。ステートレス(関数で宣言された純粋なレンダリングコンポーネント)コンポーネントの場合、renderElement = instとなり、それ以外の場合はundefinedとなります。 続いてperformInitialMountを見てみましょう。
if (renderedElement === undefined) {
  renderedElement = this._renderValidatedComponent();
}

var nodeType = ReactNodeTypes.getType(renderedElement);
this._renderedNodeType = nodeType;
var child = this._instantiateReactComponent(
  renderedElement,
  nodeType !== ReactNodeTypes.EMPTY /* shouldHaveDebugID */,
);
this._renderedComponent = child;

var markup = ReactReconciler.mountComponent(
  child,
  transaction,
  hostParent,
  hostContainerInfo,
  this._processChildContext(context),
  debugID,
);非ステートレスコンポーネントの場合、renderedElementに値を割り当てる必要があります。呼び出しスタックは以下の通りです。this._renderValidatedComponent -> this._renderValidatedComponentWithoutOwnerOrContext
  _renderValidatedComponentWithoutOwnerOrContext: function() {
    var inst = this._instance;
    var renderedElement;

    if (__DEV__) {
      renderedElement = measureLifeCyclePerf(
        () => inst.render(),
        this._debugID,
        'render',
      );
    } else {
      renderedElement = inst.render();
    }

    if (__DEV__) {
      // We allow auto-mocks to proceed as if they're returning null.
      if (renderedElement === undefined && inst.render._isMockFunction) {
        // This is probably bad practice. Consider warning here and
        // deprecating this convenience.
        renderedElement = null;
      }
    }

    return renderedElement;
},最終的にrenderedElement、つまりinst.render()の結果が得られます。 さらに進むと、child = this._instantiateReactComponent(renderedElement)とmarkup = ReactReconciler.mountComponent(child,...)があります。 ここで、childがReactCompositeComponentでなくなるまで、ReactReconciler.mountComponentが繰り返し再帰的に呼び出され、最終的なMarkUpが取得されることが連想できます。MarkUpのデータ構造はDOMLazyTreeで見つけることができます。
// DOMLazyTree
{
  node: node,
  children: [],
  html: null,
  text: null,
  toString,
}MarkUpを取得したら、残るは最後のステップのみです。ReactMount._mountImageIntoNodeを通じてMarkUpを実際のDOMにマウントします。
ReactMount._mountImageIntoNode
  _mountImageIntoNode: function(
    markup,
    container,
    instance,
    shouldReuseMarkup,
    transaction,
  ) {
    invariant(
      isValidContainer(container),
      'mountComponentIntoNode(...): Target container is not valid.',
    );
    // 首次渲染,这里为 shouldReuseMarkup = false ,里面都是更新的逻辑
    if (shouldReuseMarkup) {
      ...
    }
    // 首次渲染,transaction.useCreateElement = true
    if (transaction.useCreateElement) {
      while (container.lastChild) {
        container.removeChild(container.lastChild);
      }
      DOMLazyTree.insertTreeBefore(container, markup, null);
    } else {
      setInnerHTML(container, markup);
      ReactDOMComponentTree.precacheNode(instance, container.firstChild);
    }
  },
ロジックは非常にシンプルで、マークアップをDOMにレンダリングする方法は2つあります。
- 指定されたコンテナコンポーネントをクリアし、マークアップを指定されたコンテナに挿入します
setInnerHTMLを呼び出してマークアップを指定されたコンテナに挿入し、仮想DOMを実際のDOMノードにキャッシュします
初回レンダリングの場合、最初の方法が実行され、コンテナコンポーネントをクリアし、マークアップを実際のDOMにマウントします。呼び出しスタックはDOMLazyTree.insertTreeBefore -> insertTreeChildrenです。
function insertTreeChildren(tree) {
  if (!enableLazy) {
    return;
  }
  var node = tree.node;
  var children = tree.children;
  if (children.length) {
    for (var i = 0; i < children.length; i++) {
      insertTreeBefore(node, children[i], null);
    }
  } else if (tree.html != null) {
    setInnerHTML(node, tree.html);
  } else if (tree.text != null) {
    setTextContent(node, tree.text);
  }
}
すべてのコンポーネントをDOMに再帰的にマウントします。
まとめ
これで初回レンダリングのロジック全体が完了しました。全体的に見ると、ReactとReactDOMのコードは抽象度が高く、コードを読むのが非常に複雑です。この記事も全体的なフローに限定されており、詳細には深入りしていません。なぜなら、詳細が多すぎるからです。
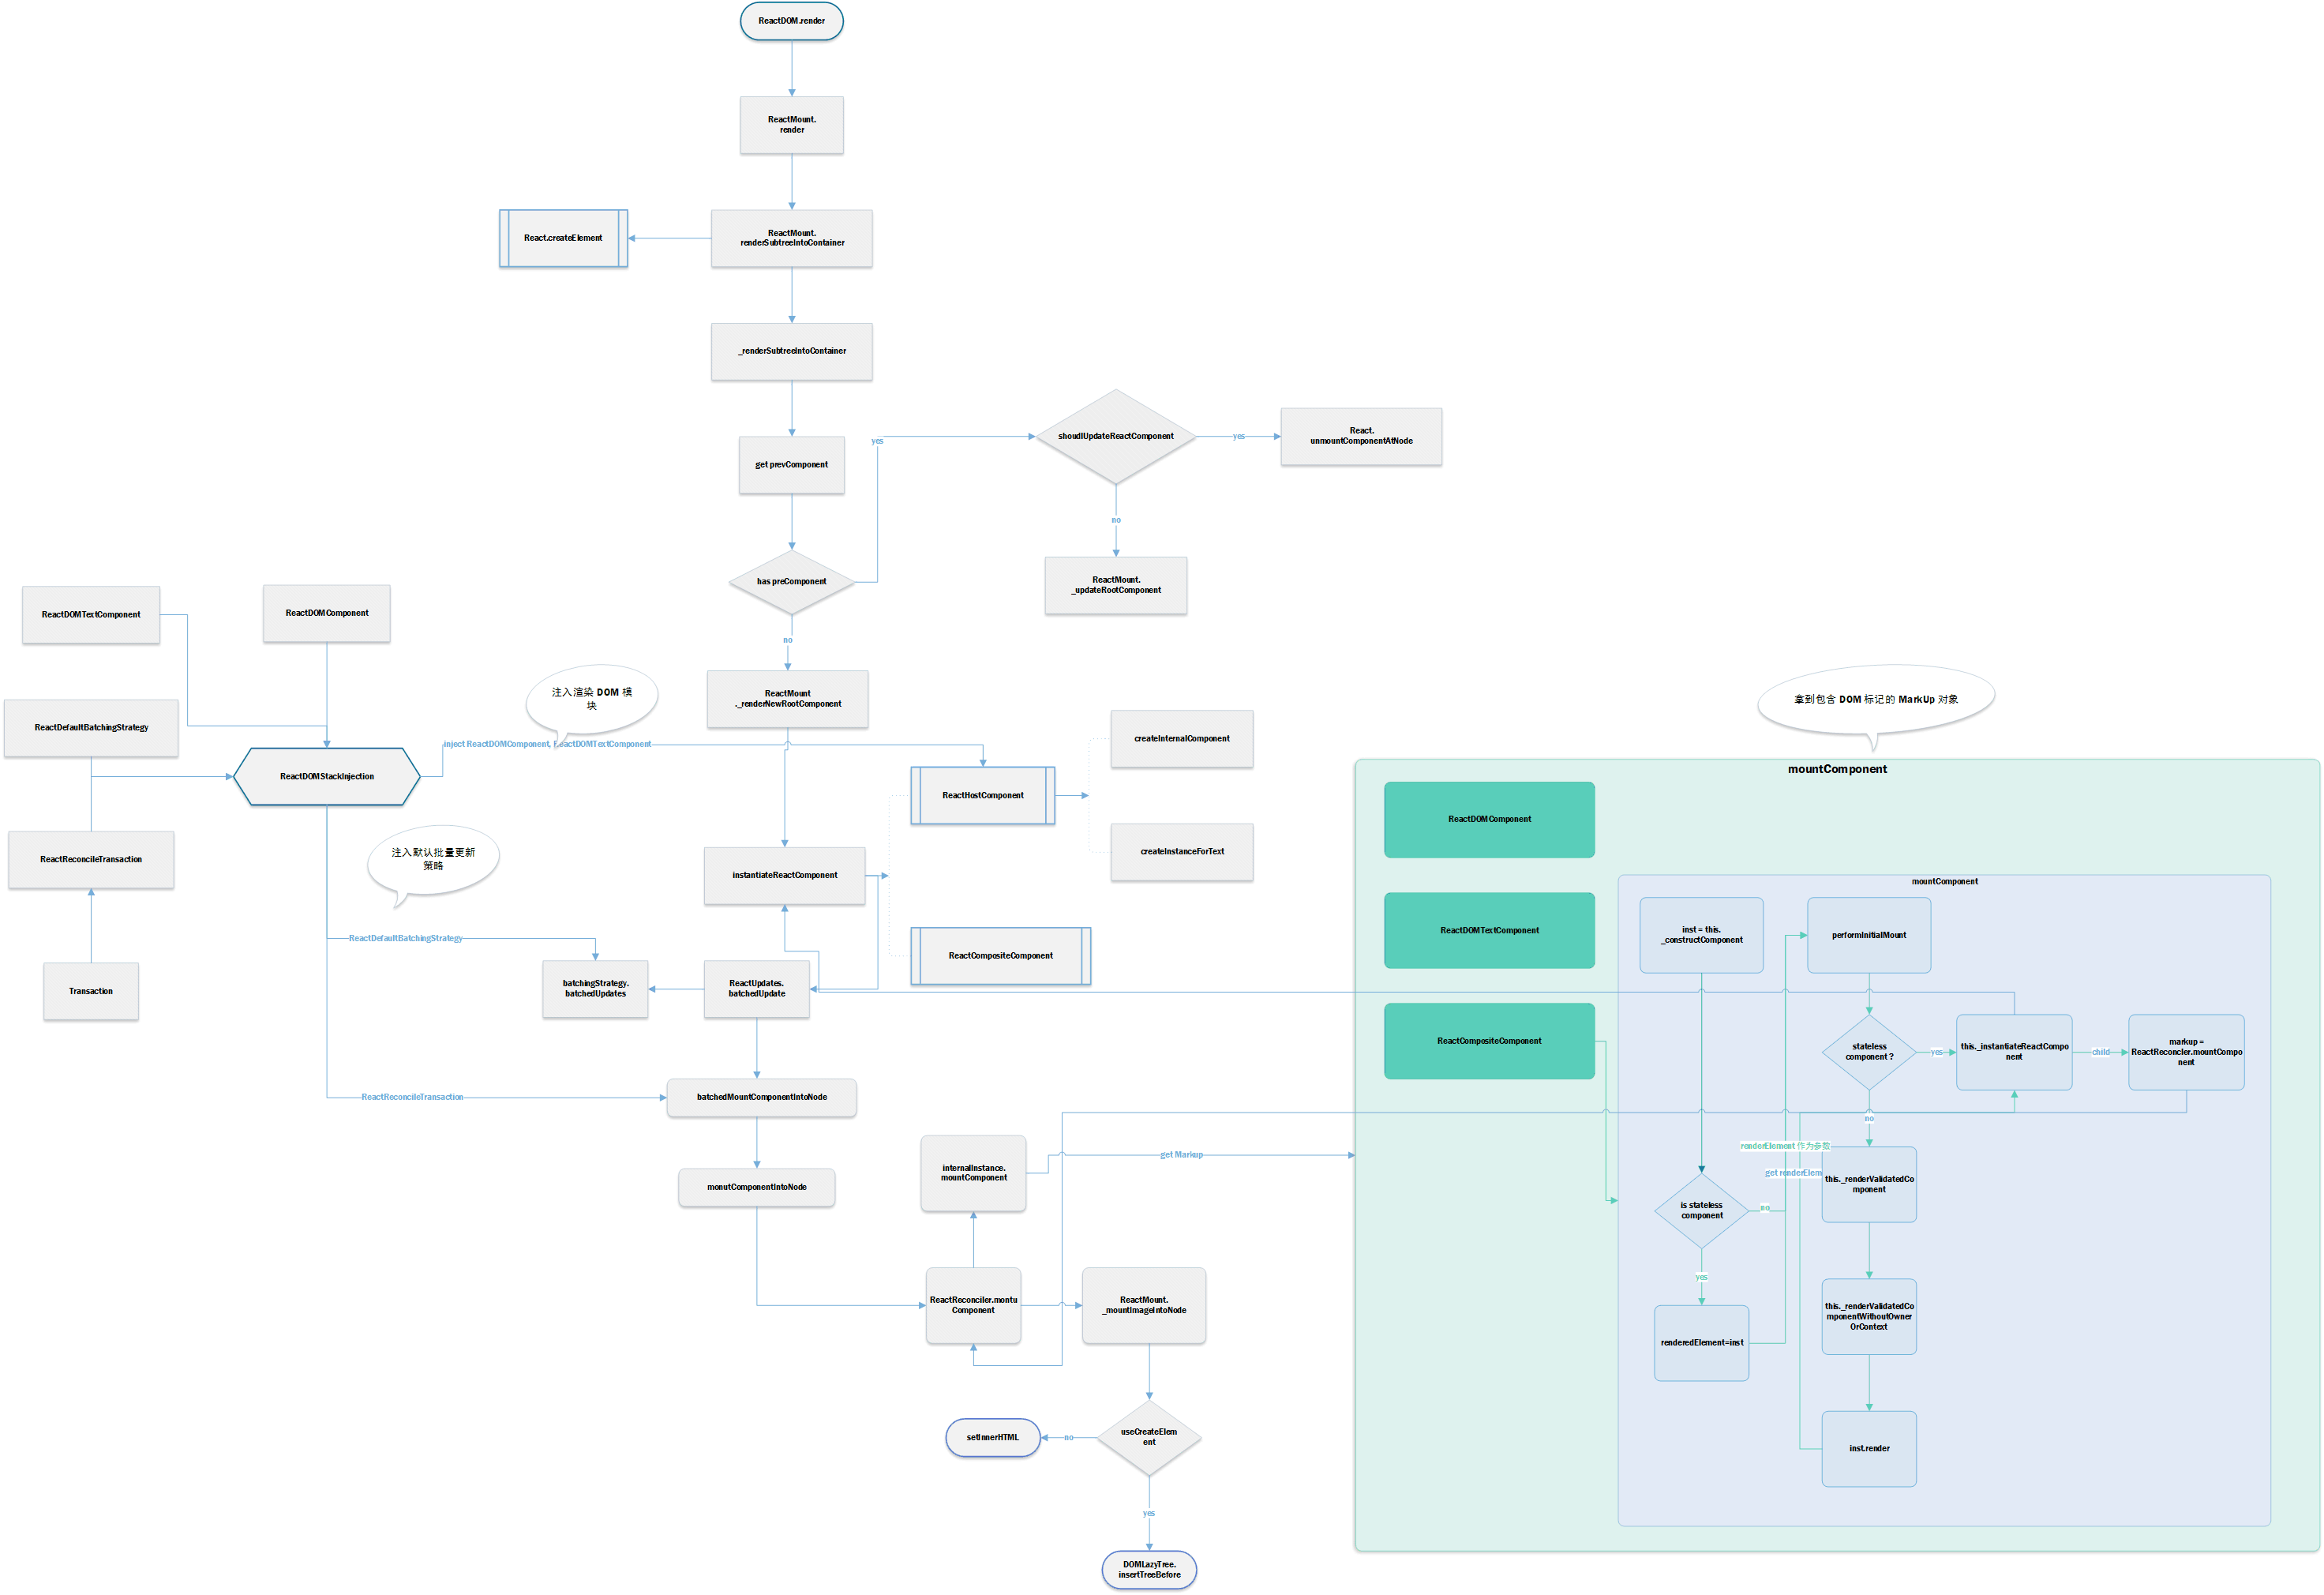
最後に、ReactDOM.render実行後のフロー関係図をまとめました。これは、そのプロセス全体を理解するのに役立つでしょう。 図は非常に大きいので、クリックして拡大しても見えにくいかもしれません。ローカルに保存してから閲覧することをお勧めします。より鮮明に見えるでしょう。
関連文章
- {% post_link react-source-code-analyze-1 Reactソースコードの浅い分析 - エントリファイル %}
- {% post_link react-source-code-analyze-2 Reactソースコードの浅い分析 - ReactBaseClasses %}
- {% post_link react-source-code-analyze-3 Reactソースコードの浅い分析 - ReactChildren %}
- {% post_link react-source-code-analyze-4 Reactソースコードの浅い分析 - ReactElement %}
- {% post_link react-source-code-analyze-5 Reactソースコードの浅い分析 - onlyChildren %}