

This article was originally published on the company’s internal ATA platform and has been reorganized into this post after data anonymization. Therefore, there will be many introductions and links to internal systems within the article. These links and platforms cannot be accessed outside the company’s intranet, but this does not affect the overall readability and understanding of the article.
Foreword
Over the past year, our team’s traffic-related business has undergone a series of refactorings and significant performance optimizations. Recently, with the support of the Frontend Development Standardization Platform, we also conducted a round of standardization governance. Now, from all perspectives, the entire application has seen considerable improvements compared to before.
As a starting point, I’ve summarized some of our thoughts and choices into this article for your reference.
Tech Stack Selection
Development Framework Selection
Why React
There’s not much to discuss here. All internal infrastructure and the broader environment dictate that React is the inevitable choice.
Why React 18
The project was originally on React 16. The main changes in React 18 compared to 16 are:
- Concurrent Mode - React 18 enables Concurrent Mode by default. Simply put, component rendering has changed from synchronous and uninterruptible to asynchronous and interruptible, thereby improving page responsiveness;
With this capability, React can prepare new screens in the background without blocking the main thread. This means the UI can respond immediately to user input even if it’s in the middle of a large rendering task, creating a fluid user experience.
- Automatic Batching - Allows multiple state updates to be batched into a single re-render, improving performance by reducing the number of re-renders;
- For detailed documentation, refer to the React official website: React v18.0 or the internal ATA article React18 新在哪 - ATA (atatech.org)
How to Upgrade
Upgrading from React 16 to React 18 is a non-breaking upgrade by default, but if you want to use React 18’s new features like Concurrent Mode and Automatic Batching, a small change is required:
From
import React, { useEffect, lazy } from 'react';
import ReactDOM from 'react-dom';

ReactDOM.render(
	<ShowRoom {...(window.globalUtils.getPageData() as SearchResult.PageData)} />,
	document.getElementById('root')
);
Change to:
import React, { useEffect } from 'react';
import { createRoot } from 'react-dom/client';

const container = createRoot(document.querySelector('#root')!);
container.render(
	<ShowRoom {...(window.globalUtils.getPageData() as SearchResult.PageData)} />
);
This will enable React 18’s Concurrent Mode and Automatic Batching. This might lead to a minor issue: before React 18, setState was batched only within event handlers, but now it’s essentially always batched. Testing is required. However, issues are common in general cases. It’s recommended to use StrictMode in development to more easily expose problems.
  const RootComponent = process.env.NODE_ENV === 'development' ? React.StrictMode : React.Fragment;
  if ($root) {
    const container = createRoot($root);
    container.render(
      <RootComponent>
        <DRMSearch {...(window.globalUtils.getPageData() as DRMSearchResult.PageData)} />
      </RootComponent>
    );
  }
Development Language
TypeScript
TypeScript, as a superset of JavaScript, offers numerous benefits:
- Type System: Adds a type system on top of JavaScript.
- Tooling Support: IDE features like code autocompletion, jump-to-definition, and interface hints all require type system support.
- Lower maintenance costs and low-cost refactoring.
- …
These benefits are immediately felt during development and are self-evident.
Disadvantages of using TypeScript:
- Development overhead due to adding types.
- Some might get annoyed with the type system and resort to
anyScript.
This can only be avoided through code reviews, but generally, developers won’t do this once they’ve experienced the benefits of TypeScript.
For tsconfig configuration, for React projects, we generally extend the default tsconfig from create-react-app as a base. This default setup meets the requirements of most projects:
{
  // see https://www.typescriptlang.org/tsconfig to better understand tsconfigs
  "extends": "@tsconfig/create-react-app/tsconfig.json",
  "include": ["src", "types"],
  "compilerOptions": {
    "outDir": "./build/"
  }
}
Of course, if you have custom requirements, you can refer to TypeScript: TSConfig Reference - Docs on every TSConfig option (typescriptlang.org) for modifications.
Less
Among the CSS preprocessors: scss, less, and stylus, we chose less:
stylus: Not used internally, so directly excluded.scss: Many internal components, includingfusion, usescss. However,scssis too heavy; both the installation and compilation of itsnode-scssdependency and each project build are too slow.less: In fact, with post-processors like PostCSS, these preprocessors might not even be necessary. However, long-standing reliance on nesting and simple variable/function capabilities still improves development efficiency, which is why we choseless. Although it’s slightly less feature-rich thanscss, it fully meets daily development needs and is lightweight enough.
Earlier, PostCSS was mentioned. We primarily use it for two features: resolving browser compatibility issues and postcss-px-to-viewport for adaptive layouts on mobile. The configuration file is as follows:
const pxtoviewport = require("postcss-px-to-viewport");
const postcssPresetEnv = require("postcss-preset-env");

module.exports = {
  plugins: [
    postcssPresetEnv(),
    pxtoviewport({
      viewportWidth: 375, // (Number) The width of the viewport.
      viewportHeight: 667, // (Number) The height of the viewport.
      unitPrecision: 3, // (Number) The decimal numbers to allow the REM units to grow to.
      viewportUnit: "vw", // (String) Expected units.
      selectorBlackList: [".ignore", ".hairlines", /^\.bc-/, /^\.wlkeeppx/], // (Array) The selectors to ignore and leave as px.
      minPixelValue: 1, // (Number) Set the minimum pixel value to replace.
      mediaQuery: true, // (Boolean) Allow px to be converted in media queries.
    }),
  ],
};
postcss-preset-env relies on the browserslist configuration. This should be determined based on your specific business’s browser distribution.
  "browserslist": [
    "android >= 7",
    "ios >= 13"
  ],
Component Library
Fusion Next Components
For buyer-facing component libraries, Fusion is currently the only option. It’s important to note that you should use the @alifd/next package, not @alife/next, as the latter is likely no longer maintained.
Using Fusion components poses a problem: its direct usage results in a very large bundle size. Even after gzip compression, the combined JS and CSS exceed 300KB. Furthermore, if it participates in the project build, it significantly slows down the development server’s build speed.
To address the bundle size and development experience issues, we created TrafficModlib.
TrafficModLib
This is our traffic business’s shared component library, containing a subset of Fusion components and our own business components. This separation helps avoid the bundle size issues of directly referencing Fusion and improves the application development experience. More details will be provided later.
Build Tools
Originally, our traffic applications were distributed across several independent applications, each built separately. We previously refactored and upgraded to a unified builder, fie, to reduce the maintenance costs and negative risks associated with build tools across multiple projects.
However, due to the group’s organizational split and concerns about fie’s support, we ultimately decided to abandon the fie base and refactor to an icbuBuyer builder with no cross-group dependencies.
The process had its twists and turns. Initially, we wanted to develop a scaffolding tool and builder based on the def foundation. However, def’s command-line tools were no longer updated and had been upgraded to o2. The current state of o2’s command-line support also raised concerns. We took many detours during the initial transition from def to o2. Ultimately, we couldn’t find any documentation for the upgraded o2 commands corresponding to def-dev-kit. Therefore, we eventually abandoned def, o2, and similar tools, opting instead to develop our own simple, conventional command-line tool.
icbuBuyer
We ultimately named this builder icbu-buyer, positioning it as a buyer-facing frontend builder. The current usage documentation: 脚手架 icbu-buyer 使用文档 (antfin.com)
The entire build tool does very simple things: it wraps a webpack configuration that supports single-page and multi-page development. Additionally, during project initialization, it sets up environment configurations that comply with development standards, such as ESLint, Prettier, Commitlint, etc. There’s no magic involved. During the final build, a separate set of resources is built with special optimizations for SSR scenarios. The core webpack configuration is as follows:
export default function (userCofig: Partial<userConfig>): Configuration {
  const { port, production, debug, entryName, type } = userCofig;
  return {
    context: cwd,
    entry: getEntry({ dev: !production, entryName }),
    output: {
      publicPath: '',
      path: getBuildPath(),
      filename: '[name].js',
      chunkFilename: '[name].chunks.js',
      crossOriginLoading: 'anonymous',
    },

    mode: !production ? 'development' : 'production',
    devtool: !production && 'source-map',
    devServer: !production
      ? comboProxy({
          port,
          host: '0.0.0.0',
          hot: true,
        })
      : {},

    resolve: getResolve(),

    optimization: getOptimization(),

    module: {
      rules: getLoaderRules({ production, debug, entryName }),
    },

    externals: getExternals(false, userCofig),

    plugins: [
      debug && new BundleAnalyzerPlugin(),
      new MiniCssExtractPlugin({
        filename: '[name].css',
        chunkFilename: '[name].chunk.css',
      }),
      !production &&
        new ForkTsCheckerWebpackPlugin({
          typescript: {
            memoryLimit: 1024,
          },
        }),
    ].filter(item => !!item) as Configuration['plugins'],
  };
}
Code address: @ali/builder-icbu-buyer - Alibaba NPM Registry (alibaba-inc.com)
What are the benefits of a unified builder?
For multiple applications within a large business, adopting a unified builder can significantly reduce maintenance and selection issues. It allows us to enjoy the benefits of independently split applications while also reducing the maintenance costs associated with application splitting.
Main advantages:
- Unified Babel configuration and management: This prevents situations where code that works in one project might encounter browser compatibility issues in another due to Babel configuration differences.
- Unified code style control: At project startup, it can detect whether various configurations in the current project comply with standards. If not compliant, it can enforce uniformity, eliminating the need to manually configure ESLint, Stylelint, Prettier, Husky, and other tedious tasks in each project.
- Reduced dependency cognitive load: Each application no longer needs to list a pile of Babel, Webpack, and similar dependencies in
devDependencies.
Disadvantages:
- Since local development services and build-related configurations are consolidated within the unified
icbuBuyer, the understanding cost is slightly higher compared to a straightforward webpack configuration file.
Moreover, more and more businesses are adopting solutions like ice, umi, etc., precisely to avoid similar build-related configuration maintenance. The difference is that tools like ice tend to be more bloated to be more general-purpose and cover more business scenarios, and also offer less technical autonomy.
After weighing the pros and cons, we opted for a solution that is more aligned with our business scenarios, lower cost, and more controllable, by performing a minimal, simple encapsulation of our own build tools.
How Applications Integrate
Simply run tnpm install @ali/builder-icbu-buyer && npx ibuyer setup in your project directory. This will write icbubuyer.config.js to your project and modify the cloud build abc.json configuration.
icbubuyer.config.js serves as the application’s custom configuration. For most applications, the default configuration is sufficient. However, if customization is needed, you can modify the contents of icbubuyer.config.js:
/**
 * ICBU 买家前台通用构建器配置
 * 只要 abc.json 中的 type 以及 builder 为以下字段
 *    "type": "icbu-buyer"
 *    "builder": "@ali/builder-icbu-buyer"
 * 那么就不要删除该文件,否则构建器将无法正常工作。
 */
const fs = require("fs");
const path = require("path");
const cwd = process.cwd();
const { DEV, DEBUG } = process.env;

module.exports = {
  /**
   * 项目类型, 取值为以下值之一,
   * const PROJECT_TYPE = {
      pc: 'web-app-pc',
      m: 'web-app-m',
      npm: 'npm-package',
    };
   */
  type: "web-app-pc",
  port: 3000,
  // 目前仅支持 webpack 作为构建器,后续可能支持别的比如 vite 等
  builder: "webpack",
  // 如果有提取业务功能组件作为独立的包,挂载在全局的 window 上,需要在这里配置
  modLib: {
    // 公共包 package.json 中的 name,用来作为 import 时候的 id
    // 比如 import {Button} from "@alife/icbu-mod-lib",packageName 为 @alife/icbu-mod-lib
    packageName: "@alife/icbu-traffic-mod-lib",
    // 公共包挂载到全局变量上的命名,比如 IcbuModLib
    modName: "TrafficModLib",
  },
  extendWebpackConfig: (webpackConfig) => {
    // NOTE: 如果一定要自定义 webpack 的配置,可以在这里做一些修改。
    // 但是请注意,如果你的配置有问题,可能会导致构建失败,而且可能会和后续的脚手架升级不兼容【所以强烈不建议修改】
    // webpackConfig.externals = {
    //   react: 'window.React',
    //   'react-dom': 'window.ReactDOM',
    // };
    // TODO: 待七巧板的引用改为 index.js 后,删除 showroom 的配置
    return webpackConfig;
  },
};
Technical Conventions
Code Standards
There’s not much to say about code standards here. Except for JavaScript, all other languages follow the overall standards of the former Group Frontend Technology Department. For JavaScript, due to the outdated and unmaintained eslint-config-ali standard, we adopted the latest eslint-config-att.
- JS:
eslint-config-att, configuration documentation: Web 终端代码规范指南 (antfin.com) - CSS, Less:
stylelint-config-ali, reference configuration:
{
    extends: ['stylelint-config-ali'],
    customSyntax: 'postcss-less',
    plugins: ['stylelint-order'],
    rules: {
      'no-descending-specificity': null,
    },
};- Unified code style: Prettier adds an import order rule on top of conventional standards, ensuring consistent import order across all codebases. See:
module.exports = {
  printWidth: 100,
  tabWidth: 2,
  useTabs: false,
  semi: true,
  singleQuote: true,
  trailingComma: "es5",
  bracketSpacing: true,
  arrowParens: "avoid",
  proseWrap: "always",
  importOrder: [
    "public-path",
    "<THIRD_PARTY_MODULES>",
    "^@ali/(.*)$",
    "^@alife/(.*)$",
    "^@alifd/(.*)$",
    "^[./]",
    "^[./](.*).(json)$",
    "^[./](.*).(css|less|scss|sass)$",
  ],
  importOrderSeparation: true,
  importOrderSortSpecifiers: true,
  plugins: ["@trivago/prettier-plugin-sort-imports"],
};- Ensure all committed code is compliant using
lint-stagedandhusky.
Commit Interception
The standards configured above are useless if no one enforces them. Therefore, we added a unified hook during commits to ensure all submitted code complies with the standards. We use husky and lint-staged for this. You can refer to the official documentation for specific configuration methods; our configuration is as follows:
  "lint-staged": {
    "*.{json,md,scss,css,less,html}": "npx prettier --write --ignore-unknown",
    "src/**/*.{js,jsx,ts,tsx}": [
      "npx prettier  --write",
      "npx eslint --fix"
    ]
  },
Quick Integration
Configuring these code standards and commit interceptions can be quite cumbersome. Therefore, we have a tool for quick integration. You can quickly integrate this set of standards by simply running: tnpm install @ali/builder-icbu-buyer && npx ibuyer setup --configOnly in your project directory.
Architecture Design
Previously, our application architecture was as follows:
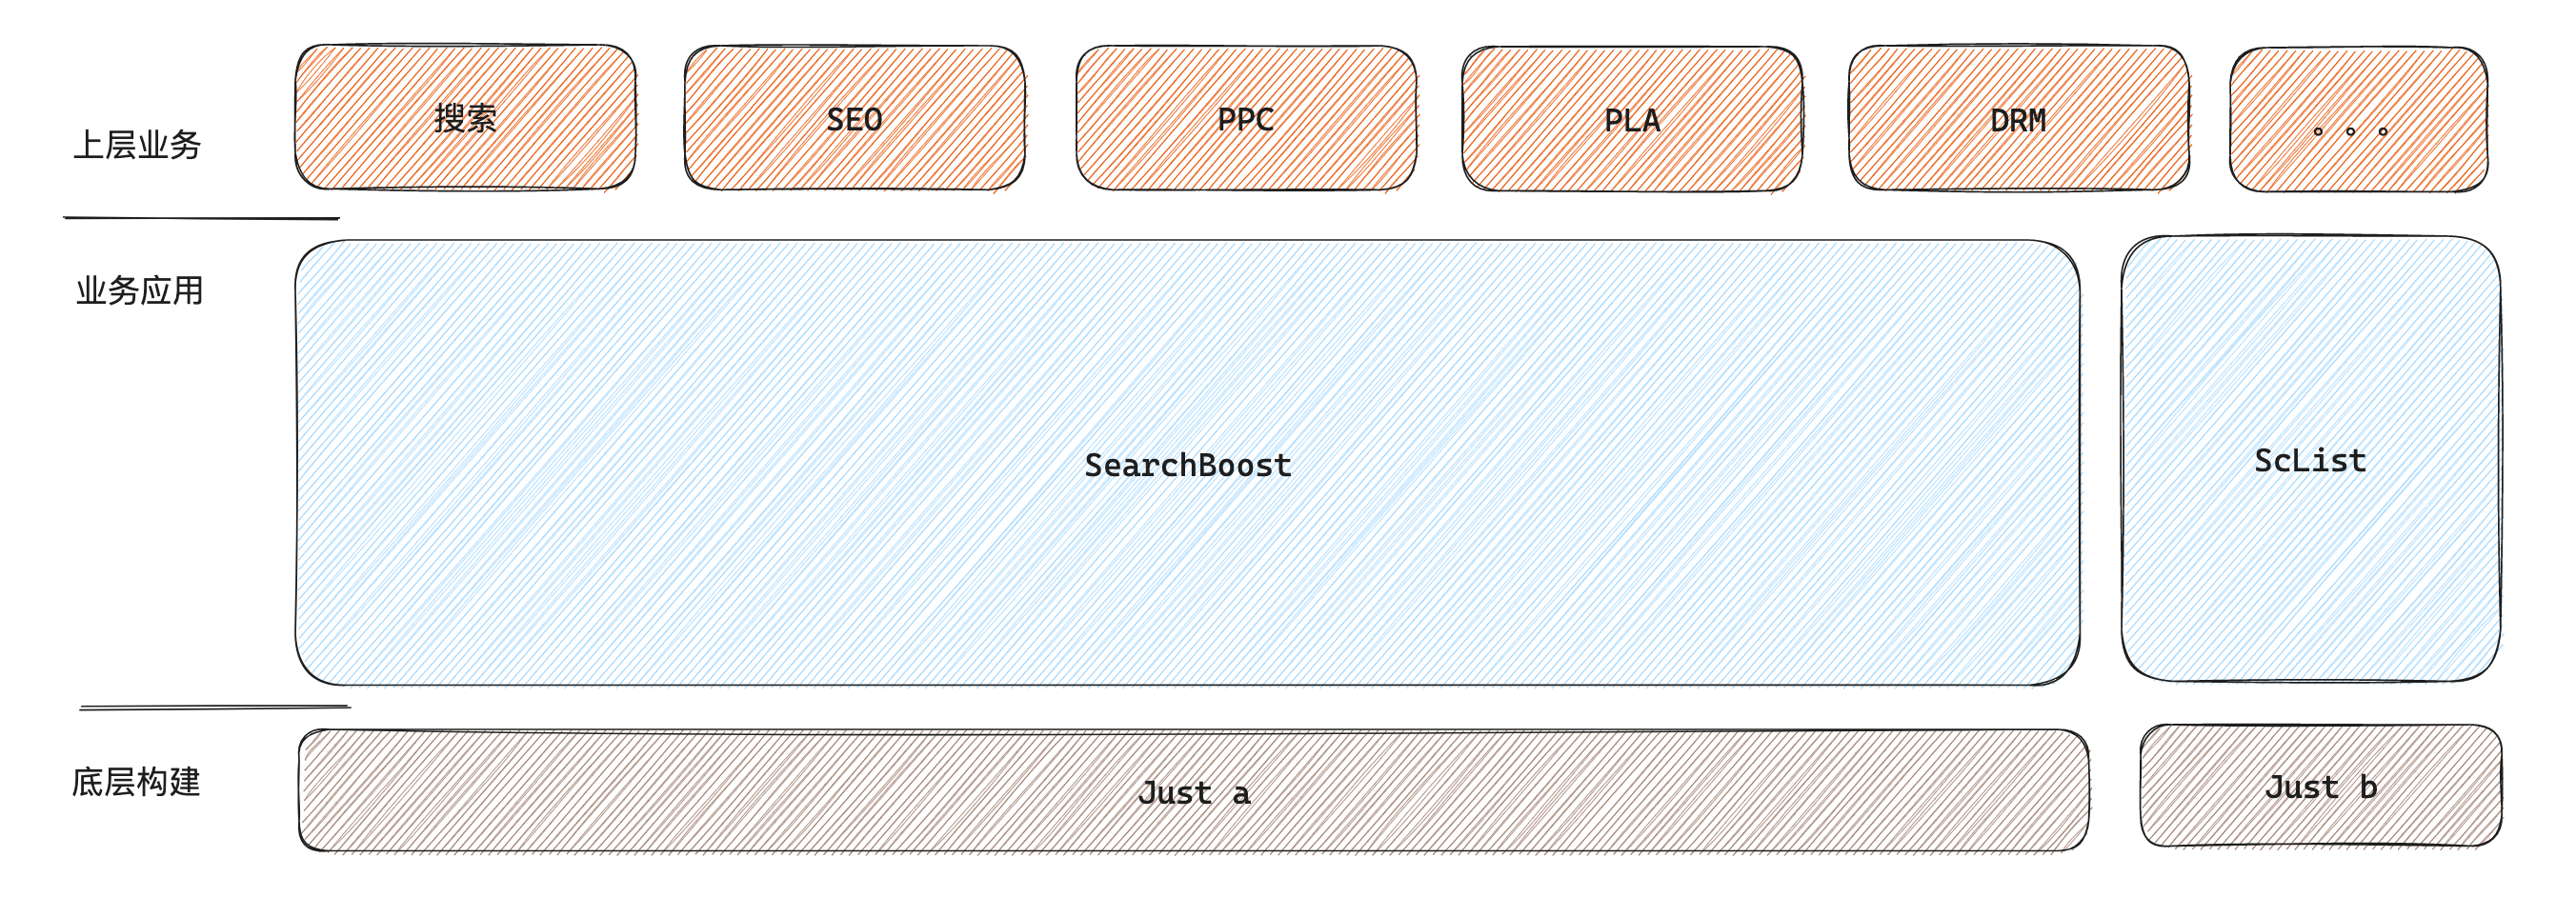
These businesses were all intertwined within the search applications searchBoost and sclist. This meant that a change in one area could affect everything; even a single SEO release could potentially bring down the search frontend. Of course, there were historical reasons and organizational structure reasons for this. We won’t delve too much into past issues, but instead, let’s look at how we adjusted to better suit our current business needs.
Background Analysis
Specific business scenarios that need to be supported under the traffic business domain:
- Free Landing Pages: Primarily for SEO scenarios like
showroomandcountrySearch, covering both PC and mobile. - Paid Landing Pages: For PPC, PLA, DRM, etc., covering both PC and mobile.
Currently, we ultimately chose to use four applications to handle these businesses separately:
traffic-free-pc: PC application for free landing pages.traffic-free-wap: Mobile application for free landing pages.traffic-pay-pc: PC application for paid landing pages.traffic-pay-wap: Mobile application for paid landing pages.
This application division granularity is relatively appropriate, following the principles of business domain isolation and device type isolation.
- Business Domain Isolation: First, business domains must be independently separated. That is, free and paid businesses cannot reside in the same application and must not affect each other.
- Device Type Isolation: Within a business domain, PC and mobile applications need to be isolated, as they have no commonalities on the frontend.
In addition, we created two extra applications:
traffic-base: Provides global foundational methods.traffic-mod-lib: Provides shared components for business domains.
Why were two additional applications extracted? The core reason is complexity decomposition: to extract highly complex parts as much as possible into traffic-base or traffic-mod-lib, so that the upper-layer business applications only focus on the final page display. Beyond complexity decomposition, the additional benefits are performance and development experience, which will be discussed in detail later.
Final Solution
Our final application architecture is as follows: 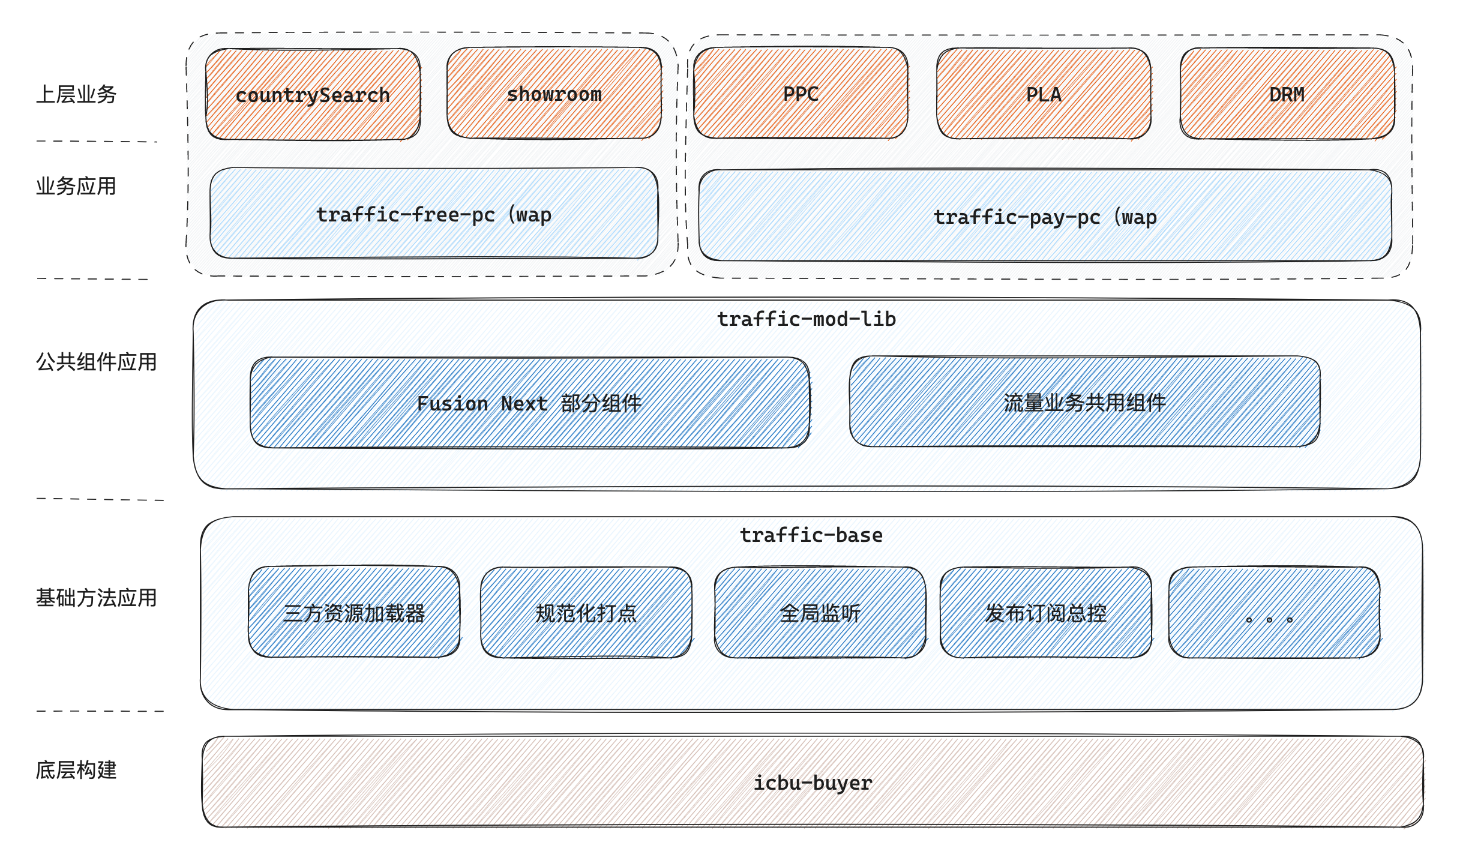
Advantages of the New Architecture
Complexity Management
- Upper-layer business applications are primarily responsible for business-related logic and frontend rendering, making their logic more independent.
- Highly complex logic is moved down to
traffic-mod-libandtraffic-base, achieving effective complexity decomposition.
Code Reusability
- By extracting foundational components and methods into
traffic-baseandtraffic-mod-lib, we not only improved code reusability but also reduced release risks. - Foundational methods are extracted into
traffic-base, encouraging developers to isolate global, business-agnostic methods.
Stability
- Upper-layer businesses have the highest release frequency, while shared components and foundational methods have relatively lower release frequencies. This layered design reduces overall release risk.
- Releases between business domains (e.g., free and paid applications) do not affect each other, further enhancing system stability.
Development Experience
- Because dependency libraries (such as React, ReactDOM, Fusion) do not need to be recompiled with each build, and application splitting significantly reduces irrelevant code within each application, this greatly reduces the cold start and hot compilation time of local development services, thereby significantly improving the development experience.
- Reduced irrelevant code in each repository also lowers developers’ cognitive load.
Performance
- Foundational applications with low release frequency (
traffic-mod-libandtraffic-base) are more easily cached on CDNs and user browsers, passively improving page performance.
Ultimately, there was a 70% reduction in built code size, and over a 50% reduction in build time. For details, refer to the documentation: 流量业务重构升级 (antfin.com).
Detailed Explanation of Foundational Applications
traffic-base
Provides global solutions. Specifically: unified tracking, unified event listening, a unified event publish-subscribe mechanism, and unified third-party resource loading control, among others.
Log Collection
For instance, to standardize tracking, we established tracking specifications (antfin.com). But how do we ensure everyone’s tracking complies with these specifications? Code review is certainly an option, but the cost is too high. Therefore, our solution is to centralize all tracking methods within traffic-base: automatic impression tracking is directly controlled by traffic-base, and click tracking uniformly uses the logClick method provided by traffic-base. This ensures that all tracking adheres to the specifications.
- Unified impression tracking code.
- Unified click tracking method.
Event Bus Management
In many business scenarios, components or modules need to communicate via an event mechanism. This publish-subscribe event pattern offers significant decoupling advantages. However, excessive decoupling can also be a disadvantage. As project complexity increases over time, a lack of clear constraints and documentation can lead to the project being filled with various uncontrollable events. To address this, we adopted the following unified control solution:
Unified Listening and Subscription Methods
By using a unified TrafficEvent class, we can manage all events from a central point. This class inherits from EventEmitter and includes a predefined EventType object.
import { EventEmitter } from 'events';
import { EventType } from './constants';

class TrafficEvent extends EventEmitter {
  EventType: typeof EventType;

  constructor() {
    super();
    this.EventType = EventType;
  }

  on<T extends string | symbol>(event: T, fn: (...args: any[]) => void, context?: any): this {
    if (typeof event === 'string') {
      if (!Object.values(EventType).includes(event)) {
        throw new Error(`无效的事件类型:${event}`);
      }
      console.log(`订阅事件:${event}`);
    }
    // 如果类型是 symbol,则不进行 EventType 校验
    return super.on(event, fn, context);
  }

  emit<T extends string | symbol>(event: T, ...args: any[]): boolean {
    if (typeof event === 'string') {
      if (!Object.values(EventType).includes(event)) {
        throw new Error(`无效的事件类型:${event}`);
      }
      console.log(`发布事件:${event}`);
    }
    // 如果类型是 symbol,则不进行 EventType 校验
    return super.emit(event, ...args);
  }
}

export default new TrafficEvent();
Unified Event ID Management
All event types are predefined in the EventType object. This not only improves code readability but also ensures event uniqueness.
export const EventType = {
  scrollToEnd: "scrollToEnd",
  scrolling: "scrolling",
  videoChange: "videoChange",
};
With this design, all components requiring event communication must register new eventTypes in base. Additionally, this solution restricts publishing and subscribing only to predefined event IDs. In this way, the entire event communication system remains in a controllable and manageable state. If needed, you can also add more management and monitoring features to the TrafficEvent bus.
Thus, we not only retain the advantages of decoupling but also enhance project maintainability and controllability through a unified management mechanism.
An example:
export function useScrollToEnd(fn: () => void): void {
  const { globalUtils } = useGlobalUtils();
  React.useEffect(() => {
    if (!globalUtils) return;
    const { eventEmitter } = globalUtils;
    eventEmitter.on(eventEmitter.EventType.scrollToEnd, fn);
    return () => {
      eventEmitter.off(eventEmitter.EventType.scrollToEnd, fn);
    };
  }, [fn, globalUtils]);
}
Page Data Retrieval
A unified method for synchronous page data retrieval is provided. All upper-layer business applications retrieve page data by calling this method, rather than directly reading global variables under window:
  getPageData(): Record<string, any> {
    return window._PAGE_DATA_;
  }
It looks very simple, just three lines of code. However, this embodies a development philosophy: the use of global variables needs to be controlled, and details are abstracted away. For upper-layer business applications, I just need to know that I should use the getPageData method to retrieve page data. How it’s obtained is not important.
This way, upper-layer business applications no longer need to directly manipulate this global variable. If, one day, this global variable conflicts with other variables, we can confidently modify it without being trapped in a deadlock where changes are impossible because global variable reads and writes are scattered across various code files in multiple systems.
Going a step further, for this read-only data, it can be frozen using Object.freeze() upon retrieval, making it read-only, to prevent hidden bugs caused by modifications from unknown sources.
Other
There are also other methods, such as global page scroll listeners, unified third-party resource loading control to ensure page core functionality priority, and more.
traffic-mod-lib
As a common component application, it primarily hosts FusionNext components and our own business-agnostic components.
FusionNext components are comprehensive, making their bundle size quite significant. In our scenarios, we only need a subset of these components, so we handled them separately:
// ---------------Next 组件 start---------------
import Balloon from "@alifd/next/lib/balloon";
import Button from "@alifd/next/lib/button";
import Checkbox from "@alifd/next/lib/checkbox";
import Collapse from "@alifd/next/lib/collapse";
import ConfigProvider from "@alifd/next/lib/config-provider";
import Dialog from "@alifd/next/lib/dialog";
import Drawer from "@alifd/next/lib/drawer";
import Icon from "@alifd/next/lib/icon";
import Input from "@alifd/next/lib/input";
import Loading from "@alifd/next/lib/loading";
import Pagination from "@alifd/next/lib/pagination";
import Select from "@alifd/next/lib/select";
import Slider from "@alifd/next/lib/slider";
import Tag from "@alifd/next/lib/tag";
// ---------------Next 组件 end---------------

export {
  Balloon,
  Button,
  Checkbox,
  Collapse,
  Dialog,
  Loading,
  Pagination,
  Icon,
  ConfigProvider,
  Tag,
  Select,
  Slider,
  Drawer,
  Input,
  NextLocalEnUS,
};
The rest are business-agnostic components, nothing special to mention:
import "./public-path";

import classnames from "classnames";
import React from "react";
import ReactDOM from "react-dom";

// import IcbuIcon from './components/icon';
import IcbuIcon, { Certificate, FlagIcon, GsYear } from "@alife/bc-icbu-icon";
import safeLog from "@alife/bc-safe-log";

import Alitalk from "./components/alitalk";
import "./index.less";
import "./index.scss";
// ---------------PC流量Footer三巨头-------------
import {
  FloatingWindow,
  RecommendLayer,
  RfqLayer,
  Swiper,
  SwiperRefType,
} from "./modules";
import {
  Balloon,
  Button,
  Checkbox,
  Collapse,
  ConfigProvider,
  Dialog,
  Drawer,
  Icon,
  Input,
  Loading,
  NextLocalEnUS,
  Pagination,
  Select,
  Slider,
  Tag,
} from "./next";

IcbuIcon.GsYear = GsYear;
IcbuIcon.FlagIcon = FlagIcon;
IcbuIcon.Certificate = Certificate;

export {
  // 基础框架&方法
  React,
  ReactDOM,
  classnames,
  safeLog,

  // next 组件
  Balloon,
  Button,
  Checkbox,
  Collapse,
  Dialog,
  Loading,
  Pagination,
  Icon,
  ConfigProvider,
  Select,
  Tag,
  Slider,
  Drawer,
  Input,
  NextLocalEnUS,

  // 流量业务组件
  FloatingWindow,
  RfqLayer,
  RecommendLayer,
  Swiper,
  // 三方业务组件
  IcbuIcon,
  Alitalk,
};

export type { SwiperRefType };
It’s important to note how upper-layer business applications use components from traffic-mod-lib in their projects. This brings us to the build process for traffic-mod-lib. We need to build it as an independent package rather than a regular application. Modify icbubuyer.config.js in the project directory:
  extendWebpackConfig: (webpackConfig, env) => {
    const isSSR = env === 'ssr';
    // 本应用会作为一个基础包加载到其他应用中,所以需要将打包后的代码挂载到全局变量上
    webpackConfig.output.library = 'TrafficModLib';
    webpackConfig.output.libraryTarget = isSSR ? 'global' : 'window';
    webpackConfig.output.globalObject = isSSR ? 'global' : 'window';
    return webpackConfig;
  },
This way, as long as the page loads traffic-mod-lib’s JavaScript, a TrafficModLib variable will be mounted on the global scope. Then, configuration is needed in the upper-layer business application’s icbubuyer.config.js:
  modLib: {
    // 公共包 package.json 中的 name,用来作为 import 时候的 id
    // 比如 import {Button} from "@alife/icbu-mod-lib",packageName 为 @alife/icbu-mod-lib
    packageName: '@alife/icbu-traffic-mod-lib',
    // 公共包挂载到全局变量上的命名,比如 IcbuModLib
    modName: 'TrafficModLib',
  },
This ensures that all references from @alife/icbu-traffic-mod-lib are ultimately retrieved from the global TrafficModLib variable. For example:
import {
  Alitalk,
  Balloon,
  Button,
  IcbuIcon,
  Icon,
  Swiper,
  SwiperRefType,
} from "@alife/icbu-traffic-mod-lib";
Base Framework
For foundational frameworks like React and ReactDOM, we introduce them via separate JavaScript files. The group provides corresponding CDNs. Our traffic business currently uses the latest React version, specifically the resources converted to s.alicdn.com:
- Combo-ed resources:
https://s.alicdn.com/@g/code/lib/??react/18.2.0/umd/react.production.min.js,react-dom/18.2.0/umd/react-dom.production.min.js- After de-comboing:
- React:
https://s.alicdn.com/@g/code/lib/??react/18.2.0/umd/react.production.min.js - ReactDOM:
https://s.alicdn.com/@g/code/lib/??react-dom/18.2.0/umd/react-dom.production.min.js - If you use
lightProxyfor local proxying, you can add this command during development:https://s.alicdn.com/@g/code/lib/??react/18.2.0/umd/react.production.min.js,react-dom/18.2.0/umd/react.production.min.js https://s.alicdn.com/@g/code/lib/??react/18.2.0/umd/react.development.js,react-dom/18.2.0/umd/react.development.jsto enhance the development experience.
- React:
Advantages of using a separate CDN to import base framework code:
- More persistent caching and relatively higher cache hit rates.
- Further reduces development service compilation and build times, improving the development experience, and offering some relief to developers using MacBooks—often touted as top-tier Intel models but with weak actual performance, frequently maxing out their 16GB RAM, causing fans to spin wildly, systems to nearly freeze, and being tormented by cloud shells. Be a benevolent person.
Development & Debugging
Project Directory Structure
This is our directory standard for business applications:
.
├── README.md                   # 项目文档
├── abc.json                    # 云构建的配置
├── demo                        # 示例代码
│   ├── data.json               # 示例数据
│   ├── index.html              # 示例HTML
│   ├── index.tsx               # 示例TypeScript React文件
│   └── pla.json                # 示例配置
├── icbubuyer.config.js         # icbubuyer 构建器配置
├── package.json                # 依赖管理
├── src                         # 源代码
│   ├── component               # 共用组件
│   ├── hook                    # 自定义 Hooks
│   ├── module                  # 业务模块
│   ├── pages                   # 页面级组件
│   ├── public-path.js          # webpack 的chunk 引入路径配置
│   ├── style                   # 样式文件
│   ├── types                   # 类型定义
│   └── utils                   # 工具函数
├── tsconfig.json               # TypeScript配置
└── yarn.lock                   # Yarn锁文件
The benefits of all projects adhering to the same standards are self-evident. If I were to elaborate, they are:
- Code Organization and Maintainability: A clear directory structure reduces maintenance difficulty and error rates.
- Lowered Entry Barrier: Understanding the directory structure of one project means understanding all other projects.
- Code Readability: A clear and explicit directory reduces the cognitive cost of understanding the project and improves code readability.
- Improved Collaboration Efficiency: Convention over configuration; standards reduce unnecessary communication and improve team efficiency.
Local Development
All projects adhere to a unified npm script standard:
- Start the local debugging service with
npm run start. - Perform a local build with
npm run build.
This avoids situations where one project uses npm run start to launch a development service while another uses npm run dev. While this information is easily found in package.json, not having to look at all is more reassuring and pleasant.
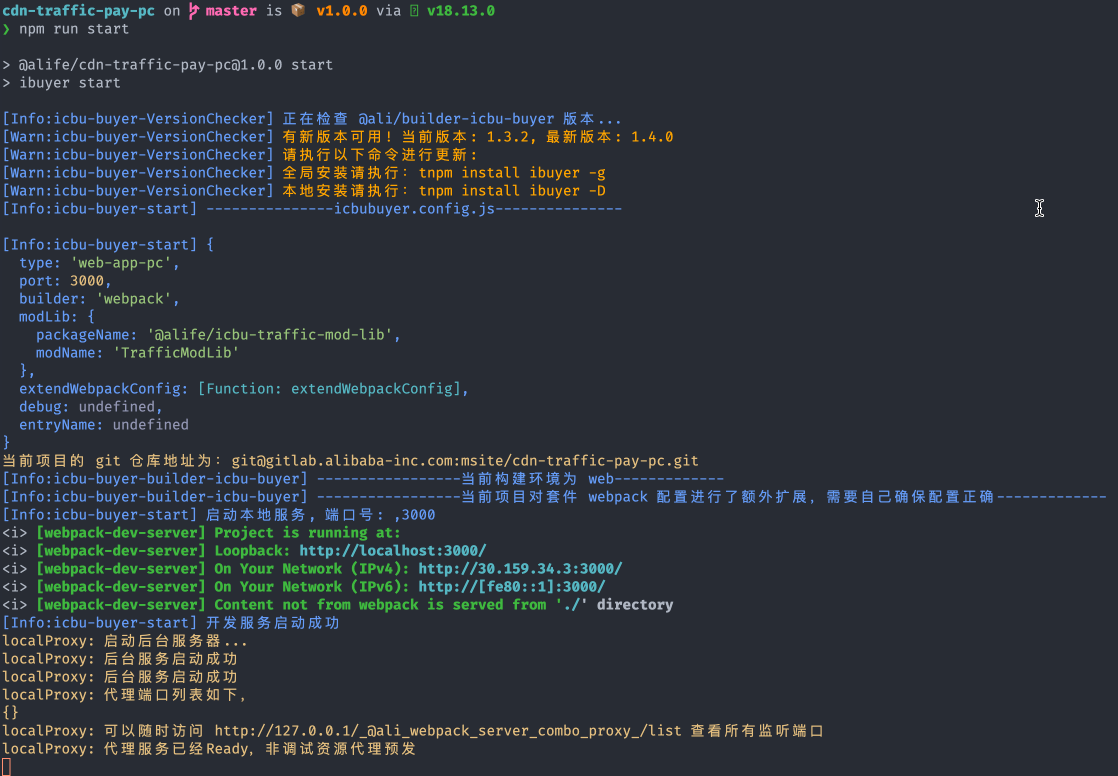
After running npm run start, the console will output information such as: whether the builder needs updating, the final configuration used, development service address and port, etc.
Then, you need to bind the following hosts or proxies. The core purpose is to proxy all frontend resources to the local development service. Whether to test the backend’s pre-release environment or the production environment depends on your specific needs for proxying.
// 前端资源代理
127.0.0.1 assets.alicdn.com
127.0.0.1 s.alicdn.com
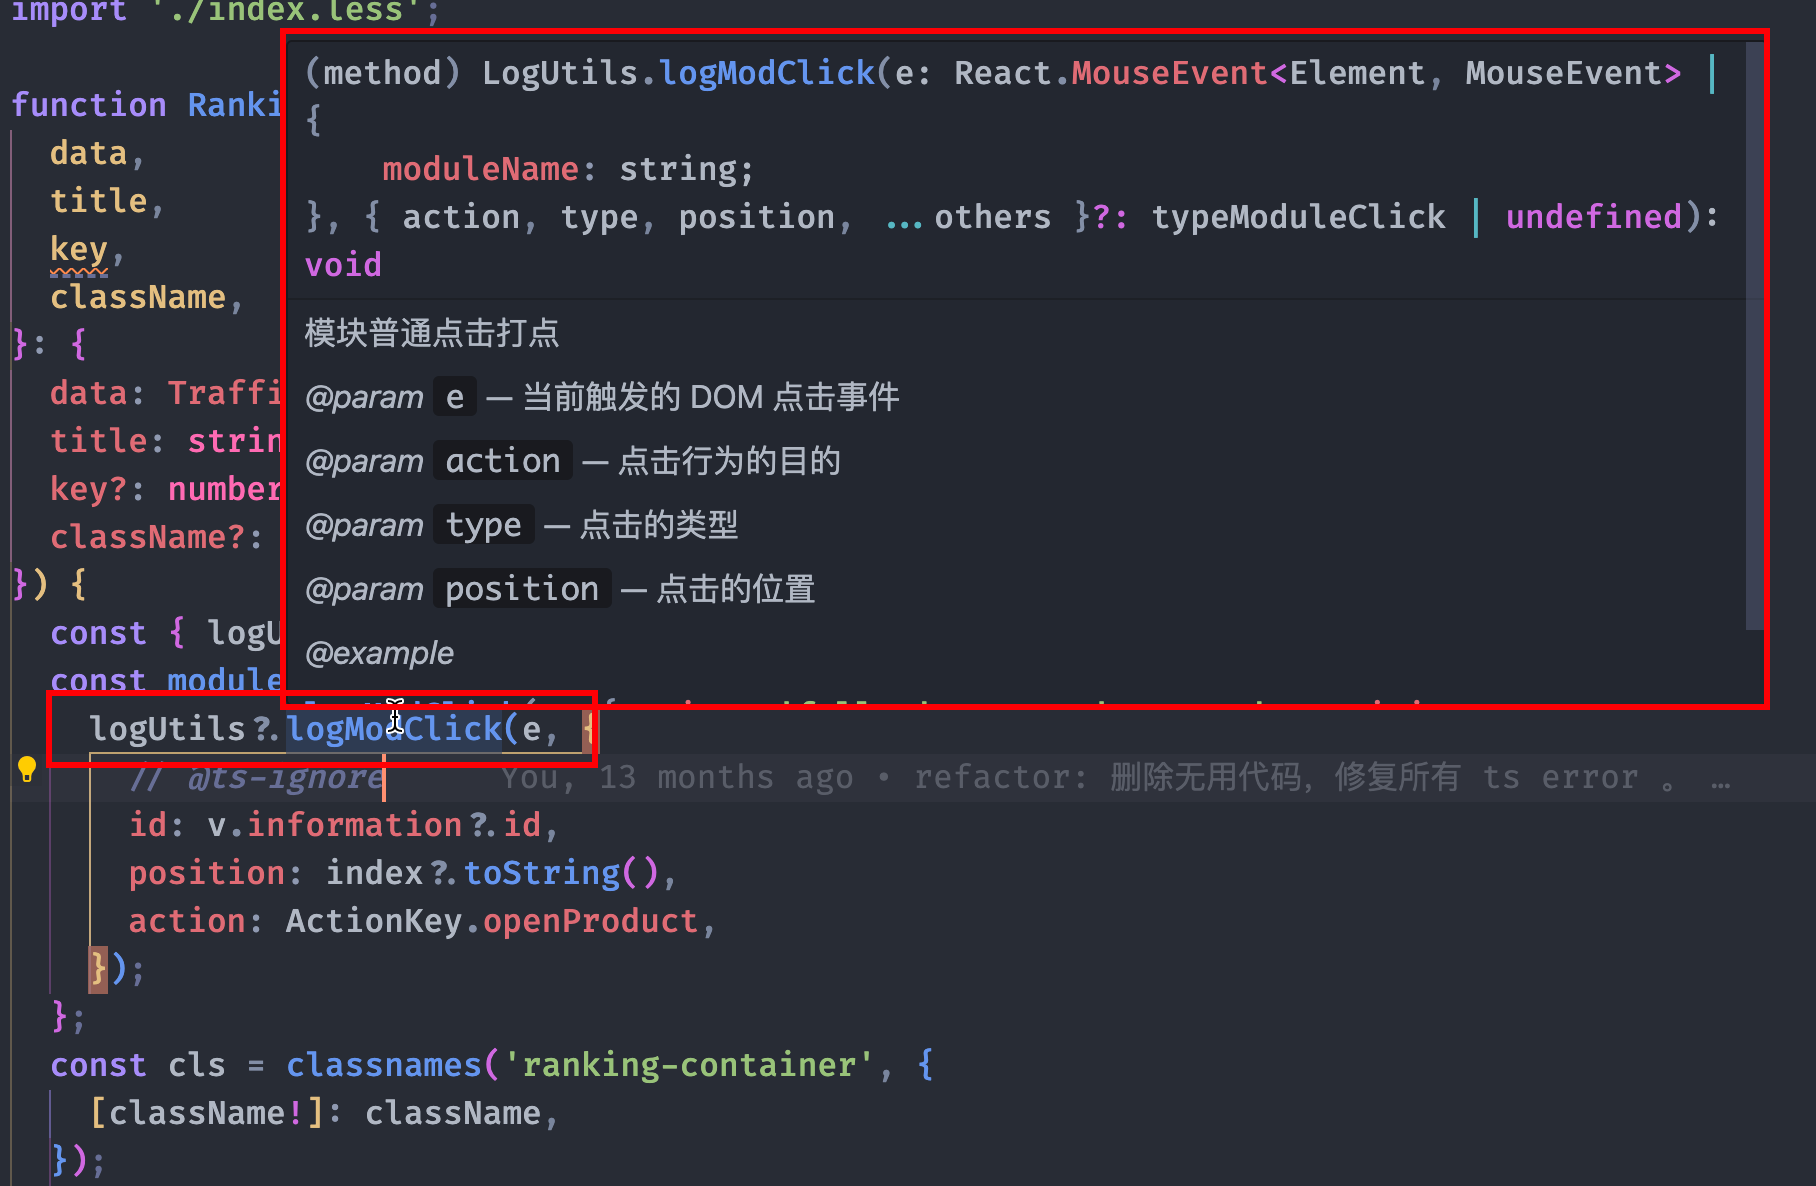
127.0.0.1 dev.g.alicdn.comNow, open a production page that needs debugging. You should see output similar to this in the console:  This indicates that the page you currently have open is using code from the local development service, and you can directly modify and debug the code.
Multi-Application Development & Joint Debugging
In the architecture section, we mentioned that any given page actually depends on at least three applications:
- Upper-layer business application
traffic-mod-libtraffic-base
This presents several challenges:
- When an upper-layer business application calls components from
traffic-mod-libor methods fromtraffic-base, how does it know what components or methods are available? Does one have to check their code every time they’re used? - If a requirement necessitates modifying the upper-layer business application,
traffic-mod-lib, andtraffic-basesimultaneously, how does one debug? Does this mean other applications need to be deployed to a pre-release environment every time, or that a bunch of proxy rules need to be written for local debugging?
Let’s answer these questions one by one.
Cross-Application API Call Hints
When using components from traffic-mod-lib or methods from traffic-base in a business application, it’s impractical to have to look up code or documentation every time they’re used. This is too inefficient, prone to errors, and negatively impacts the development experience, making application splitting seem like an unnecessary hassle.
The answer to this question is also, in fact, an answer to why TypeScript was adopted earlier: both underlying applications build a .d.ts definition file, and each upper-layer business application simply references it.
For example, in traffic-base, there are these commands:
"build-types": "./node_modules/.bin/tsc --emitDeclarationOnly",
"publish-patch": "rm -rf ./typings && tnpm run build-types && tnpm run build  && tnpm version patch && tnpm publish && git push"
Executing build-types generates the type definition file for the entire application under the project, which is then published as an npm package. It just needs to be referenced in the business application’s .d.ts file:
/// <reference types="@alife/cdn-traffic-base/typings/pc" />This provides type-safe code hints during actual use:
- It’s not recommended for business applications to directly read and call methods from global variables, so calls to
traffic-basemethods are encapsulated.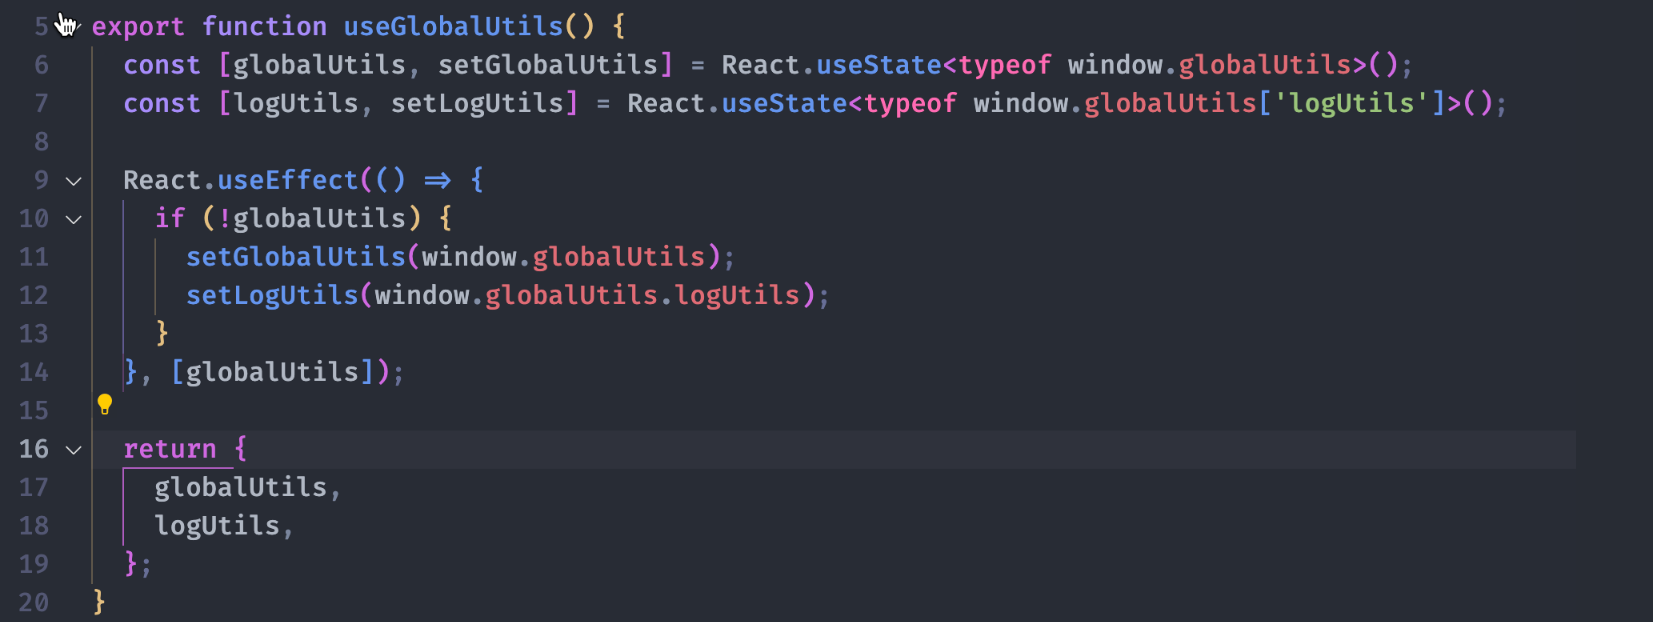
- When used, full API hints become available.
traffic-mod-lib is even simpler. It only needs to build a type definition file and then publish it as an npm package. Upper-layer business applications can then directly use it: 
It’s important to note that although @alife/icbu-traffic-mod-lib and @alife/cdn-traffic-base are referenced in business applications, they do not actually participate in the project’s build, compilation, or packaging. They are externalized in webpack. Refer to the icbubuyer.config.js configuration:
  modLib: {
    // 公共包 package.json 中的 name,用来作为 import 时候的 id
    // 比如 import {Button} from "@alife/icbu-mod-lib",packageName 为 @alife/icbu-mod-lib
    packageName: '@alife/icbu-traffic-mod-lib',
    // 公共包挂载到全局变量上的命名,比如 IcbuModLib
    modName: 'TrafficModLib',
  },
Multi-Application Local Debugging
If a requirement necessitates simultaneously modifying the upper-layer business application, traffic-mod-lib, and traffic-base, how does one debug? Our icbu-buyer builder uses comboProxy for webpack’s local development service. The specific code in the builder is:
    devServer: !production
      ? comboProxy({
          port,
          host: '0.0.0.0',
          hot: true,
        })
      : {},
The comboProxy here is a package we maintain ourselves. Internal address: @ali/webpack-server-combo-proxy - Alibaba NPM Registry (alibaba-inc.com). Currently, store, traffic, and several backend applications all use this package for local development services.
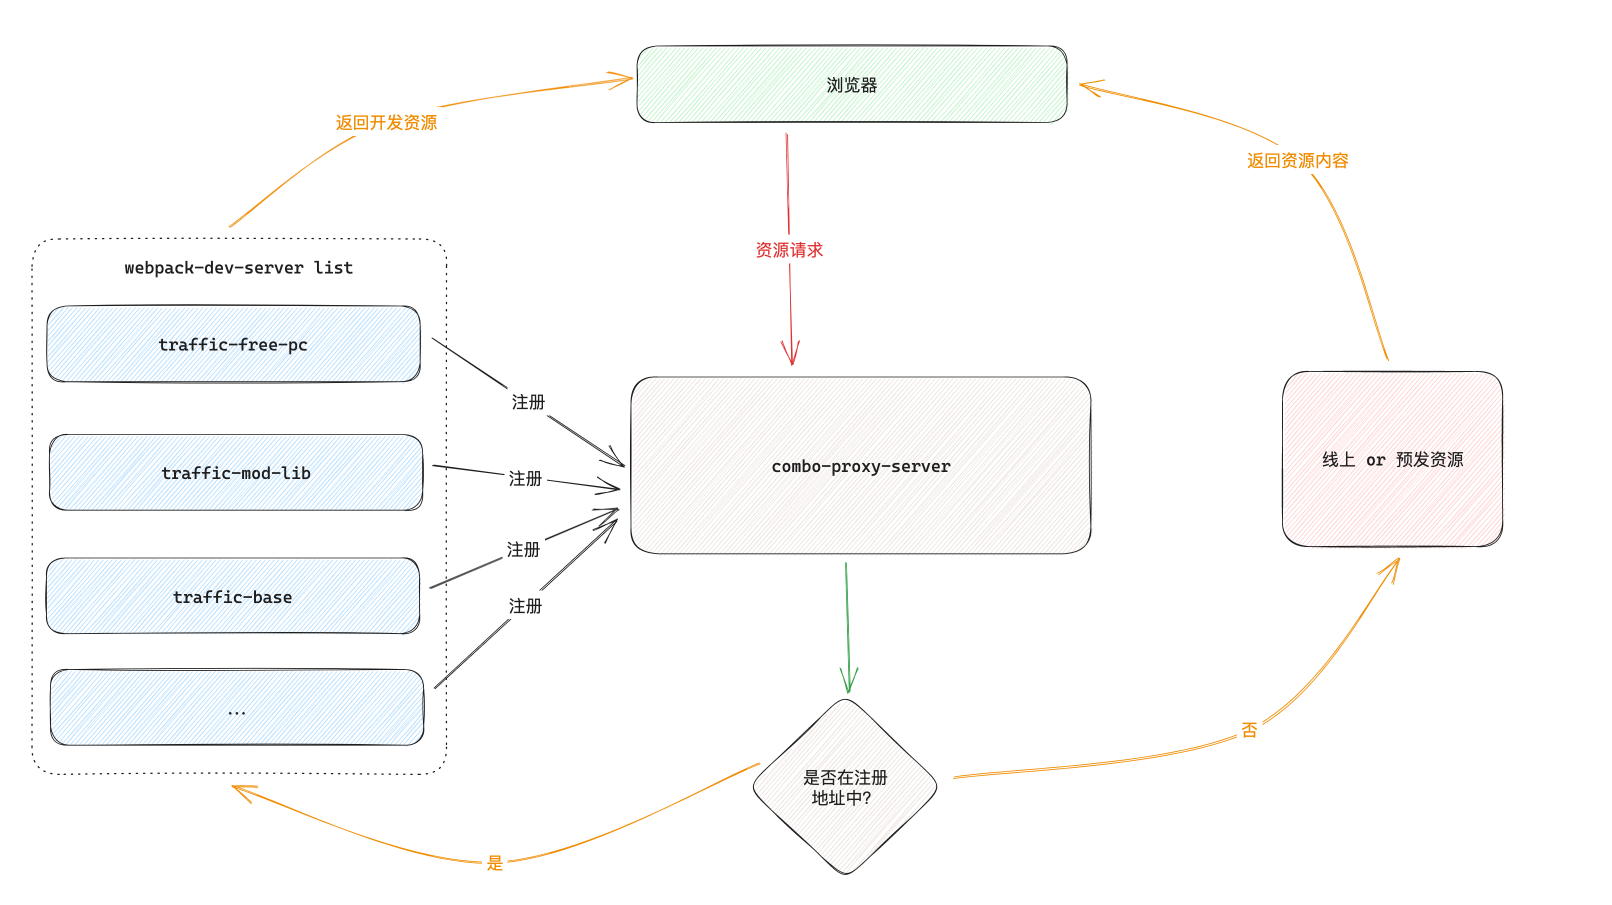
webpack-server-combo-proxy
This plugin primarily does the following:
- Starts a background service running on ports 80 and 443.
- Registers the current application with this background service.
- When browser requests are proxied to the local service, they are forwarded to the specific local application based on the registered address.
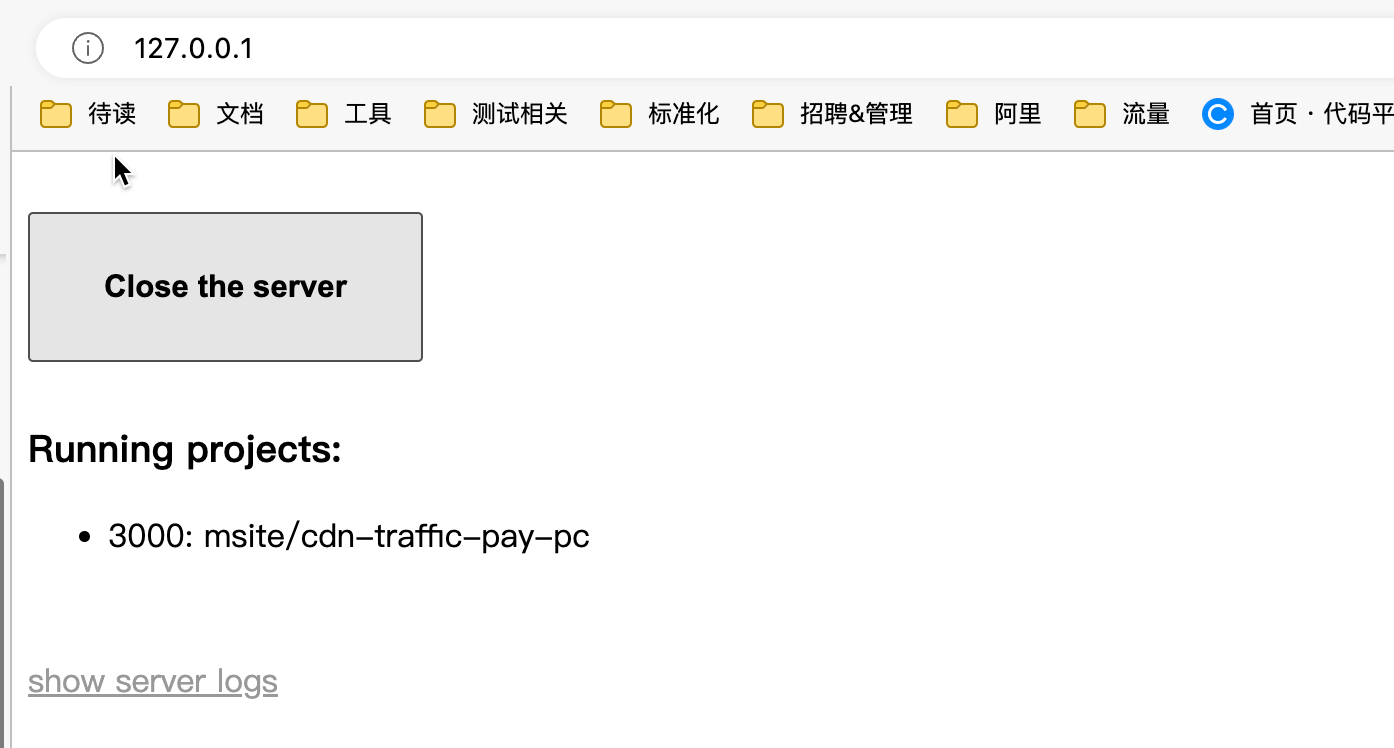
For example, if I’m developing the cdn-traffic-pay-pc application, when I run npm run start locally to launch the development service:
- Checks if the background service is running. If not, it starts a new service, occupying ports 80 and 443.
- Registers the
cdn-traffic-pay-pcapplication with its Git address as an ID on this background service. Opening127.0.0.1will show: - When the browser accesses a paid landing page, such as alibaba.com/premium/Seals.html?src=sem_ggl&mark=drm0611&tagId=62431584548&product_id=62431584548&pcate=1407&cid=1407&ali_creative_id=7396748df8d7b7171c8c69322fc97f56&ali_image_material_id=0f7f01f815bf5e66f0fe539b6a5802ff, dependent resources like
drm-search.csswill first go through the local background service, then be judged and finally forwarded to the localwebpack-dev-serveror directly requested from the pre-release frontend or production environment.
When other projects need to be debugged simultaneously, simply run npm run start in the project to be debugged. This will register new ports and service addresses based on the same logic. For example, if I need to develop traffic-mod-lib at this point, then after starting its local development service and visiting 127.0.0.1, you will find an additional registered address for cdn-traffic-mod-lib: 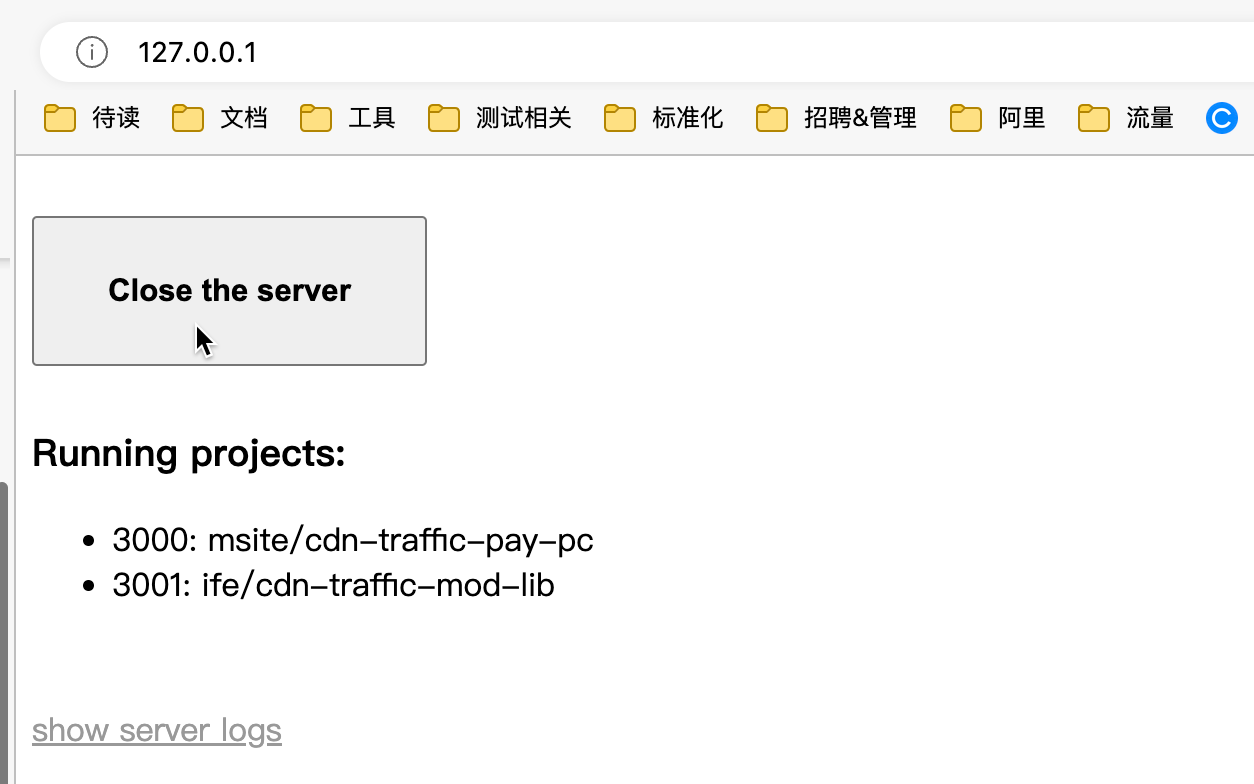
Thus, when accessing the frontend page again, requests matching the cdn-traffic-pay-pc link path will be forwarded to the development service on port 3000, and requests matching the cdn-traffic-mod-lib link path will be forwarded to port 3001, enabling simultaneous joint debugging of multiple projects.
Key points of this mechanism:
- There is a one-to-one correspondence between the address of a frontend application after being published to CDN and its Git repository address. For example, this CDN resource:
https://s.alicdn.com/@g/ife/cdn-traffic-mod-lib/1.0.4/index.jscorresponds to the Git repository path:[email protected]:ife/cdn-traffic-mod-lib.git. Therefore, ourcomboProxycan analyze the corresponding code repository from the resource link, allowing it to register and forward to the correct local service address. - The service must run on ports 80 and 443. Then, whether through hosts binding or proxying, all frontend resource requests are proxied to this local service, ensuring all resource requests pass through the local proxy service.
Performance
Landing pages place great emphasis on performance experience, as it directly impacts Google’s algorithm rankings and paid landing rates. Therefore, we have done a lot of work on performance. This article focuses solely on code engineering aspects. For complete performance optimization guidelines, refer to: Alibaba.com 性能优化经验总结
At the application level, we did the following:
- Asynchronous loading of non-core functionalities.
- CDN configuration.
- Independent integration of common libraries.
Asynchronous Loading of Non-Core Functionalities
For non-core functionalities on the page, webpack’s asynchronous import can be used for loading. For example, the left filter module on our page:
function LeftFilterAsync({ data }: { data: PPCSearchResult.PageData }) {
  const TrafficLeftFilter = lazy(() =>
    import(/* webpackChunkName: "left-filter" */ "@alife/traffic-left-filter")
  );
  const { snData, i18nText } = data;
  const handleChange = (link: string) => {
    window.location.href = link;
    window.globalUtils.logUtils.logModClick(
      {
        moduleName: "left-filter",
      },
      {
        action: "filter",
        type: link,
      }
    );
  };
  return (
    <SSRCompatibleSuspense
      fallback={
        <Icon type="loading" style={{ marginLeft: 40, marginTop: 50 }} />
      }
    >
      <TrafficLeftFilter
        data={snData}
        i18n={i18nText}
        handleChange={handleChange}
      />
    </SSRCompatibleSuspense>
  );
}
By using import(/* webpackChunkName: "left-filter" */ '@alife/traffic-left-filter') to asynchronously load the @alife/traffic-left-filter module, it’s important to note that we wrapped the asynchronously loaded module with an SSRCompatibleSuspense component. Its benefit is that it can display a loading placeholder before the module finishes loading, preventing user anxiety during waiting or page reflows.
export default function SSRCompatibleSuspense(
  props: Parameters<typeof Suspense>["0"]
) {
  const isMounted = useMounted();

  if (isMounted) {
    return <Suspense {...props} />;
  }
  return <>{props.fallback}</>;
}
Also, one point to note is that since our JavaScript files are all on a CDN, their domain usually differs from the page’s main domain. Therefore, configuration is required to ensure the correct chunk addresses are loaded at runtime:
文件名:public-path
/**
 * 处理 webpack 代码切分的 path 路径
 */
const REG_SRC = /^(https?:)?\/\/(.+)\/msite\/(.*)cdn-traffic-pay-pc\/([\d.]+)\//;

function getSrcMatch() {
  if (document.currentScript) {
    return document.currentScript.src.match(REG_SRC);
  } else {
    const elScripts = document.querySelectorAll('script[src]');
    // render脚本一般在最后,这里从后往前找,以便提升查找效率
    for (let i = elScripts.length - 1; i >= 0; i--) {
      const matches = elScripts[i].src.match(REG_SRC);
      if (matches) {
        return matches;
      }
    }
  }
}

export function getPublicPath() {
  const matches = getSrcMatch();
  return `//${matches[2]}/msite/cdn-traffic-pay-pc/${matches[4]}/`;
}

try {
  // eslint-disable-next-line no-undef
  __webpack_public_path__ = getPublicPath();
} catch (err) {
  console.error(err);
}
You need to manually set webpack’s publicPath, and then import it at the application’s main entry JavaScript file:
import "../../public-path";

import React from "react";
import classnames from "classnames";
This way, asynchronous chunks will be loaded from your configured webpack_public_path, instead of from the current page’s domain.
CDN Configuration
A .assetsmetafile file is required in the project root to inform the CDN server about the current resource’s cache time. Refer to the one-year cache configuration:
cache-control:max-age=31536000,s-maxage=31536000Note: Communication with colleagues in the architecture team indicates this is a private configuration, and it might become obsolete one day.
Independent Integration of Common Libraries
Common libraries like React and ReactDOM, mentioned earlier, generally do not change and are consistently chosen across the entire department. It’s recommended to introduce them via independent CDN addresses. The group provides a CDN address platform for common libraries: https://work.def.alibaba-inc.com/lib. Our traffic business uses the latest React version, specifically the resources converted to s.alicdn.com:
- Combo-ed resources:
https://s.alicdn.com/@g/code/lib/??react/18.2.0/umd/react.production.min.js,react-dom/18.2.0/umd/react-dom.production.min.js- After de-comboing:
- React:
https://s.alicdn.com/@g/code/lib/??react/18.2.0/umd/react.production.min.js - ReactDOM:
https://s.alicdn.com/@g/code/lib/??react-dom/18.2.0/umd/react-dom.production.min.js
- React:
Benefits of independent referencing: Low release frequency, high cache hit rate. Benefits of using existing CDN addresses provided by the group: More business units will use them, leading to a higher caching probability on various CDN edge nodes.
Stability
During development, we enforce stronger constraints by using TypeScript, and linting tools like ESLint and Stylelint to reduce code issues during the development phase. Additionally, after application splitting, the complexity of upper-layer business applications is lower, which has significantly reduced the risk of daily releases.
During the release process, we also adhere to the group’s secure release specifications. All releases must go through the following steps:
- Pre-release environment testing passed.
- Code review: Requires approval from 2 people for core projects.
- Fields automated tests passed.
- Secure production environment verification.
After all checks pass, the release goes live. After going live, we monitor the metrics at [Traffic Business Monitoring Address] for a period to ensure everything is normal. If not, we roll back immediately.
Summary
This article follows the development-to-deployment pipeline, detailing our business’s tech stack selection, conventions, architecture design, development and debugging methods, and efforts in stability and performance. Actual code snippets are included in some sections to facilitate understanding. There are no profound technologies or particularly clever implementations involved; these are all best practices that we’ve distilled from our work.
If you have any questions or opinions regarding the methods, choices, or solutions presented in this article, we welcome discussion.