
Background
Recently, I took over a mobile project at the company. It was developed using Rax as its DSL. During publishing, multiple code bundles are built: one for the APP, compiled into code that runs on weex, and another for H5 (which runs in browsers or webviews, and we’ll collectively refer to all such environments as H5), where a degraded weex version is used.
This development system seemed perfect: develop once, run on three platforms. However, in reality, it wasn’t so seamless. Since it runs on weex rather than directly in a browser, it was challenging to directly port web development practices. To achieve cross-platform compatibility, only a subset of CSS and DOM APIs were implemented. During development, everything worked fine when debugging in the browser, but upon deployment to the APP and running on weex, various issues would arise, leading to a very clunky development experience.
Of course, some might argue that it’s due to my unfamiliarity with the weex API, which is fair. I’ve never been particularly interested in proprietary, non-standard systems that implement ‘magic’ features. However, if the cost of learning it outweighs the benefits it provides, then there’s no need for us to pursue it.
weex’s biggest advantage over H5 lies in its slightly better interactive performance.
However, with the improvements in mobile phone performance and continuous webview optimizations, H5 pages are becoming increasingly smooth, especially for purely display-oriented pages. Furthermore, compared to H5, weex inherently lacks SEO capabilities and has drawbacks regarding sharing and propagation. This further diminishes the reasons to use weex. Moreover, we developed a page for a new business using H5, and leveraging isomorphic rendering and pre-caching capabilities, we achieved sub-second global first-screen load times, with business metrics meeting expectations. Therefore, we plan to migrate all existing legacy businesses to H5.
This is why I need to convert module code developed with Rax to React code, which brings us to this article. This article focuses on Rax version 0.6.8. Version 1.x introduced significant changes and is outside the scope of this discussion.
Desired Goals
For a Rax module, our desired outcomes after compilation are:
- Ability to run under
React - Extract styles into CSS files as much as possible, avoiding inline styles
Differences
From its inception, Rax was designed to enable weex development using React syntax, so initially, its syntax was almost identical to React. As Rax continued to iterate, it gradually diverged from React in some aspects, but the differences remained minor. Let’s compare the implementation code for the same module in Rax and React:
Rax module
import { Component, createElement, findDOMNode } from "rax";
import Text from "rax-text";
import View from "rax-view";

import styles from "./index.css";

class Kisnows extends Component {
  constructor(props) {
    super(props);
    this.state = {
      count: 1,
    };
  }

  handleClick = () => {
    this.setState({
      count: this.state.count + 1,
    });
  };

  render() {
    const { count } = this.state;
    const { name } = this.props;
    return (
      <View style={styles.wrap}>
        <Text style={[styles.name, { color: "red" }]}>{name}</Text>
        <View onClick={this.handleClick}>
          怕什么真理无穷,进一步有进一步的好。
        </View>
        <View>点击进步:{count}</View>
      </View>
    );
  }
}

export default Kisnows;
React module
import { Component } from "react";
import { findDOMNode } from "react-dom";

import styles from "./index.css";

class Kisnows extends Component {
  constructor(props) {
    super(props);
    this.state = {
      count: 1,
    };
  }

  handleClick = () => {
    this.setState({
      count: this.state.count + 1,
    });
  };

  render() {
    const { count } = this.state;
    const { name } = this.props;
    return (
      <div className="wrap">
        <h1 className="name" style={{ color: red }}>
          {name}
        </h1>
        <div onClick={this.handleClick}>
          怕什么真理无穷,进一步有进一步的好。
        </div>
        <div>点击进步:{count}</div>
      </div>
    );
  }
}

export default Kisnows;
Their differences are as follows:
Different Framework Imports
This is obvious:
Raxmodules importComponent,createElement, etc., fromrax, whileReactmodules import them fromreact.Another difference is
findDOMNode. InRax, it’s directly mounted on theraxmodule, whereasfindDOMNodeis obtained fromreact-dom.Different Base Components
Raxitself was created to writeweexusingReactsyntax. To ensure compatibility between iOS and Android,weexextracted some components and added an adaptation layer on top.To achieve cross-platform compatibility between Web and Native,
Raxwrapped another layer on top ofweex, leading to base components likeText,View, andImage, instead of the standard HTML tags such asspan,div, andimgused in regular web development.Different Style Usage
All style files in
RaxareCSS-in-JS. Even if later builds supported referencing external CSS files, they still remainedCSS-in-JS, with all styles being inline.Also, as seen in the code above,
Raxstarted supportingArraytypes for thestyleattribute at some point. This differs fromReact, which only supportsObjecttypes.However, if an
Arrayis passed, and JavaScript is a dynamic language, it becomes impossible to determine the type of elements within the array at compile time. This makes it difficult to ascertain which elements should be converted to classes and which should remain inline styles. A significant portion of our conversion effort was spent here.
How to Convert
Knowing their differences, we now have a direction for conversion.
The most common method for code transformation today is through babel plugins. This involves first converting the code into an AST (Abstract Syntax Tree), then transforming the AST, and finally converting the modified AST back into the desired code.
Developing babel plugins for code transformation is common in modern frontend development, so I won’t go into extensive detail. While I’ve used them before, I hadn’t developed one myself until now, so this was a learn-as-you-go experience.
Here are some documents and tools I referenced during my learning:
- babel-handbook — Covers almost everything needed to develop
babelplugins. - AST Explorer — An online syntax parsing website that allows you to validate your ideas in real-time.
Since the babel-handbook already provides a detailed explanation of how to develop babel plugins, this article will not reiterate basic concepts. It assumes readers continuing onward already possess this foundational knowledge.
Different Framework Imports
This is straightforward to solve. We need to convert:
import { Component, createElement, findDOMNode, PureComponent } from "rax";into code like this:
import { Component, createElement, PureComponent } from "react";
import { findDOMNode } from "react-dom";
Looks simple, right? Let’s open AST Explorer and input:
import { Component, createElement, findDOMNode, PureComponent } from "rax";which will yield the following result:
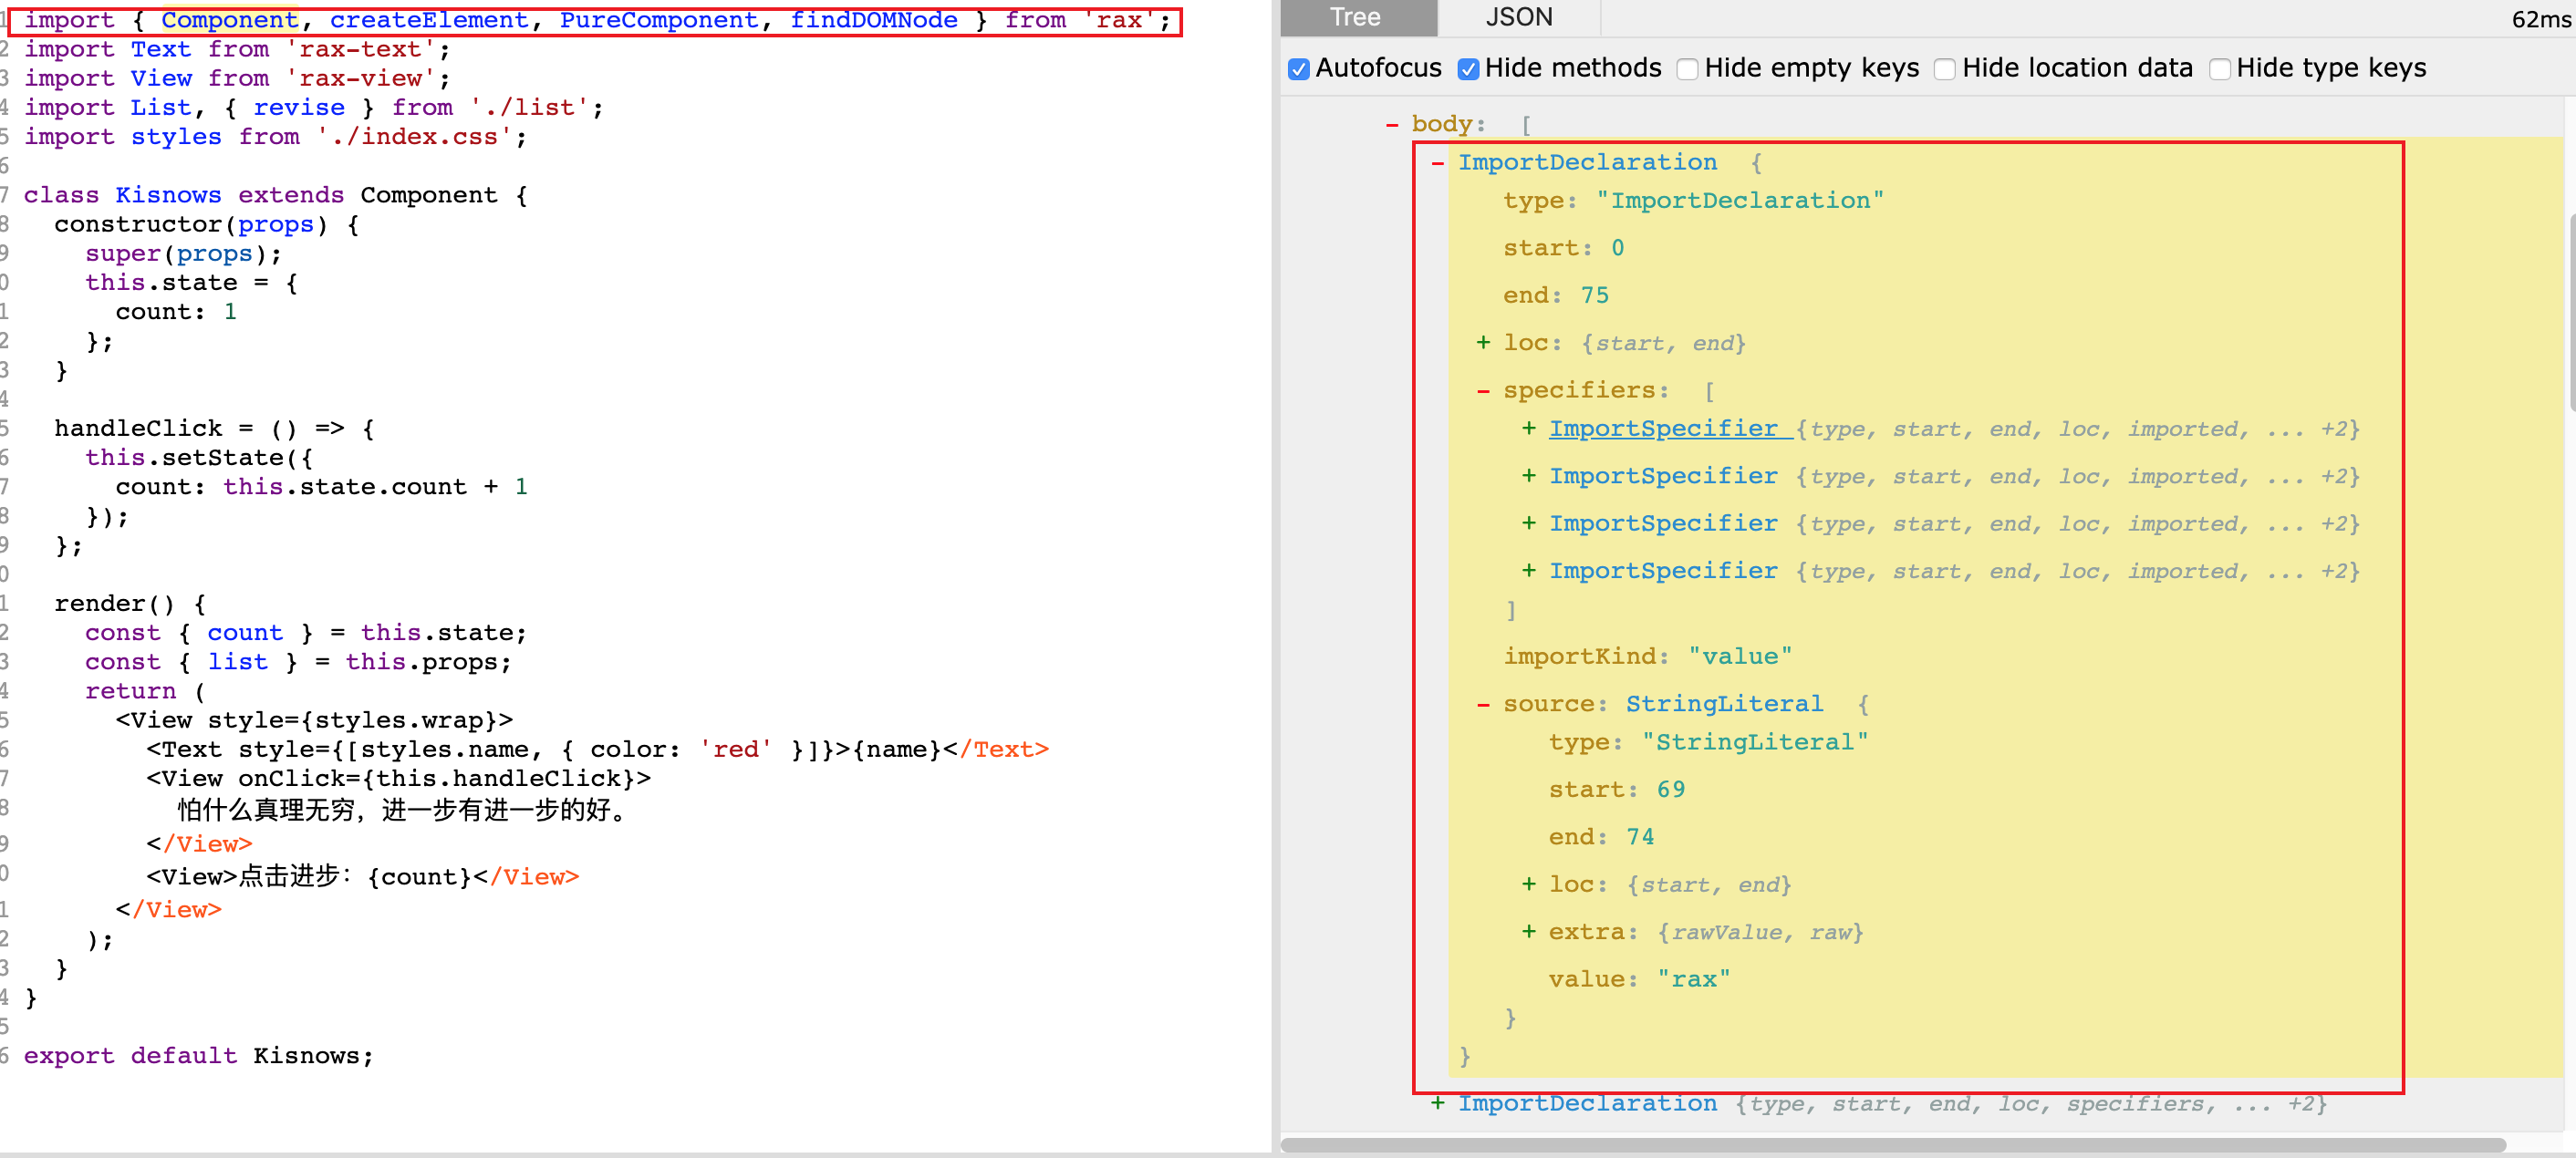
The import statement on the left side of the image, when converted to an AST, corresponds to the content within the red box on the right. The entire import statement is an ImportDeclaration, and each imported method like Component, createElement, etc., corresponds to an ImportSpecifier node. What we need to do is change ImportDeclaration.source.value to react, then extract findDOMNode from rax and import it from react-dom instead.
Specifically, in our visitor, we add traversal for ImportDeclaration type nodes:
visitor: {
  ImportDeclaration(path) {
    // 对于不符合我们要修改条件的节点,直接 return ,节省无用递归调用的时间
    if (
      path.node.source.value !== 'rax' ||
      path.node.source.type !== 'StringLiteral'
    ) {
      return;
    }
  }
}
Next, we differentiate which modules should be imported from react and which from react-dom. We then traverse the ImportSpecifier nodes to find the modules that meet our criteria, facilitating the generation of new import statements later.
 visitor: {
  ImportDeclaration(path) {
    if (
      path.node.source.value !== 'rax' ||
      path.node.source.type !== 'StringLiteral'
    ) {
      return;
    }
    const REACT_METHODS = [
      'createElement',
      'Component',
      'PureComponent',
      'PropTypes'
    ];
    const REACT_DOM_METHODS = ['findDOMNode'];
    const reactMethods = new Set();
    const reactDOMMethods = new Set();
    path.traverse({
      ImportSpecifier(importSpecifierPath) {
        importSpecifierPath.traverse({
          Identifier(identifierPath) {
            const methodName = identifierPath.node.name;
            // console.log('importSpecifierPath:Identifier:methodName', methodName)
            if (REACT_DOM_METHODS.includes(methodName)) {
              reactDOMMethods.add(methodName);
            } else if (REACT_METHODS.includes(methodName)) {
              reactMethods.add(methodName);
            } else {
              reactMethods.add(methodName);
              console.warn(
                `当前方法 ${methodName} 没有进行配置,直接从React上获取,如有问题请检查此方法。`
              );
            }
          }
        });
      }
    });
    },
}
The final step is to use the previously identified react and react-dom modules, leveraging babel’s template to regenerate the import statements and remove the original rax references.
visitor: {
ImportDeclaration(path) {
if (
path.node.source.value !== 'rax' ||
path.node.source.type !== 'StringLiteral'
) {
return;
}
const REACT_METHODS = [
'createElement',
'Component',
'PureComponent',
'PropTypes'
];
const REACT_DOM_METHODS = ['findDOMNode'];
const reactMethods = new Set();
const reactDOMMethods = new Set();
path.traverse({
ImportSpecifier(importSpecifierPath) {
importSpecifierPath.traverse({
Identifier(identifierPath) {
const methodName = identifierPath.node.name;
// console.log('importSpecifierPath:Identifier:methodName', methodName)
if (REACT_DOM_METHODS.includes(methodName)) {
reactDOMMethods.add(methodName);
} else if (REACT_METHODS.includes(methodName)) {
reactMethods.add(methodName);
} else {
reactMethods.add(methodName);
console.warn(
`当前方法 ${methodName} 没有进行配置,直接从React上获取,如有问题请检查此方法。`
);
}
}
});
}
});
// 使用前面的 reactMethods 和 reactDOMMethods ,来生成新的 import 语句。
const importReactTemplate = template.ast(`
import {${Array.from(reactMethods).join(',')} } from 'react';
`);
const importReactDOMTemplate = template.ast(`
import { ${Array.from(reactDOMMethods).join(
','
)} } from 'react-dom';
`);
// 插入到当前 path 前面
path.insertBefore(importReactTemplate);
path.insertBefore(importReactDOMTemplate);
// 删除当前 path ,也就是 rax 的 import 语句
path.remove();
},
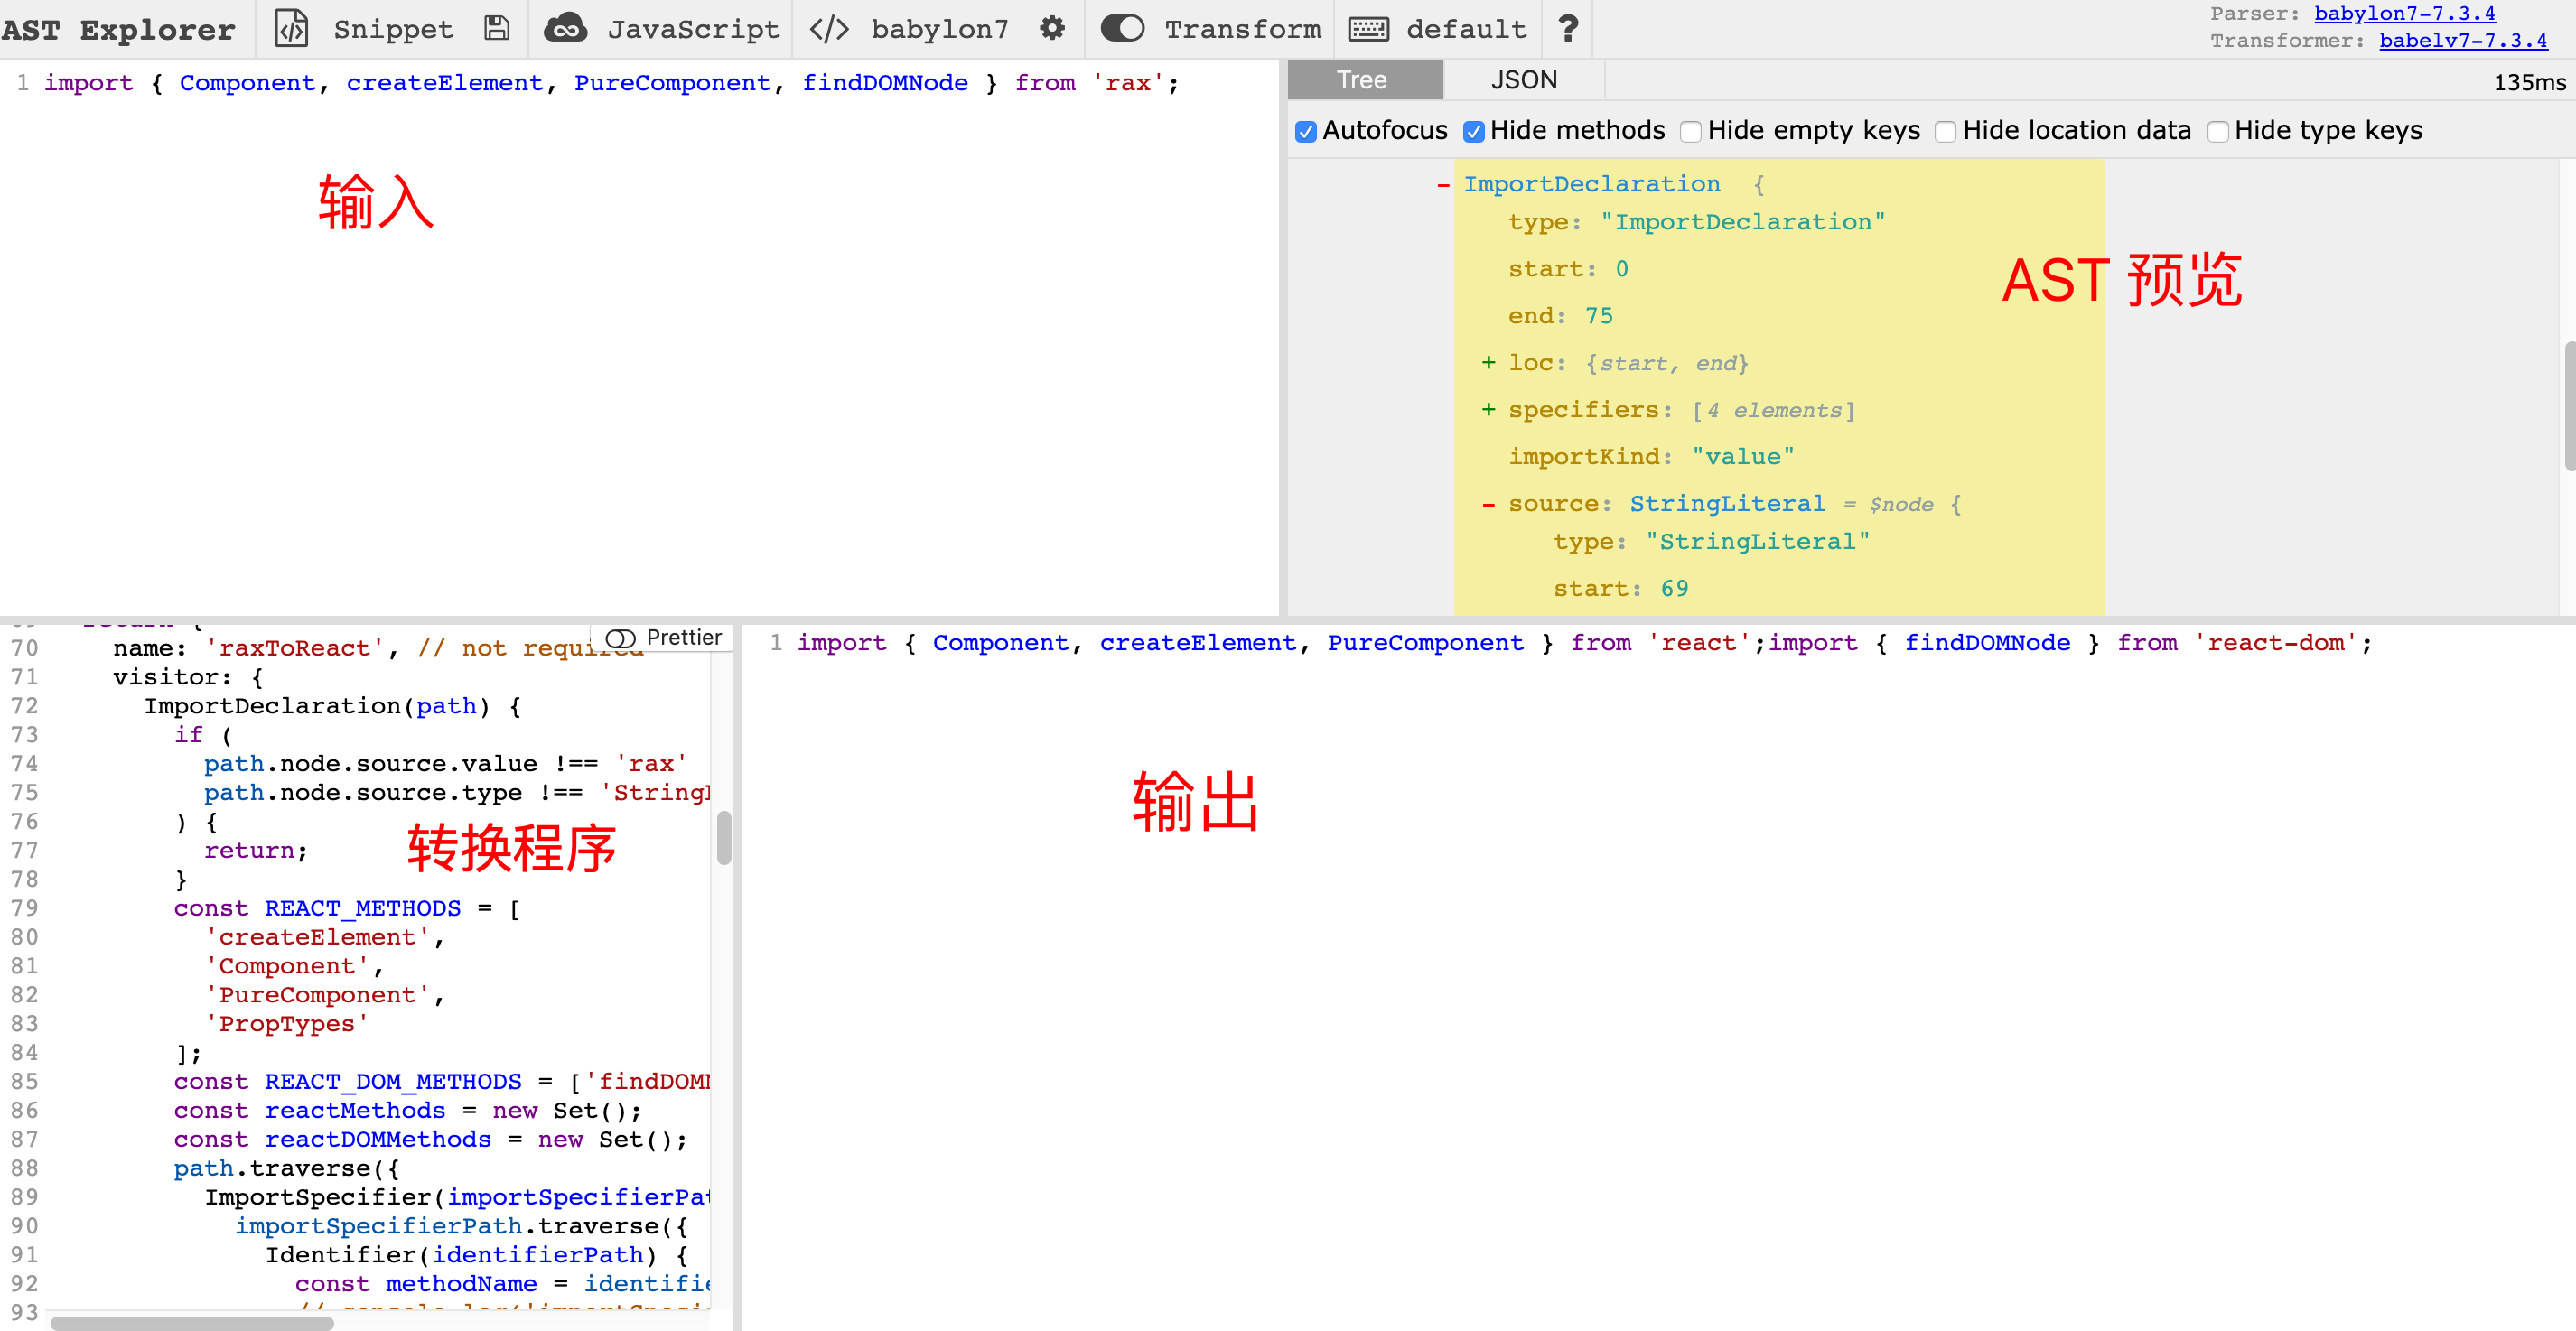
}This completes the conversion of imported modules, as shown:
Different Base Components
For base components, we can choose not to perform any processing. In Rax, each component is essentially a regular Rax component, and we can directly convert them to React code using babel as if they were other Rax components.
However, our converted code only needs to run on the Web. If you’ve looked at the code for base components, for example rax-text (rax-text), you’ll see a lot of code that only runs under weex, which we don’t need at all. Therefore, we can use a somewhat crude method to streamline these components: directly use Webpack’s alias to point references to rax-text and other base components to our own simplified components. For instance, we added the following components to our webpack alias:
  resolve: {
    modules: ['node_modules'],
    extensions: ['.json', '.js', '.jsx'],
    alias: {
      rax: 'react',
      'rax-image': require.resolve('./components/rax-image'),
      'rax-view': require.resolve('./components/rax-view'),
      'rax-scrollview': require.resolve('./components/scroll-view'),
      '@ali/ike-splayer': require.resolve('./components/ike-splayer'),
      '@ali/ike-image': require.resolve('./components/ike-image')
    },
  },
Components that hit an alias rule are directly replaced with our own streamlined components. This involves removing weex-specific checks and code that would only run under weex.
This part is quite simple, there’s not much to elaborate on.
Different Style Usage
This is where things get a bit more complicated. First, let’s look at our requirements:
Style Extraction
External CSS files should no longer be inlined onto every tag via
CSS-in-JS. Instead, they should be extracted into conventional CSS files and used with classes to achieve standard style layouts.styleSupportsArraySupport
Rax’s special syntax wherestylecan accept anArraytype.
Style Extraction
Let’s look at how external CSS is referenced and used in Rax:
import { Component, createElement, findDOMNode } from "rax";
import Text from "rax-text";
import View from "rax-view";

// 引入样式文件
import styles from "./index.css";

class Kisnows extends Component {
  constructor(props) {
    super(props);
    this.state = {
      count: 1,
    };
  }

  handleClick = () => {
    this.setState({
      count: this.state.count + 1,
    });
  };

  render() {
    const { count } = this.state;
    const { name } = this.props;
    return (
      // 使用样式文件
      <View style={styles.wrap}>
        <Text style={[styles.name, { color: "red" }]}>{name}</Text>
        <View onClick={this.handleClick}>
          怕什么真理无穷,进一步有进一步的好。
        </View>
        <View>点击进步:{count}</View>
      </View>
    );
  }
}

export default Kisnows;
The usage <View style={styles.wrap}> is almost identical to CSS Modules in the community, so we can use CSS Modules to solve this.
The idea is this: for external CSS properties assigned to the style attribute (i.e., styles imported from a CSS file, not directly defined in JS), we generate a unique string for them and combine them onto the className attribute. For CSS defined internally in JS, it continues to be assigned as an inline style to the style attribute.
In webpack’s CSS rule, introduce css-loader and enable CSS Modules functionality:
{
    test: /\.(css)$/,
    use: [
      {
        loader: require.resolve('css-loader'),
        options: {
          importLoaders: 2,
          modules: {
            mode: 'local',
            localIdentName: '[path][name]__[local]--[hash:base64:5]',
          },
          // sourceMap: !!DEV,
        },
      }
    ],
}
With this configuration, styles imported via import styles from './index.css' will be processed by css-loader. References like styles.wrap within it will be transformed into a calculated unique ID string, such as _3zyde4l1yATCOkgn-DBWEL, which can then be assigned to the class attribute.
As for how to place this ID onto className, we’ll discuss that together later. The converted effect is as follows:
Currently, two issues remain:
- Non-standard CSS file processing: To adapt for mobile in
Raxusingweex, CSS is written slightly differently from standard CSS; specifically,RaxCSS properties often lack units. However, the CSS we extract will definitely require units. - Style specificity issues: Previously, all styles were inline, and each style had the same specificity. Whether written directly in JS or imported from a CSS file, the final specificity was determined by the order of
Object.assignparameters when processing inline styles within JS. However, after extraction, this changes. External CSS applied via classes to elements has lower specificity than inline styles, which can lead to issues.
Non-standard CSS File Processing
Example of a Rax CSS file:
.wrap {
  width: 750;
}

.name {
  width: 750;
  height: 124;
  font-size: 24;
}
As you can see, properties like width and height lack units. These need to be converted to their corresponding units. This is quite simple to handle. postcss is a tool for post-processing CSS; autoprefix, which we frequently use, is a well-known postcss plugin. Here, we’ll also leverage its plugin capabilities to process CSS. The plugin code is as follows:
const postcss = require("postcss");
const _ = require("lodash");
// 定义所有需要添加单位的属性
const props = [
  "width",
  "height",
  "padding",
  "margin",
  "margin-top",
  "margin-bottom",
  "top",
  "bottom",
  "right",
  "left",
  "border",
  "box-shadow",
  "border-radius",
  "font-size",
];
/**
 * main function
 */
module.exports = postcss.plugin("realCss", function (options) {
  return function (css) {
    options = options || {};
    const reg = /(\d+)\b(?!%)/gm;
    css.walkDecls((decl) => {
      // 1. 遍历所有 css 属性,找到我们定义的需要添加单位的项
      if (
        _.find(props, (props) => {
          return decl.prop.includes(props);
        })
      ) {
        // 2. 简单粗暴,直接添加 px
        decl.value = decl.value.replace(reg, (a) => a + "px");
      }
      // 3. 给所有属性添加 !important ,提高优先级
      decl.value += "!important";
    });
  };
});
Accordingly, we add the postcss configuration to webpack’s CSS rule:
{
  loader: require.resolve('postcss-loader'),
  options: {
    plugins: [
      postcssPresetEnv(),
      // 我们自己的开发 postcss 插件, realCss
      realCss(),
      post2Rem({ remUnit: 100 }),
    ],
    sourceMap: !!DEV,
  },
},
Style Specificity Issues
Initially, I didn’t notice this issue, but during later testing, I found that some styles were consistently not applying. After investigation, I discovered it was due to style specificity. For example:
import { Component } from "rax";

class View extends Component {
  render() {
    let props = this.props;
    let styleProps = {
      ...styles.initial,
      ...props.style,
    };
    return <div {...props} style={styleProps} />;
  }
}

const styles = {
  initial: {
    border: "0 solid black",
    position: "relative",
    boxSizing: "border-box",
    display: "flex",
    flexDirection: "column",
    alignContent: "flex-start",
    flexShrink: 0,
  },
};

export default View;
The code above is for rax-view, and you can see it has an initial style directly inlined onto the element tag. If everything were developed with Rax and all styles were inline, then props.style (passed down externally via props) would have higher specificity than its own initial style styles.initial, which would be fine.
However, once we extract external CSS, and props.styles is essentially what we’re extracting, if it becomes an external CSS file, its specificity will always be lower than styles.initial. This will cause our styles to break.
I couldn’t think of a better way to increase the specificity of external CSS here, so I resorted to the crude method of adding !important to each external CSS property, as referenced in comment 3 of realCss above. It’s a bit of a hack, but it effectively solves the problem. Plus, it’s not hardcoded into the CSS, making it easy to remove later.
style Supports Array
Here, we’ll discuss this in conjunction with extracting external CSS properties and placing them on the class attribute. We need to handle the following four types of style attributes:
1`<View style={{color: red}}>`;
2`<View style={styles.wrap}>`;
3`<Text style={[styles.name, { color: 'red' }, {fontSize: 24}]}>{name}</Text>`;
4`<View style={sty}>`;
For these situations, our desired outcomes should be as follows:
- Remains unchanged, treated as a regular JS inline style.
<View style={{color: red}}>
2.  We assume `styles` are all imported from external CSS files, so `styles.wrap` needs to be replaced with a class string and assigned to the `class` attribute.
 ```js
const cls = "className";
return <View className={cls} />;- This situation is a combination of the previous two: for inline styles, they remain inlined on the
styleattribute; for externally referencedstyles, they are replaced with class strings and placed onclassName.
const cls = “className”; const style = Object.assign({}, { color: “red” }, { fontSize: 24 }); return
4. Requires looking up the type of the current variable. If it's an `Array`, process it according to the previous point; otherwise, treat it as an inline style and process it according to point 1.
With the desired outcomes in mind, the approach to solving the problem becomes relatively straightforward. What we need to do is evaluate the properties of existing `style` tags:
1. If it's an `Object`, corresponding to an `ObjectExpression` after AST parsing, then treat it directly as an inline style.
2. If it's a value read from `styles` (to simplify judgment, we assume `styles` are imported from external CSS), corresponding to a `MemberExpression` after AST parsing, then consider it a style imported from external CSS.
3. If it's an `Array`, corresponding to an `ArrayExpression` after AST parsing, iterate through its contents to find styles that need to be converted to class strings and inline styles. After processing, place them on the current element's `className` and `style` attributes.
4. Another case is when the value is another defined variable, corresponding to an `Identifier` after AST parsing. In this situation, we need to check if the value inside is an `Array`. If it is, process it according to the previous point; otherwise, treat it as an inline style.
Let's abstract the operations for the above cases:
1. Find tags with `style` attributes, then evaluate the `style`'s value, extracting inline CSS and styles to be converted into classes.
2. Reconstruct the `style` attribute and add the `className` attribute based on the results from the previous step.
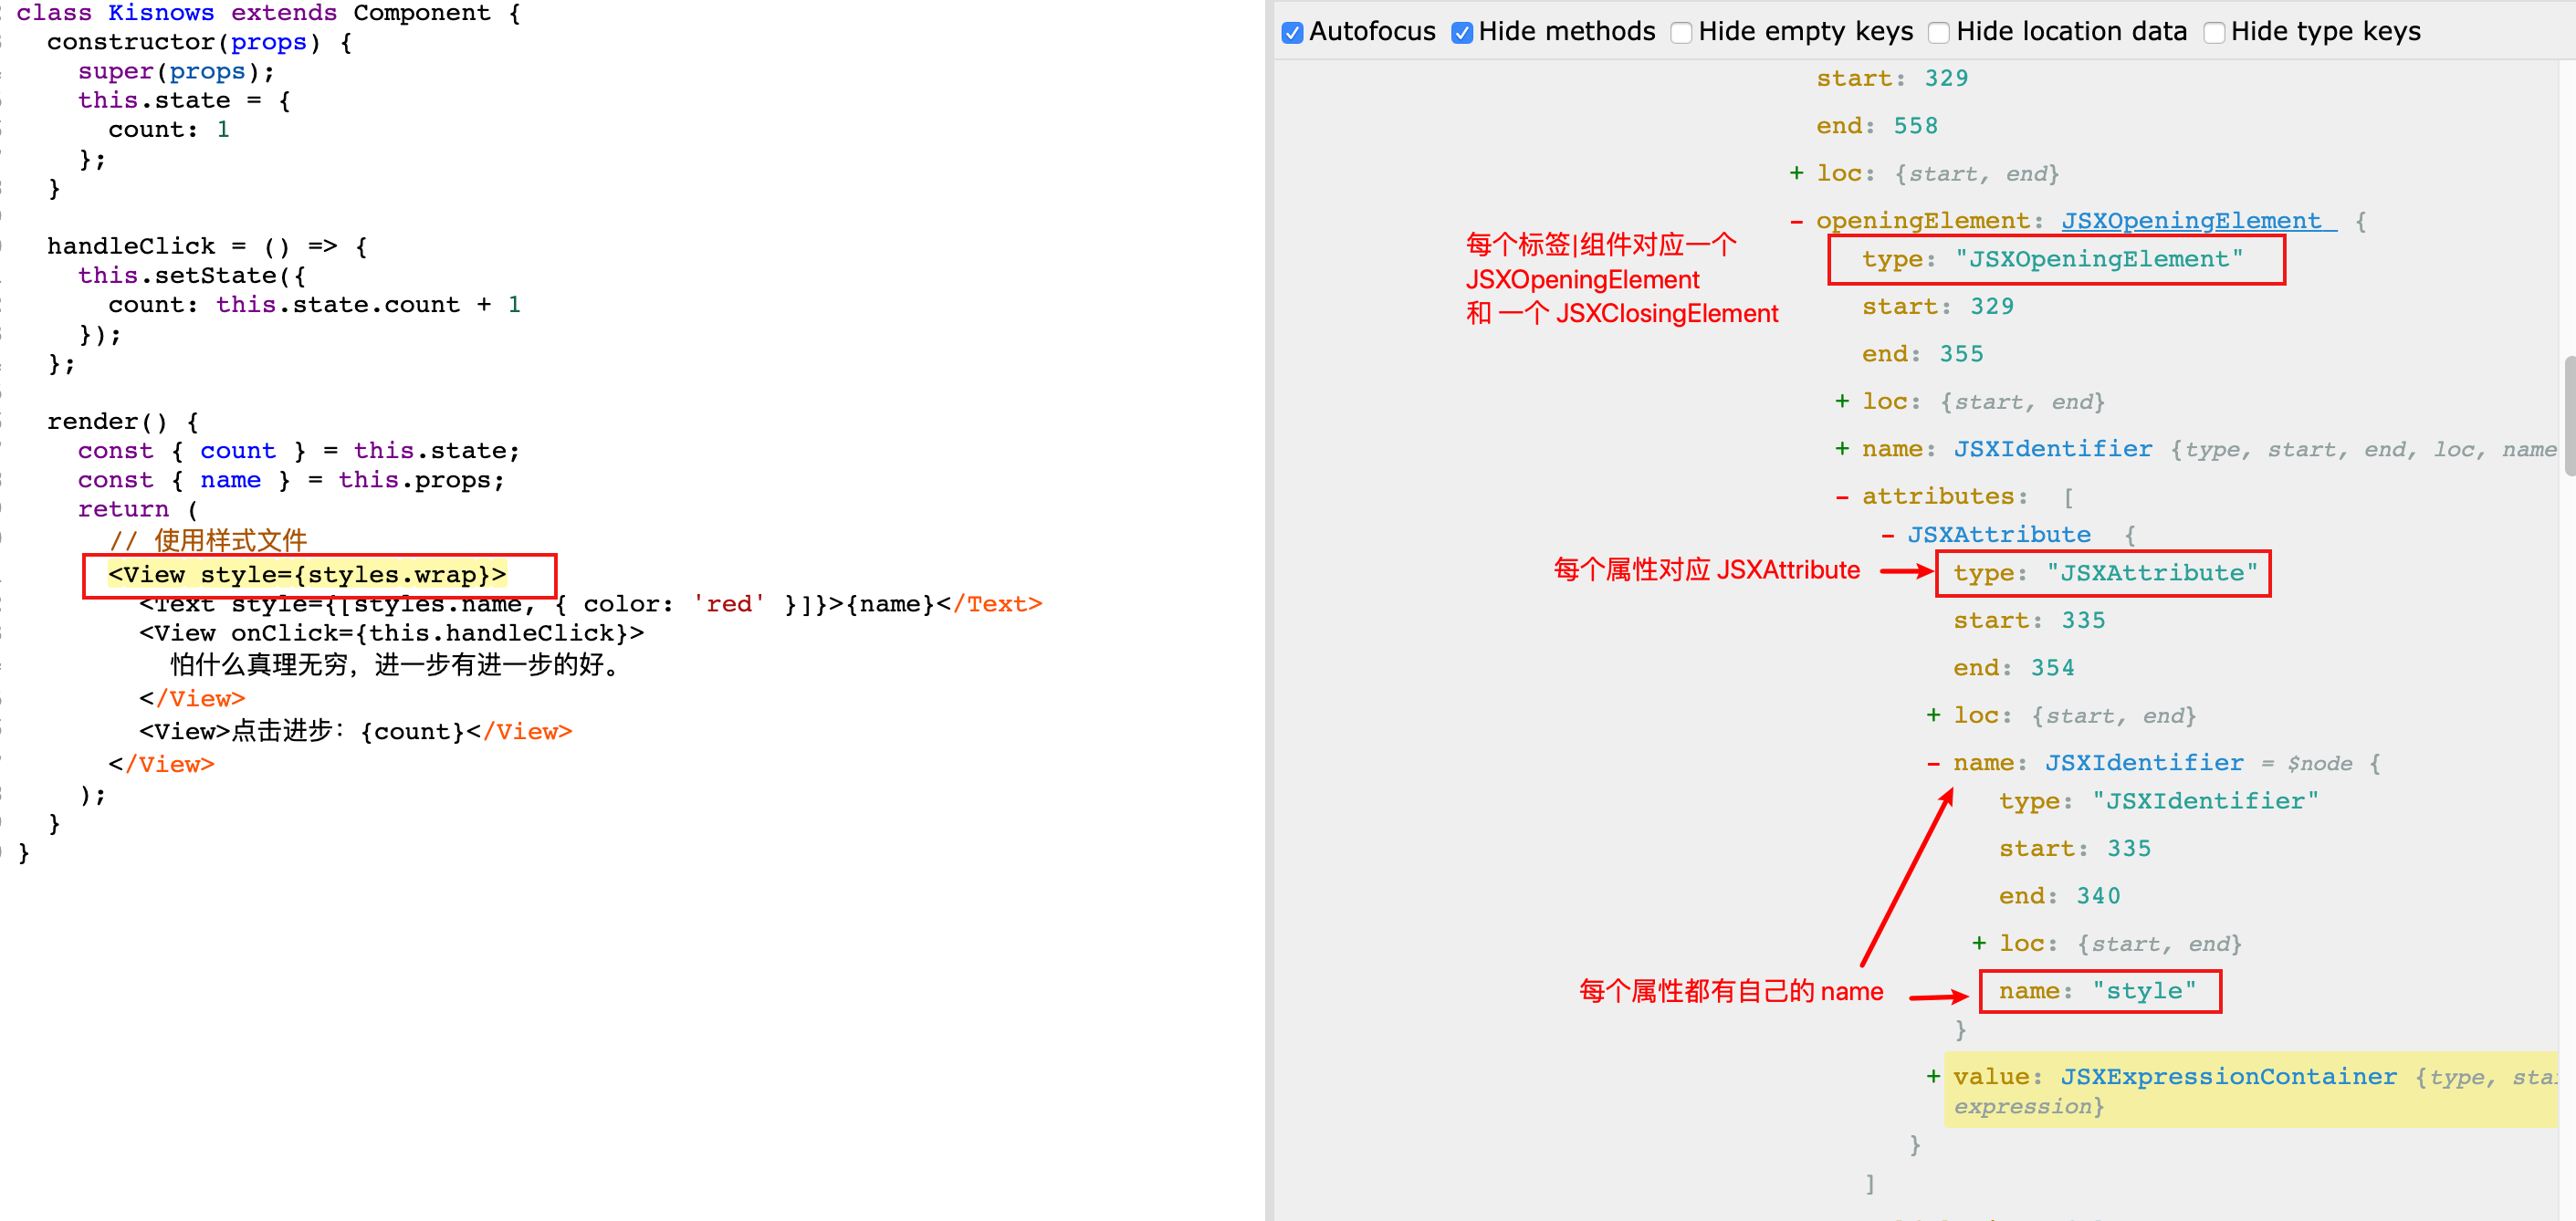
Let's check [https://astexplorer.net/](https://astexplorer.net/). Each element corresponds to a `JSXOpeningElement`. What we need to do is traverse `JSXOpeningElement`s and process each tag/component.
<!-- @import "./transform-rax-to-react/jsx-element.png" -->
Specific implementation logic:
Step one: Find inline CSS and classes that need conversion.
```js
JSXOpeningElement: {
enter(path) {
const node = path.node;
// 用来存放找到的内联 css
const styles = [];
// 用来存放被转换的 class
const classNames = [];
let newStyleAttr = null;
let newClassNameAttr = null;
let styleAttrPath = null;
path.traverse({
JSXAttribute(path) {
if (path.node.name.name !== 'style') return;
styleAttrPath = path;
path.traverse({
/**
* 从离元素最近的一个方法往下找,判断 style 的值是否是一个 Array,
* 仅限查找直接的变量,而非从对象上读取的。
* eg: style={[list, obj.arr]} ,则只查找 list 而不管 obj.arr
*/
Identifier(identifyPath) {
const name = identifyPath.node.name;
const parent = identifyPath.parent;
if (t.isMemberExpression(parent)) return false;
let isArray = false;
// 从当前 path 向上查找最近的一个方法
const par = identifyPath.findParent(p => {
if (t.isClassMethod(p) || t.isFunction(p)) {
// 从 render 方法里面往下找当前变量的定义,
p.traverse({
VariableDeclarator(path) {
if (
t.isArrayExpression(path.node.init) &&
path.node.id.name === name
) {
isArray = true;
}
}
});
}
});
if (isArray) {
// TODO: 如果是 Array ,则重新走一下后面的 ArrayExpression 的处理
// 创建当前作用域下的唯一变量
const arrayStyle = identifyPath.scope.generateUidIdentifier(
'arrayStyle'
);
// 生成新的变量定义语句,
// 如果是 Array ,那么认为里面每个元素都是内联样式,通过 Object.assign 把它们组合到一起
const preformArrayStyle = template.ast(`
const ${arrayStyle.name} = {}
${name}.forEach(sty => {
if (typeof sty === 'object') {
Object.assign(${arrayStyle.name}, sty)
}
})
`);
const jsxParent = identifyPath.findParent(p => {
if (
t.isReturnStatement(p) ||
t.isVariableDeclaration(p)
) {
return true;
}
});
// 在最近的 return 语句上插入生成的语句
jsxParent.insertBefore(preformArrayStyle);
// 把当前 style 的值赋值为我们新建的变量名 arrayStyle
identifyPath.node.name = arrayStyle.name;
}
},
/**
* 如果是变量上读取的属性,则认为是从外部 css 引入的样式。通过 css-loader 的处理后,
* 引入的值已经变成了一个包含所有 class 的 object,我们直接把它替换为 style 就好了
* */
MemberExpression(path) {
// function replaceStyle(path) {
// if (!path.parentPath.parent.name) return;
// path.parentPath.parent.name.name = 'className';
// }
replaceStyle(path);
},
/**
* 如果是 Array ,那么判断里面的值,规则按照上面两种处理方式处理。
* */
ArrayExpression(arrayExpressionPath) {
const eles = arrayExpressionPath.node.elements;
// 遍历 Array 里面的元素
eles.forEach(e => {
// MemberExpression 认为是处理后的 class string
if (t.isMemberExpression(e)) {
classNames.push(e);
} else if (t.isObjectExpression(e)) {
// 如果是 Object 表达式,认为是内联样式
styles.push(e);
} else if (t.isIdentifier(e)) {
// 如果是自定义变量,粗暴的认为是内联样式
styles.push(e);
} else if (t.isLogicalExpression(e)) {
// 由于不好判断最终返回的值类型, 所以直接假定返回的 string ,当作 className处理
classNames.push(e);
}
});
}
});
}
});
}This way, we can obtain the corresponding styles and classNames. The next step is to use them to reconstruct our style and className attributes. See the code:
if (!styles.length && !classNames.length) return;
/**
 * NOTE: 重建样式属性
 * 1. 删除 style 属性节点
 * 2. 用 styles 创建新的 style 节点
 * 3. 用 classNames 创建 className 节点
 */
// 尝试获取最近的一个 render 方法
const renderPath = getRenderPath(path);
// 获取最近的一个 return 方法
let returnPath = getReturnPath(path);

// NOTE: 生成唯一 id ,并插入合并 styles 的代码,
styleAttrPath.remove();
if (styles.length) {
  if (!renderPath) return false;
  // 为 style 值创建当前作用域唯一变量名
  const styleUid = path.scope.generateUidIdentifier("style_UID");

  function buildStyleScript(styleUidName, styles) {
    const test = t.callExpression(
      t.memberExpression(t.identifier("Object"), t.identifier("assign")),
      styles,
    );
    const newScript = t.variableDeclaration("const", [
      t.variableDeclarator(styleUidName, test),
    ]);
    return newScript;
  }

  const newScript = buildStyleScript(styleUid, styles);
  // 在 return 语句前添加当前 style_UID 的变量定义
  returnPath.insertBefore(newScript);
  newStyleAttr = t.jsxAttribute(
    t.jsxIdentifier("style"),
    getAttributeValue({ value: styleUid.name, literal: true }),
  );
  path.node.attributes.push(newStyleAttr);
}
if (classNames.length) {
  // 构建并插入 className 字段
  if (!renderPath) return;
  // 为  className 创建当前作用域唯一变量名
  const classNameUid = path.scope.generateUidIdentifier("className_UID");
  function buildClassNameScript(classNameUid, nodes) {
    // DONE: 构建一个 List ,用来创建 className 字符串
    const array = t.arrayExpression(nodes);
    const call = t.callExpression(
      t.memberExpression(array, t.identifier("join")),
      [t.stringLiteral(" ")],
    );
    const newScript = t.variableDeclaration("const", [
      t.variableDeclarator(classNameUid, call),
    ]);
    return newScript;
  }

  const newScript = buildClassNameScript(classNameUid, classNames);
  // 在 return 前插入当前 className_UID 的变量定义
  returnPath && returnPath.insertBefore(newScript);

  //  构建 className 属性节点
  newClassNameAttr = t.jsxAttribute(
    t.jsxIdentifier("className"),
    getAttributeValue({ value: classNameUid.name, literal: true }),
  );
  // 给当前 jsx 标签添加 className 属性节点
  path.node.attributes.push(newClassNameAttr);
}
With this processing, the entire Rax component can be compiled to React, involving tools like webpack and babel.
The final conversion effect was quite perfect, as not much was handled beyond style-related aspects. However, through this practical experience, I learned how to develop babel plugins, which gives me another approach for similar problems in the future. —>
Summary
Ultimately, developing towards standards and relying on the community offers a more promising future.