
Last week, I purchased a VPS to play around with from Bandwagonhost, a one-year plan for $19. It offers decent value for money. Here are the specs:
10 GB SSD RAID-10 Disk Space
256 MB RAM
500 GB Transfer
Gigabit port
Multiple locations
Here’s the purchase link.
After purchasing it, I first set up an SS (Shadowsocks) to bypass internet censorship. Then I thought about whether I should migrate my blog over as well, since an SS doesn’t use much traffic. So, I decided to go for it. After some searching and querying, I achieved my goal.
Here’s a simple record of the steps I took:
Client-side:
- Configure SSH
- Deploy Hexo locally
Server-side:
- Install required software a. Git b. Nginx
- For security and convenience, create a dedicated
gituser for Hexo deployment and grant appropriate permissions. - Configure SSH to establish a connection with the client.
- Configure Git hooks. This way, after deploying Hexo locally to the
gituser’s repository on the server, you won’t need to manually copy it to the website’s access folder.
#!/bin/bash
GIT_REPO=/home/git/hexo.git #git仓库
TMP_GIT_CLONE=/tmp/hexo
PUBLIC_WWW=/var/www/hexo #网站目录
rm -rf ${TMP_GIT_CLONE}
git clone ${GIT_REPO} ${TMP_GIT_CLONE}
rm -rf ${PUBLIC_WWW}/*
cp -rf ${TMP_GIT_CLONE}/* ${PUBLIC_WWW}- Configure Nginx and start the Nginx service.
Issues Encountered
- Accessing the VPS address directly showed “403 Forbidden”. I thought it was a permission issue and searched online for a long time without a solution. Finally, I discovered that the directory used for the website was empty.
- From issue 1, I deduced that Git hooks weren’t working at all. Since the website folder was consistently empty, I manually tested the Git hook commands. When executing
rm -rf ${PUBLIC_WWW}, the system reported “operation denied”. I realized it was a permission issue and granted thegituser permissions forwww/hexo, the directory used for the website. - SSH encountered problems after the server restarted. After extensive troubleshooting, I found it was also a permission issue and granted the
gituser 700 permissions for the.sshfile.
After entering www.kisnows.com, the access was successful! Haha, I was so happy. Moreover, the access speed from within China was slightly faster than before, even if only by a little.
I also thought about adding SSL; otherwise, it would be too outdated, especially since telecom hijacking has been severe recently. Since I didn’t want to incur significant costs, I decided to use the free SSL provided by Cloudflare. Although only the connection between the browser and Cloudflare is encrypted, something is better than nothing. So, I switched my DNS service from DNSPod to Cloudflare, and enabled HTTPS across the entire site using Cloudflare. At the same time, I redirected the top-level domain to the www subdomain. Here’s how:
Enabling HTTPS
Go to the Cloudflare management center, under ‘Crypto’. 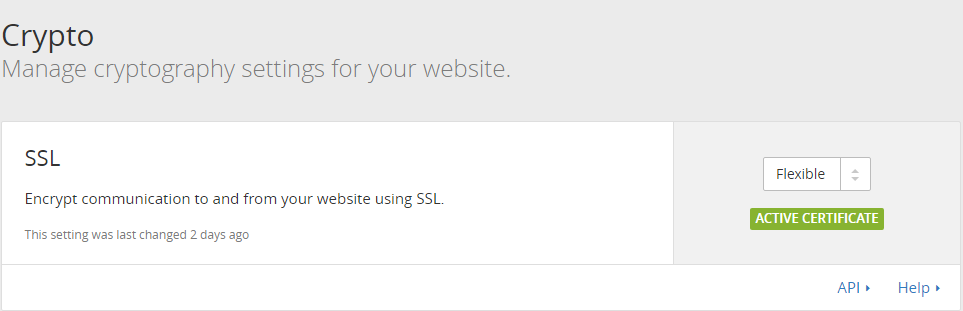
Forcing Non-HTTPS Access to Redirect to HTTPS
Located under the ‘Page Rules’ module. 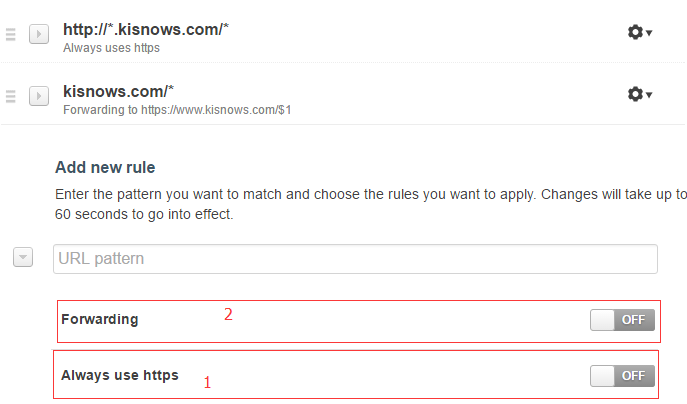 In image 1 above, select ‘Always Use HTTPS’, then apply the first rule as shown:
http://*.kisnows.com/*This way, all matching requests will use HTTPS.
Redirecting Top-Level Domain to www Subdomain
This also uses Page Rules, as shown in image 2 above. Select ‘Forwarding’, then fill in the match as follows: 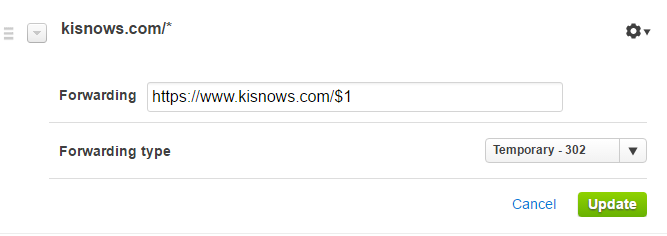 The
The $1 in ‘Forwarding’ corresponds to the element matched by * in kisnows.com/*.
With this, the two-day tinkering came to an end. The entire site has been migrated to the VPS, and HTTPS is enabled throughout. It truly is a case of ‘life never stops, neither does tinkering!’
Reference Articles: http://tiktoking.github.io/2016/01/26/hexo/ http://www.hansoncoder.com/2016/03/02/VPS%20building%20Hexo/ http://hejun.me/2015/01/05/deploy-hexo-on-cloud/