
背景
最近接手公司的一个移动端项目,是通过 Rax 作为 dsl 开发的,在发布的时候构建多分代码,在 APP 端编译为能够运行在 weex 上的代码,在 H5(跑在浏览器或者 webview 里面,不管什么技术我们统称 H5) 端使用降级的 weex
这一套开发体系,看起来很完美,一次开发,三端运行。但是真实在开发的时候,就不是这么完美了。由于毕竟是跑在 weex 上的,而不是浏览器。所以在开发方式上也很难直接从 web 端的开发方式平移过去,为了实现跨端运行,所以在样式上只实现了 Css 的子集, DOM API 也是如此,开发的时候,在浏览器里面调试的时候,一切正常,但是等发布到 APP 端用 weex 跑的时候又是各种问题,开发体验很不流畅。
当然,有人会说那是因为你对 weex 的 api 不了解,也对,一直以来对与这种自己搞一套非标准体系来实现各种魔法功能的东西都不怎么感兴趣 但是如果了解它的成本大于了它带来的收益,那么对我们来说,就没有必要做这件事情。
weex 相对于 H5 ,最大的优点在于交互性能上要更好一点。
而随着手机性能的提升,以及 webview 的不断优化,H5 的页面也越来越流畅了,尤其是纯展示形页面上。而且相较于 H5 ,weex 天生不具备 seo 能力,同时存在分享传播困难的缺点,这样看来,使用 weex 的理由就更少了。而且我们在一个新业务上使用 H5 开发了一个页面,借助同构以及提前缓存的能力,已经把首屏打开速度做到了全球秒开,而且业务数据也达到预期,所以我们打算把现有的存量业务都迁移到 H5 上。
这就是我为什么要把基于 Rax 开发的模块代码转换为 React 代码,也就有了本篇文章。 本文针对的 rax 版本是 0.6.8 ,1.x 的版本改动很大,不再本文讨论范围内。
期望的目标
对于一个 rax 模块,我们期望通过编译后:
- 能够在 react 下运行
- 尽可能提取样式到 css 文件里,不使用内联
不同之处
Rax 在开发之处,就是为了能够使用 React 的语法来开发 weex ,所以一开始在语法上和 React 几乎一致。后续随着 rax 的不断迭代,渐渐和 react 有了一些不一样的地方,但是差距不大。 我们对比一下同一个模块在 rax 和 react 的实现代码:
rax module
import { Component, createElement, findDOMNode } from "rax";
import Text from "rax-text";
import View from "rax-view";

import styles from "./index.css";

class Kisnows extends Component {
  constructor(props) {
    super(props);
    this.state = {
      count: 1,
    };
  }

  handleClick = () => {
    this.setState({
      count: this.state.count + 1,
    });
  };

  render() {
    const { count } = this.state;
    const { name } = this.props;
    return (
      <View style={styles.wrap}>
        <Text style={[styles.name, { color: "red" }]}>{name}</Text>
        <View onClick={this.handleClick}>
          怕什么真理无穷,进一步有进一步的好。
        </View>
        <View>点击进步:{count}</View>
      </View>
    );
  }
}

export default Kisnows;
react module
import { Component } from "react";
import { findDOMNode } from "react-dom";

import styles from "./index.css";

class Kisnows extends Component {
  constructor(props) {
    super(props);
    this.state = {
      count: 1,
    };
  }

  handleClick = () => {
    this.setState({
      count: this.state.count + 1,
    });
  };

  render() {
    const { count } = this.state;
    const { name } = this.props;
    return (
      <div className="wrap">
        <h1 className="name" style={{ color: red }}>
          {name}
        </h1>
        <div onClick={this.handleClick}>
          怕什么真理无穷,进一步有进一步的好。
        </div>
        <div>点击进步:{count}</div>
      </div>
    );
  }
}

export default Kisnows;
可以看到他们的区别如下:
引用的框架不同
这个当然是废话, rax 模块从
rax上引入Component,createElement等组件的, react 模块从react上引入。还有一点的不同的地方,就是
findDOMNode,rax上是直接挂载在rax模块上的,而findDOMNode从react-dom上获取。使用的基础元件不同
rax 本身是为了使用 react 语法去写 weex 的而诞生的,weex 为了兼容 ios 和 android ,所以在两个系统中抽了一些组件出来,在上面做了一层适配。
而 rax 为了跨 Web 和 Native 在 weex 之上又包了一层,于是就有了
Text,View,Image等基础元件,而无法使用普通 Web 开发使用的span,div,img等 html 标签。样式使用的不同
rax 下所有的样式文件都是 css in js ,即使后面通过构建等支持了引用外部 css 文件的样式,但依然还是 css in js ,所有的样式都是内联的。
同时从上面的代码可以看到, rax 不知道从哪个版本开始支持了
style属性传入Array类型。这一块和 react 下不一致,react 只支持Object类型。而一旦传入的是个 Array ,js 又是动态语言,所以无法在编译时判断里面元素的类型,就不好判断里面的元素哪些是要转换为 class ,哪些是直接内联的样式了。我们转换上很多的精力也是花在了这里。
如何转换
知道了二者的不同,那么如何转换我们也就有方向了。
对代码进行转换,现在最常见的方法就是基于 babel 的插件来进行,首先把代码转换成 ast 语法树,然后在此基础上对 ast 进行转换,最后把 ast 转换成我们需要的代码。
通过开发 babel 插件来转换代码,在现在的前端开发中很常见,我也不做过多介绍。但之前我也仅限于使用上, 没有自己开发过,这次也是现学现卖。
介绍几个学习中参考的文档和工具:
- babel-handbook 几乎涵盖开发 babel 插件需要的一切。
- AST Explorer 一个在线进行语法解析的网站,可以实时验证你的想法。
由于 babel-handbook 已经对如何开发 babel 插件讲解的很详细了,对一些基本概念本文就不再赘述,默认往下看的读者都已经有了这些知识基础。
引用的框架不同
这个很好解决,我们需要的就是把:
import { Component, createElement, findDOMNode, PureComponent } from "rax";这样的代码转换成:
import { Component, createElement, PureComponent } from "react";
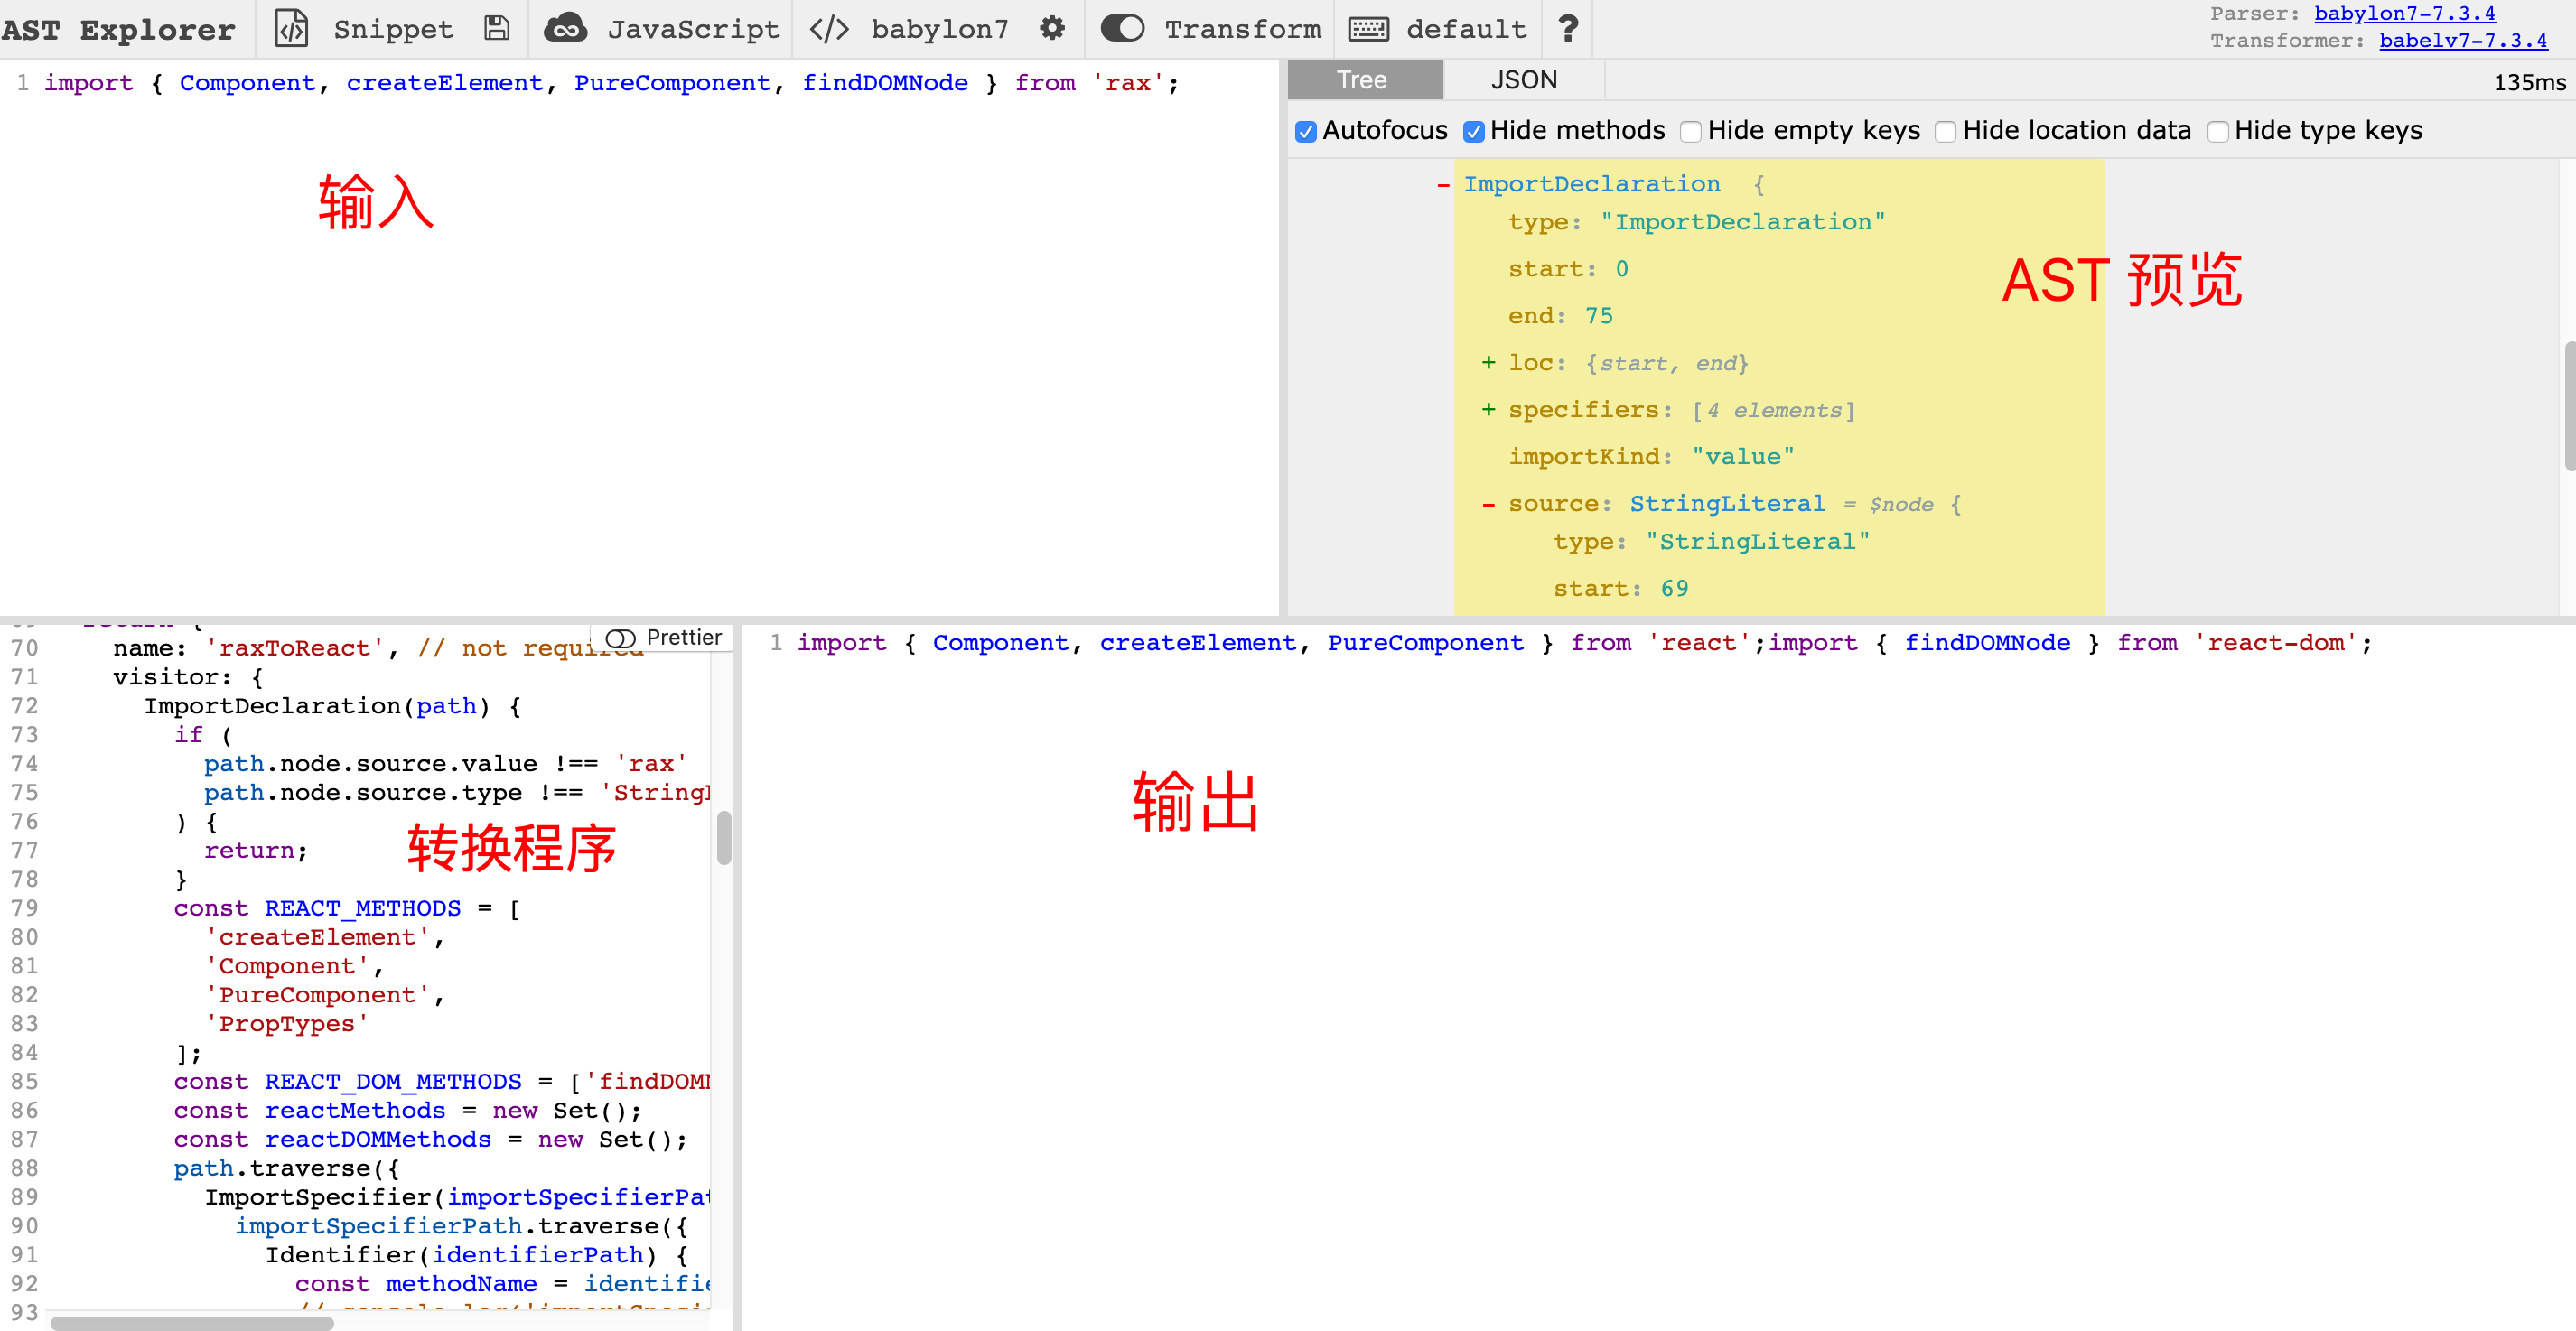
import { findDOMNode } from "react-dom";看起来很简单是吧,我们打开 AST Explorer ,在这上面输入
import { Component, createElement, findDOMNode, PureComponent } from "rax";会得到如下结果:
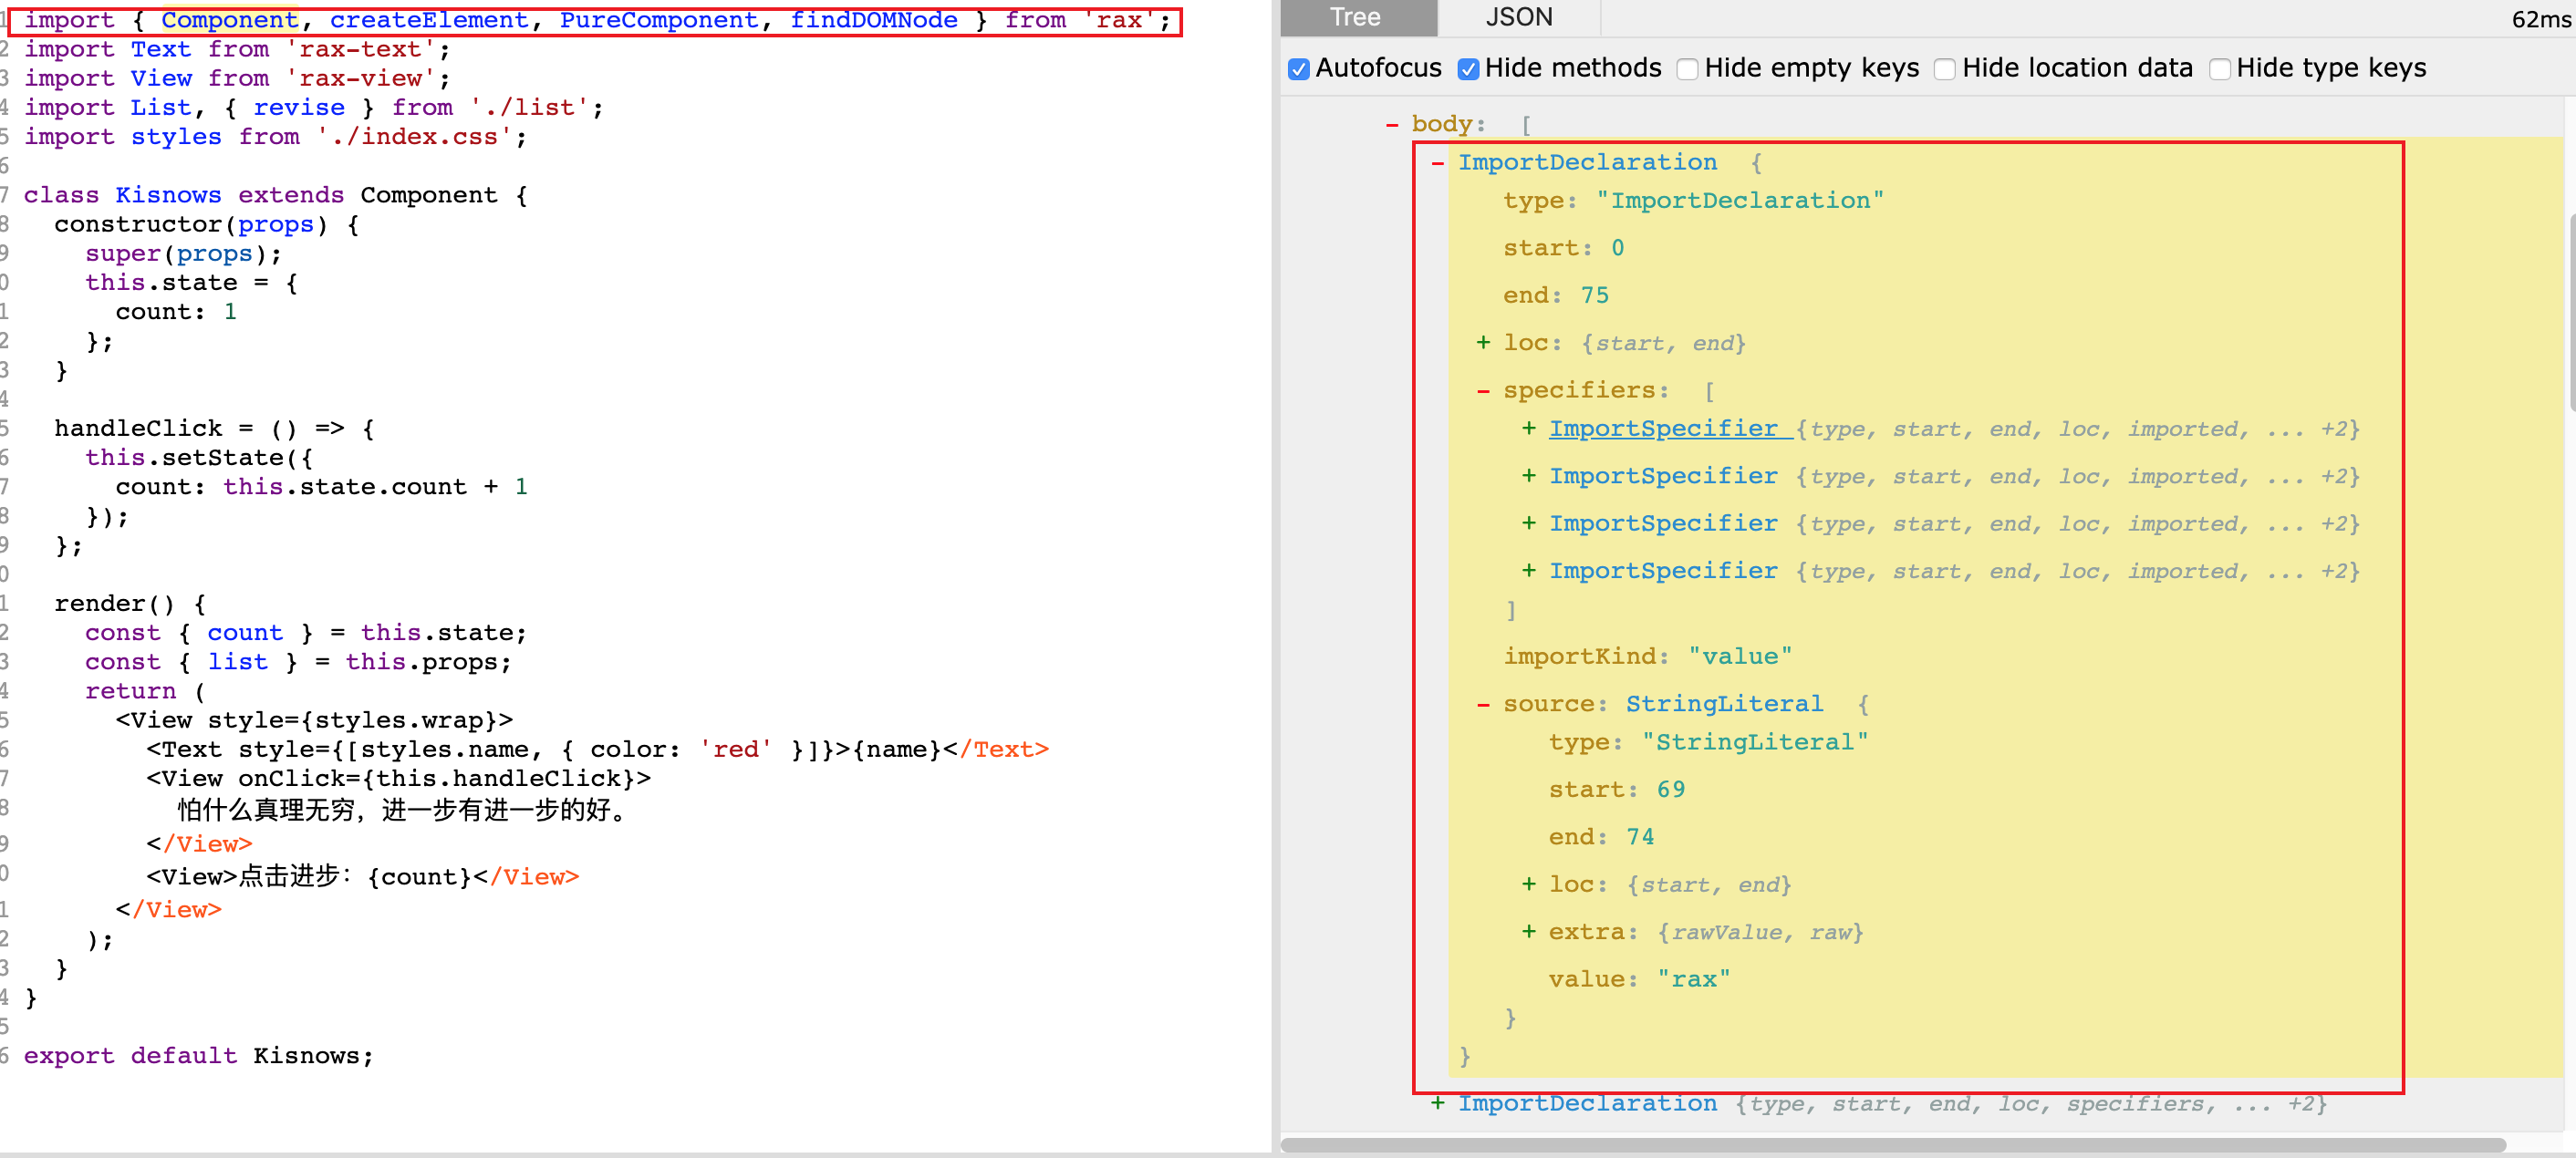
图中左侧的 import 语句转换成 ast 后就是图中右侧红框中内容。 整个 import 语句是一个 ImportDeclaration , 引入的每个方法 Component、 createElement 等对应一个 ImportSpecifier 节点。 我们要做的就是把 ImportDeclaration.source.value 改为 react, 然后把 findDOMNode 从 rax 中抽出来,改为从 react-dom 里面引入就好了。
具体到操作上,就是我们在 visitor 里面添加对 ImportDeclaration 类型节点的遍历:
visitor: {
  ImportDeclaration(path) {
    // 对于不符合我们要修改条件的节点,直接 return ,节省无用递归调用的时间
    if (
      path.node.source.value !== 'rax' ||
      path.node.source.type !== 'StringLiteral'
    ) {
      return;
    }
  }
}
然后区分哪些模块是要从 react 里面引用的,哪些是需要从 react-dom 里面引用的,再对 ImportSpecifier 节点进行遍历,找到里面符合我们符合条件的模块,方便后面生成新的 import 语句。
 visitor: {
  ImportDeclaration(path) {
    if (
      path.node.source.value !== 'rax' ||
      path.node.source.type !== 'StringLiteral'
    ) {
      return;
    }
    const REACT_METHODS = [
      'createElement',
      'Component',
      'PureComponent',
      'PropTypes'
    ];
    const REACT_DOM_METHODS = ['findDOMNode'];
    const reactMethods = new Set();
    const reactDOMMethods = new Set();
    path.traverse({
      ImportSpecifier(importSpecifierPath) {
        importSpecifierPath.traverse({
          Identifier(identifierPath) {
            const methodName = identifierPath.node.name;
            // console.log('importSpecifierPath:Identifier:methodName', methodName)
            if (REACT_DOM_METHODS.includes(methodName)) {
              reactDOMMethods.add(methodName);
            } else if (REACT_METHODS.includes(methodName)) {
              reactMethods.add(methodName);
            } else {
              reactMethods.add(methodName);
              console.warn(
                `当前方法 ${methodName} 没有进行配置,直接从React上获取,如有问题请检查此方法。`
              );
            }
          }
        });
      }
    });
    },
}
最后一步,用前面找到的 react 和 react-dom 的模块,借助 bable 提供 template 来重新生成 import 语句,并删除原有对 rax 的引用。
visitor: {
  ImportDeclaration(path) {
    if (
      path.node.source.value !== 'rax' ||
      path.node.source.type !== 'StringLiteral'
    ) {
      return;
    }
    const REACT_METHODS = [
      'createElement',
      'Component',
      'PureComponent',
      'PropTypes'
    ];
    const REACT_DOM_METHODS = ['findDOMNode'];
    const reactMethods = new Set();
    const reactDOMMethods = new Set();
    path.traverse({
      ImportSpecifier(importSpecifierPath) {
        importSpecifierPath.traverse({
          Identifier(identifierPath) {
            const methodName = identifierPath.node.name;
            // console.log('importSpecifierPath:Identifier:methodName', methodName)
            if (REACT_DOM_METHODS.includes(methodName)) {
              reactDOMMethods.add(methodName);
            } else if (REACT_METHODS.includes(methodName)) {
              reactMethods.add(methodName);
            } else {
              reactMethods.add(methodName);
              console.warn(
                `当前方法 ${methodName} 没有进行配置,直接从React上获取,如有问题请检查此方法。`
              );
            }
          }
        });
      }
    });
    // 使用前面的 reactMethods 和 reactDOMMethods ,来生成新的 import 语句。
    const importReactTemplate = template.ast(`
          import {${Array.from(reactMethods).join(',')} } from 'react';
        `);
    const importReactDOMTemplate = template.ast(`
          import { ${Array.from(reactDOMMethods).join(
            ','
          )}  } from 'react-dom';
        `);
    // 插入到当前 path 前面
    path.insertBefore(importReactTemplate);
    path.insertBefore(importReactDOMTemplate);
    // 删除当前 path ,也就是 rax 的 import 语句
    path.remove();
  },
}
这样,我们就完成了引入模块的转换,如图:
使用的基础元件不同
对于基础元件这一块,我们可以不做任何处理。因为 rax 下每个元件本身就是一个普通的 rax 组件,我们可以通过 babel 直接把他们当作其他 rax 组件转换为 react 的代码来使用。
但是我们转换后的代码只需要在 Web 上跑,而如果你看过基础元件比如用 rax-text 举例的代码:rax-text 。 里面有很多代码是仅在 weex 下运行的,我们根本不需要,所以可以通过一些粗暴的方法来精简这些元件。直接使用 Webpack 的 alias ,来把对 rax-text 等基础元件的引用直接指定到我们的自己的一个组件下,比如我们自己就把以下元件加入到了 webpack 的 alias 里:
  resolve: {
    modules: ['node_modules'],
    extensions: ['.json', '.js', '.jsx'],
    alias: {
      rax: 'react',
      'rax-image': require.resolve('./components/rax-image'),
      'rax-view': require.resolve('./components/rax-view'),
      'rax-scrollview': require.resolve('./components/scroll-view'),
      '@ali/ike-splayer': require.resolve('./components/ike-splayer'),
      '@ali/ike-image': require.resolve('./components/ike-image')
    },
  },
对于命中了 alias 规则的元件,直接替换为我们自己精简的组件。删除里面的对 weex 的判断,以及仅仅会在 weex 下运行的代码。
这一块很简单,没什么好说的。
样式使用的不同
这里是处理起来比较麻烦的地方,首先看看我们诉求:
样式提取
外部引入的 css 文件,不再通过 css in js 的方式内联到每一个标签上,而是提取为常规 css 文件,并配合 class 来实现常规的样式布局方式
style 支持 Array
支持 rax 的特殊语法,即 style 可以传入一个 Array 类型
样式提取
我们看一下 rax 下引用和使用外部 css 的方式:
import { Component, createElement, findDOMNode } from "rax";
import Text from "rax-text";
import View from "rax-view";

// 引入样式文件
import styles from "./index.css";

class Kisnows extends Component {
  constructor(props) {
    super(props);
    this.state = {
      count: 1,
    };
  }

  handleClick = () => {
    this.setState({
      count: this.state.count + 1,
    });
  };

  render() {
    const { count } = this.state;
    const { name } = this.props;
    return (
      // 使用样式文件
      <View style={styles.wrap}>
        <Text style={[styles.name, { color: "red" }]}>{name}</Text>
        <View onClick={this.handleClick}>
          怕什么真理无穷,进一步有进一步的好。
        </View>
        <View>点击进步:{count}</View>
      </View>
    );
  }
}

export default Kisnows;
<View style={styles.wrap}> 这种使用方式和社区的 css modules 几乎一致,那我们就可以用 css module 来解决这件事情。
思路是这样的,对于赋值到 style 属性上的外部 css 属性(即从 css 文件里面引入,而非直接 js 里面定义的样式),我们给它生成一个唯一字符串,然后组合起来放到 className 属性上。对于 js 内部定义的 css ,继续作为内联样式赋值到 style 属性上。
在 webpack 的 css rule 里面引入 css-loader,然后开启 css module 功能:
{
    test: /\.(css)$/,
    use: [
      {
        loader: require.resolve('css-loader'),
        options: {
          importLoaders: 2,
          modules: {
            mode: 'local',
            localIdentName: '[path][name]__[local]--[hash:base64:5]',
          },
          // sourceMap: !!DEV,
        },
      }
    ],
}
这样配置了的话,通过 import styles from './index.css' 引入的 styles 就会被 css-loader 处理,并且里面对类似 styles.wrap 的引入,就会变成 _3zyde4l1yATCOkgn-DBWEL 这样的计算出来的唯一 id 字符串,然后赋值到 class 属性上就好了。
至于如何把这个 id 放到 className 上,我们放到后面一起说。 转换后的效果如下:
目前还面临两个问题:
- 非标准 css 文件处理 rax 下使用 weex 为了做移动端适配,css 写起来和普通的 css 有一点区别,也就是 rax 的 css 属性都是没有单位的。而我们提取出来的 css 肯定是需要单位才行的;
- 样式优先级问题 以前所有的样式都是内联的,每个样式的优先级也都是一样的,无论是直接写在 js 里面的还是从 css 文件里面引入的,最终会在 js 内部根据处理内联 styles 的 Object.assign 入參的顺序决定最终优先级。但是我们提取出来以后就不一样了,外链的 css 通过 class 作用与元素上,它的优先级是低于内联样式的,这样就会导致
非标准 css 文件处理
rax 下 css 文件样例:
.wrap {
  width: 750;
}

.name {
  width: 750;
  height: 124;
  font-size: 24;
}
可以看到宽高之类属性都是没有单位的,这里需要处理成对应的单位。处理起来也很简单,postcss 是一个用来对 css 做后处理的工具,我们经常使用的 autoprefix 就是 postcss 一个有名的插件。这里我们也借助它的插件能力来处理 css, 插件代码如下:
const postcss = require("postcss");
const _ = require("lodash");
// 定义所有需要添加单位的属性
const props = [
  "width",
  "height",
  "padding",
  "margin",
  "margin-top",
  "margin-bottom",
  "top",
  "bottom",
  "right",
  "left",
  "border",
  "box-shadow",
  "border-radius",
  "font-size",
];
/**
 * main function
 */
module.exports = postcss.plugin("realCss", function (options) {
  return function (css) {
    options = options || {};
    const reg = /(\d+)\b(?!%)/gm;
    css.walkDecls((decl) => {
      // 1. 遍历所有 css 属性,找到我们定义的需要添加单位的项
      if (
        _.find(props, (props) => {
          return decl.prop.includes(props);
        })
      ) {
        // 2. 简单粗暴,直接添加 px
        decl.value = decl.value.replace(reg, (a) => a + "px");
      }
      // 3. 给所有属性添加 !important ,提高优先级
      decl.value += "!important";
    });
  };
});
相应的我们在 webpack 的 css rule 里面加上 postcss 的配置:
{
  loader: require.resolve('postcss-loader'),
  options: {
    plugins: [
      postcssPresetEnv(),
      // 我们自己的开发 postcss 插件, realCss
      realCss(),
      post2Rem({ remUnit: 100 }),
    ],
    sourceMap: !!DEV,
  },
},
样式优先级问题
一开始还没注意到这个问题,后来再测试的时候才发现有的样式总是不生效,排查后才发现原来是因为样式优先级的问题。 举例:
import { Component } from "rax";
class View extends Component {
render() {
let props = this.props;
let styleProps = {
...styles.initial,
...props.style,
};
return <div {...props} style={styleProps} />;
}
}
const styles = {
initial: {
border: "0 solid black",
position: "relative",
boxSizing: "border-box",
display: "flex",
flexDirection: "column",
alignContent: "flex-start",
flexShrink: 0,
},
};
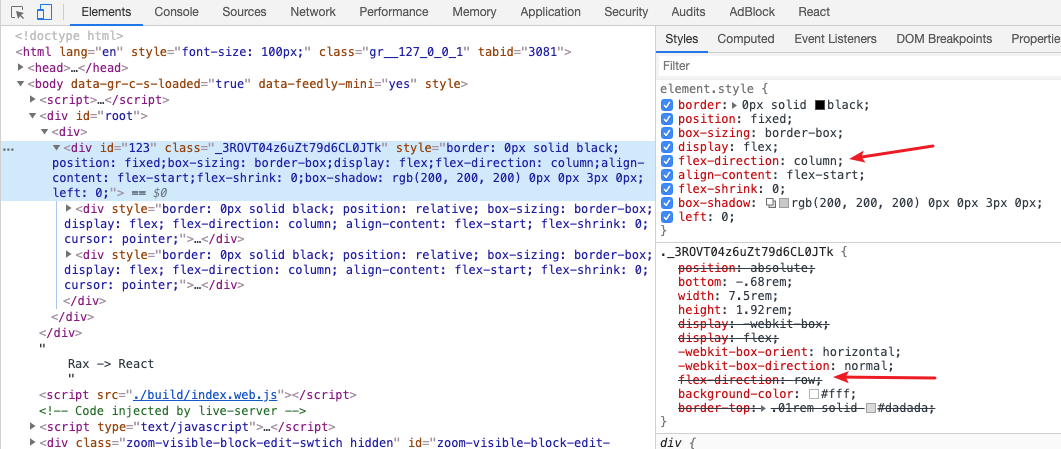
export default View;上面是 rax-view 的代码,可以看到它有一个初始化的样式,直接内联到了元素标签上。如果都是用 rax 开发,所有样式内联,那么外部通过 props 传下来的样式 props.style 的优先级是高于它自己的初始化样式 styles.initial ,这样是没有问题的。
一旦我们把外部的 css 提取出去,那么这里的 props.styles 也基本就是我们要提取出来的东西,这里的一旦提取为外联 css 文件,那么它的优先级就会永远低于 styles.initial , 这样我们的样式就会出错。
这里我没有想到什么好的办法来提升外联 css 的优先级,所以直接粗暴的给每个外联 css 的属性添加了 !important ,参考上面 realCss 的注释 3 。方法搓了一点,但是很能解决问题。而且不是硬编码到 css 里,后续去掉也很简单。
style 支持 Array
这里我们跟着上面提取外联 css 的属性并放到 class 属性上一起说。 我们要处理的 style 标签有如下四种:
1`<View style={{color: red}}>`;
2`<View style={styles.wrap}>`;
3`<Text style={[styles.name, { color: 'red' }, {fontSize: 24}]}>{name}</Text>`;
4`<View style={sty}>`;
对于这三种情况我们期望的结果应该是这样的:
保持不变,就是一个普通的 js 内联样式
<View style={{color: red}}>我们认为 styles 都是从外部 css 文件引入的,所以需要替换 styles.wrap 为 class 字符串,并赋值到 class 属性上
const cls = "className";
return <View className={cls} />;
这种情况是前面两种的组合,对于内联样式,继续内联到 style 属性上,对于外部引用的 styles ,替换为 class 字符串放到 className 上
const cls = "className";
const style = Object.assign({}, { color: "red" }, { fontSize: 24 });
return <View className={cls} style={style} />;
需要向上查找当前变量的类型,如果是 Array,那就参照上一条处理,否则认为是内联样式,按照 1 处理。
有了期望的结果,那解决问题的思路也就比较容易了。我们要做的就是对现有 style 标签的属性做判断:
- 如果是 object ,对应 ast 解析后的 ObjectExpression ,那么直接当作内联样式处理
- 如果是一个从 styles (为了简化判断,我们默认 styles 是从外部 css 引入的)上读值,对应 ast 解析后的 MemberExpression, 认为是从外部 css 引入的样式
- 如果是一个 Array ,对应 ast 解析后的 ArrayExpression ,把里面的东西遍历一边,找到要转换成 class 字符串的需要内联的样式,经过处理后,再放到当前元素的 className 属性和 style 属性上
- 还有一种是值是另外一个定义的变量,也就是 ast 解析后的 Identifier ,这种需要判断里面的值是不是 Array ,是的话按照上一条处理,否则认为是内联样式
对上面三种情况的操作抽象一下:
- 找到有 style 元素的标签,然后判断 style 的值,提取处理里面要内联的 css 和要转换为 class 的样式,
- 根据上一步的结果重建 style 属性,并添加 className 属性
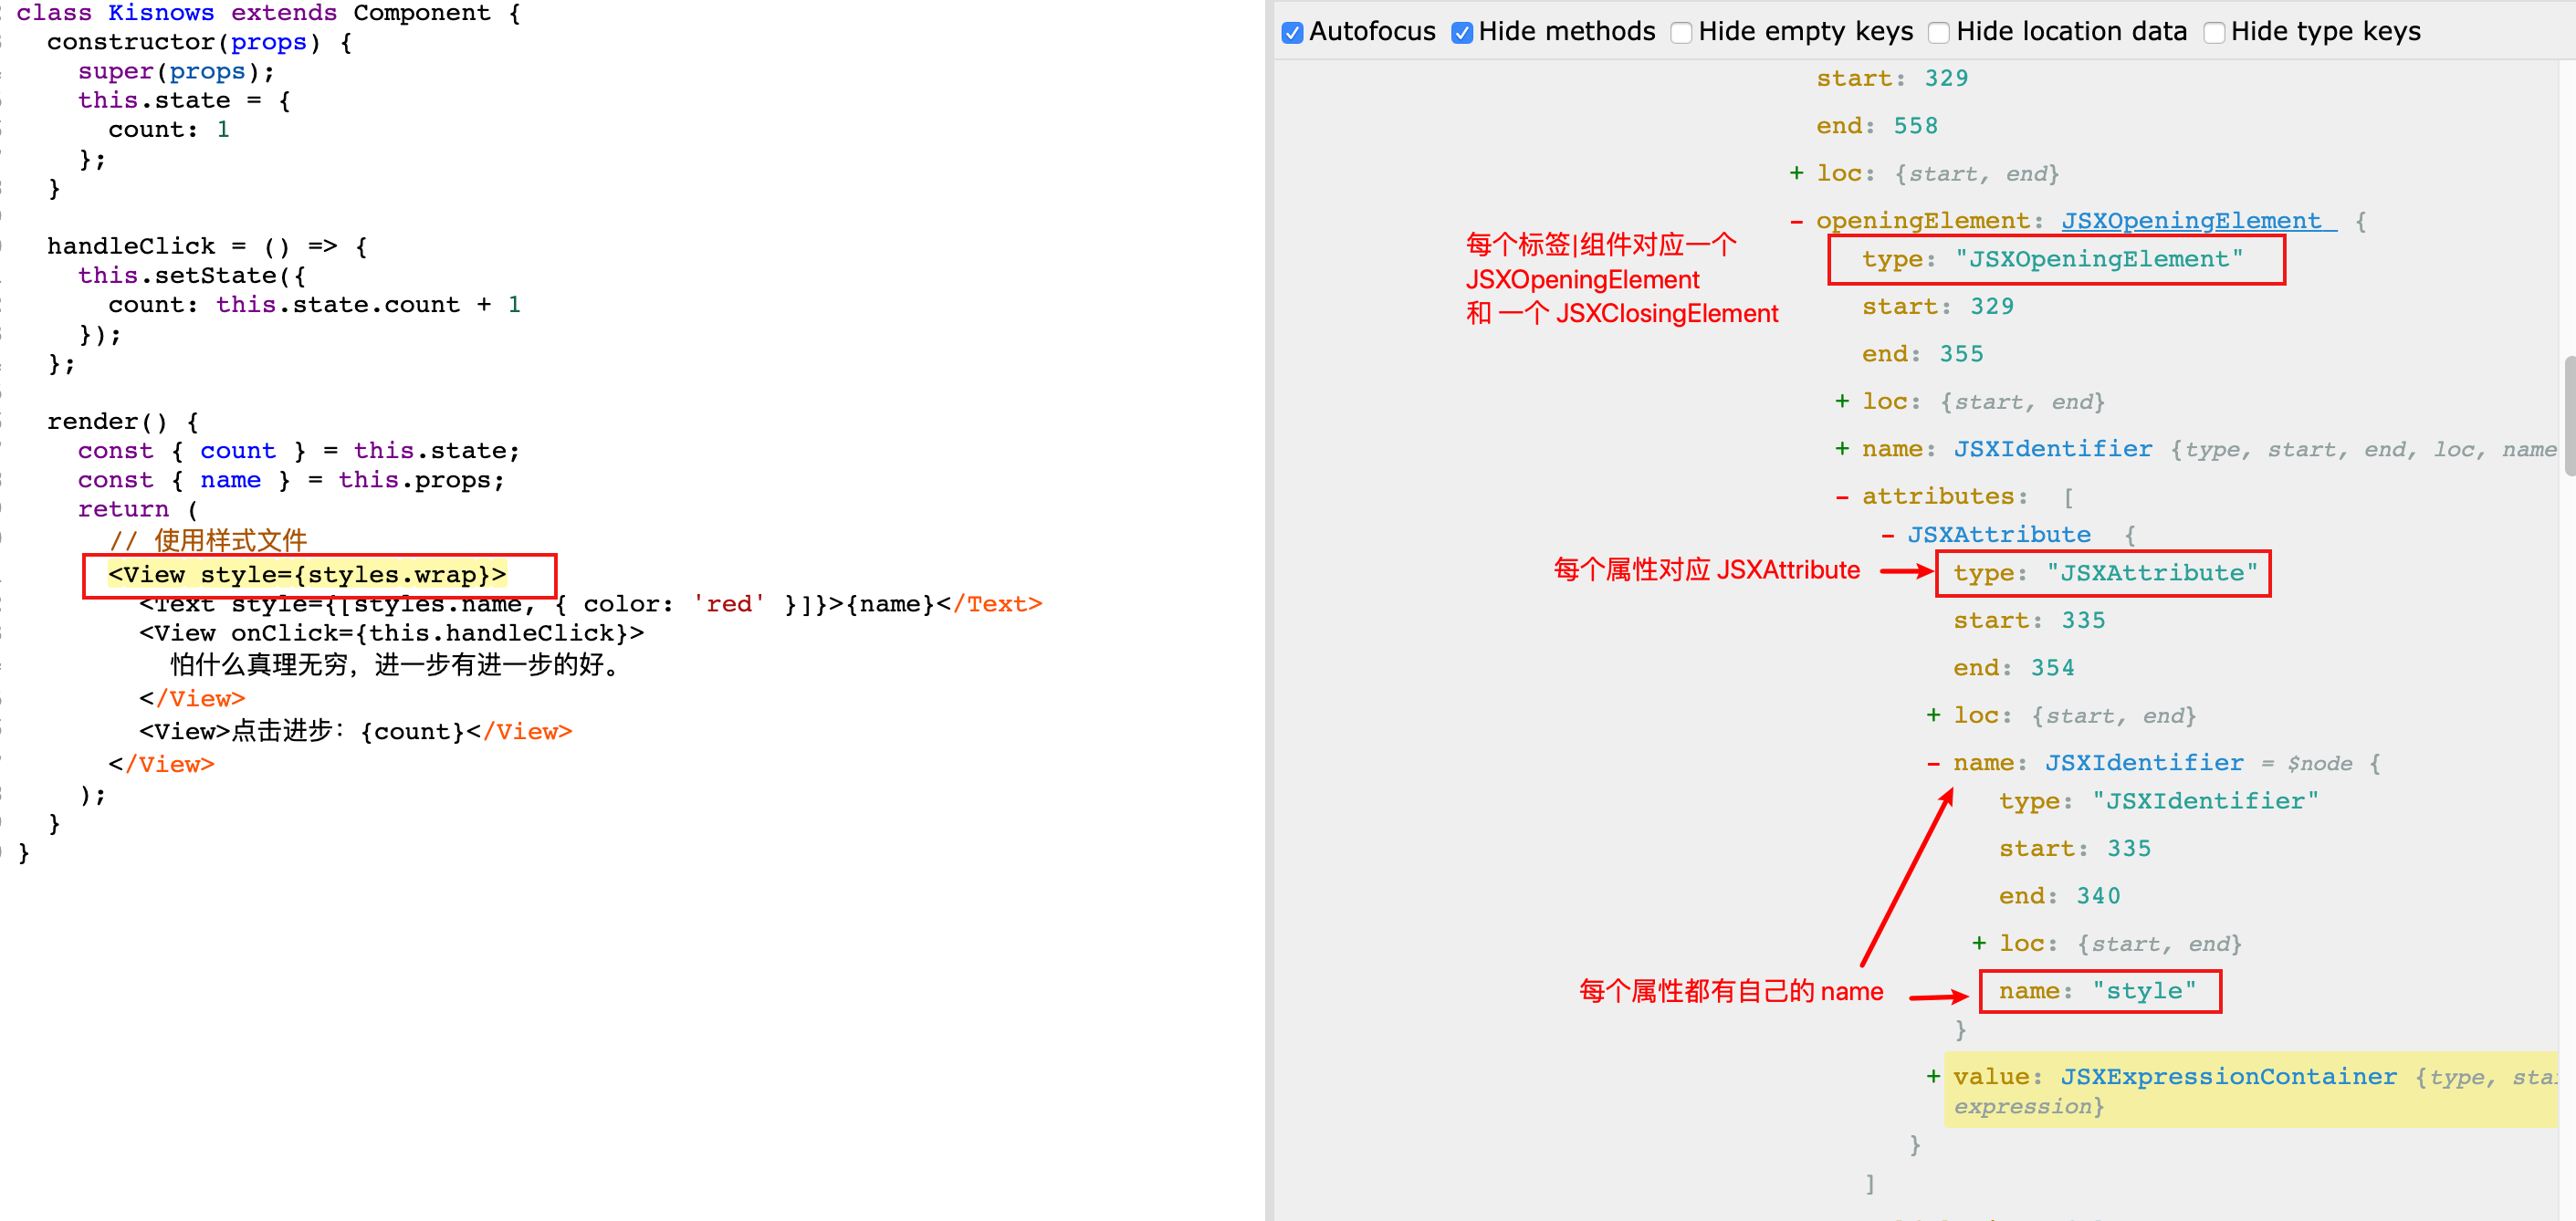
打开 https://astexplorer.net/ 看一下,每个元素对应的都是一个 JSXOpeningElement ,我们要做的就是遍历 JSXOpeningElement ,然后对每个标签|组件做处理。
具体实现逻辑:
第一步:找内联 css 和需要转换的 class
      JSXOpeningElement: {
        enter(path) {
          const node = path.node;
          // 用来存放找到的内联 css
          const styles = [];
          // 用来存放被转换的 class
          const classNames = [];
          let newStyleAttr = null;
          let newClassNameAttr = null;
          let styleAttrPath = null;

          path.traverse({
            JSXAttribute(path) {
              if (path.node.name.name !== 'style') return;
              styleAttrPath = path;
              path.traverse({
                /**
                 * 从离元素最近的一个方法往下找,判断 style 的值是否是一个 Array,
                 * 仅限查找直接的变量,而非从对象上读取的。
                 * eg: style={[list, obj.arr]} ,则只查找 list 而不管 obj.arr
                 */
                Identifier(identifyPath) {
                  const name = identifyPath.node.name;
                  const parent = identifyPath.parent;
                  if (t.isMemberExpression(parent)) return false;
                  let isArray = false;
                  // 从当前 path 向上查找最近的一个方法
                  const par = identifyPath.findParent(p => {
                    if (t.isClassMethod(p) || t.isFunction(p)) {
                      // 从 render  方法里面往下找当前变量的定义,
                      p.traverse({
                        VariableDeclarator(path) {
                          if (
                            t.isArrayExpression(path.node.init) &&
                            path.node.id.name === name
                          ) {
                            isArray = true;
                          }
                        }
                      });
                    }
                  });

                  if (isArray) {
                    // TODO: 如果是 Array ,则重新走一下后面的 ArrayExpression 的处理
                    // 创建当前作用域下的唯一变量
                    const arrayStyle = identifyPath.scope.generateUidIdentifier(
                      'arrayStyle'
                    );
                    // 生成新的变量定义语句,
                    // 如果是 Array ,那么认为里面每个元素都是内联样式,通过 Object.assign 把它们组合到一起
                    const preformArrayStyle = template.ast(`
                      const ${arrayStyle.name} = {}
                      ${name}.forEach(sty => {
                        if (typeof sty === 'object') {
                          Object.assign(${arrayStyle.name}, sty)
                        }
                      })
                    `);
                    const jsxParent = identifyPath.findParent(p => {
                      if (
                        t.isReturnStatement(p) ||
                        t.isVariableDeclaration(p)
                      ) {
                        return true;
                      }
                    });
                    // 在最近的 return 语句上插入生成的语句
                    jsxParent.insertBefore(preformArrayStyle);
                    // 把当前 style 的值赋值为我们新建的变量名 arrayStyle
                    identifyPath.node.name = arrayStyle.name;
                  }
                },
                /**
                 * 如果是变量上读取的属性,则认为是从外部 css 引入的样式。通过 css-loader 的处理后,
                 * 引入的值已经变成了一个包含所有 class 的 object,我们直接把它替换为 style 就好了
                 * */
                MemberExpression(path) {
                    // function replaceStyle(path) {
                    //   if (!path.parentPath.parent.name) return;
                    //   path.parentPath.parent.name.name = 'className';
                    // }
                  replaceStyle(path);
                },
                /**
                 *  如果是 Array ,那么判断里面的值,规则按照上面两种处理方式处理。
                 * */
                ArrayExpression(arrayExpressionPath) {
                  const eles = arrayExpressionPath.node.elements;
                  // 遍历 Array 里面的元素
                  eles.forEach(e => {
                    // MemberExpression 认为是处理后的 class string
                    if (t.isMemberExpression(e)) {
                      classNames.push(e);
                    } else if (t.isObjectExpression(e)) {
                      // 如果是 Object 表达式,认为是内联样式
                      styles.push(e);
                    } else if (t.isIdentifier(e)) {
                      // 如果是自定义变量,粗暴的认为是内联样式
                      styles.push(e);
                    } else if (t.isLogicalExpression(e)) {
                      // 由于不好判断最终返回的值类型, 所以直接假定返回的 string ,当作 className处理
                      classNames.push(e);
                    }
                  });
                }
              });
            }
          });
      }
这样我们就可以拿到对应 styles 和 classNames ,接下来就是用它们来重建我们的 style 和 className 属性,看代码:
if (!styles.length && !classNames.length) return;
/**
 * NOTE: 重建样式属性
 * 1. 删除 style 属性节点
 * 2. 用 styles 创建新的 style 节点
 * 3. 用 classNames 创建 className 节点
 */
// 尝试获取最近的一个 render 方法
const renderPath = getRenderPath(path);
// 获取最近的一个 return 方法
let returnPath = getReturnPath(path);

// NOTE: 生成唯一 id ,并插入合并 styles 的代码,
styleAttrPath.remove();
if (styles.length) {
  if (!renderPath) return false;
  // 为 style 值创建当前作用域唯一变量名
  const styleUid = path.scope.generateUidIdentifier("style_UID");

  function buildStyleScript(styleUidName, styles) {
    const test = t.callExpression(
      t.memberExpression(t.identifier("Object"), t.identifier("assign")),
      styles,
    );
    const newScript = t.variableDeclaration("const", [
      t.variableDeclarator(styleUidName, test),
    ]);
    return newScript;
  }

  const newScript = buildStyleScript(styleUid, styles);
  // 在 return 语句前添加当前 style_UID 的变量定义
  returnPath.insertBefore(newScript);
  newStyleAttr = t.jsxAttribute(
    t.jsxIdentifier("style"),
    getAttributeValue({ value: styleUid.name, literal: true }),
  );
  path.node.attributes.push(newStyleAttr);
}
if (classNames.length) {
  // 构建并插入 className 字段
  if (!renderPath) return;
  // 为  className 创建当前作用域唯一变量名
  const classNameUid = path.scope.generateUidIdentifier("className_UID");
  function buildClassNameScript(classNameUid, nodes) {
    // DONE: 构建一个 List ,用来创建 className 字符串
    const array = t.arrayExpression(nodes);
    const call = t.callExpression(
      t.memberExpression(array, t.identifier("join")),
      [t.stringLiteral(" ")],
    );
    const newScript = t.variableDeclaration("const", [
      t.variableDeclarator(classNameUid, call),
    ]);
    return newScript;
  }

  const newScript = buildClassNameScript(classNameUid, classNames);
  // 在 return 前插入当前 className_UID 的变量定义
  returnPath && returnPath.insertBefore(newScript);

  //  构建 className 属性节点
  newClassNameAttr = t.jsxAttribute(
    t.jsxIdentifier("className"),
    getAttributeValue({ value: classNameUid.name, literal: true }),
  );
  // 给当前 jsx 标签添加 className 属性节点
  path.node.attributes.push(newClassNameAttr);
}
这样处理下来,整个 rax 组件就可以编译到 react 了,涉及到的工具有 webpack ,babel 。
最终的转化效果是很完美的,毕竟除了样式相关,也没处理什么东西。 不过倒是通过这次实践,学到了 babel 插件的开发方法,以后碰到类似问题就又多了一种处理方式。 —>
总结
还是要面向标准开发,背靠社区才更有前途。
本文发布于 2019年8月1日,最后更新于 2019年8月1日,距今已有 2513 天,文章内容可能已经过时。