ReactDOM 是如何把组件渲染到 DOM 中的?
当我们在开发 React 项目中,第一次调用 ReactDOM.render 的时候都发生了什么呢?
今天就从源码角度来追踪一下这个问题(主要看流程, 而不纠结与细节)。
ReactDOMStackEntry
首先我们可以从 ReactDOM 的入口文件 ReactDOMStackEntry.js 中找到 render 方法。可以看到,render 方法是 ReactMount 组件提供的。
var ReactDOMStack = {
  findDOMNode: findDOMNode,
  render: ReactMount.render,
  unmountComponentAtNode: ReactMount.unmountComponentAtNode,
  version: ReactVersion,

  /* eslint-disable camelcase */
  unstable_batchedUpdates: ReactGenericBatching.batchedUpdates,
  unstable_renderSubtreeIntoContainer: ReactMount.renderSubtreeIntoContainer,
  /* eslint-enable camelcase */

  __SECRET_INTERNALS_DO_NOT_USE_OR_YOU_WILL_BE_FIRED: {
    // For TapEventPlugin which is popular in open source
    EventPluginHub: require("EventPluginHub"),
    // Used by test-utils
    EventPluginRegistry: require("EventPluginRegistry"),
    EventPropagators: require("EventPropagators"),
    ReactControlledComponent: require("ReactControlledComponent"),
    ReactDOMComponentTree,
    ReactDOMEventListener: require("ReactDOMEventListener"),
    ReactUpdates: ReactUpdates,
  },
}
ReactMount.render
  render: function(nextElement, container, callback) {
    return ReactMount._renderSubtreeIntoContainer(
      null,
      nextElement,
      container,
      callback,
    );
  },
又调到了 _renderSubtreeIntoContainer 方法, 这个方法核心内容如下:
ReactMount._renderSubtreeIntoContainer
_renderSubtreeIntoContainer: function(
    parentComponent,
    nextElement,
    container,
    callback,
  ) {
    callback = callback === undefined ? null : callback;
    if (!React.isValidElement(nextElement)) {
      ...
    }
    // 创建下一个 wrapped 元素
    var nextWrappedElement = React.createElement(TopLevelWrapper, {
      child: nextElement,
    });

    var nextContext = getContextForSubtree(parentComponent);
    // 拿到当前的顶层容器组件
    var prevComponent = getTopLevelWrapperInContainer(container);
    // 对于第一次 render 来说,prevComponent 为 null
    if (prevComponent) {
      var prevWrappedElement = prevComponent._currentElement;
      var prevElement = prevWrappedElement.props.child;
      if (shouldUpdateReactComponent(prevElement, nextElement)) {
        var publicInst = prevComponent._renderedComponent.getPublicInstance();
        var updatedCallback =
          callback &&
          function() {
            validateCallback(callback);
            callback.call(publicInst);
          };
        ReactMount._updateRootComponent(
          prevComponent,
          nextWrappedElement,
          nextContext,
          container,
          updatedCallback,
        );
        return publicInst;
      } else {
        ReactMount.unmountComponentAtNode(container);
      }
    }

    var reactRootElement = getReactRootElementInContainer(container);
    var containerHasReactMarkup =
      reactRootElement && !!internalGetID(reactRootElement);
    var containerHasNonRootReactChild = hasNonRootReactChild(container);

    var shouldReuseMarkup =
      containerHasReactMarkup &&
      !prevComponent &&
      !containerHasNonRootReactChild;
    var component = ReactMount._renderNewRootComponent(
      nextWrappedElement,
      container,
      shouldReuseMarkup,
      nextContext,
      callback,
    )._renderedComponent.getPublicInstance();
    return component;
  },
这里有几个方法,分别是:
getTopLevelWrapperInContainershouldUpdateReactComponent_renderNewRootComponent
getTopLevelWrapperInContainer
这个方法用来拿到现有的顶层容器组件,相关代码如下。
function getTopLevelWrapperInContainer(container) {
  var root = getHostRootInstanceInContainer(container)
  return root ? root._hostContainerInfo._topLevelWrapper : null
}
function getHostRootInstanceInContainer(container) {
  var rootEl = getReactRootElementInContainer(container)
  var prevHostInstance =
    rootEl && ReactDOMComponentTree.getInstanceFromNode(rootEl)
  return prevHostInstance && !prevHostInstance._hostParent
    ? prevHostInstance
    : null
}
调用了两个方法,getReactRootElementInContainer 和 ReactDOMComponentTree.getInstanceFromNode.
getReactRootElementInContainer
function getReactRootElementInContainer(container) {
  if (!container) {
    return null
  }

  if (container.nodeType === DOCUMENT_NODE) {
    return container.documentElement
  } else {
    return container.firstChild
  }
}
ReactDOMComponentTree
这个模块有三个方法,分别是:
precacheChildNodes在 DOM 节点上存储相应的 React 实例getNodeFromInstance从一个实例上获取到对应的 DOM 节点getInstanceFromNode从一个 DOM 节点上获取到对应的实例
shouldUpdateReactComponent
判断是否需要更新组件。
function shouldUpdateReactComponent(prevElement, nextElement) {
  var prevEmpty = prevElement === null || prevElement === false
  var nextEmpty = nextElement === null || nextElement === false
  if (prevEmpty || nextEmpty) {
    return prevEmpty === nextEmpty
  }

  var prevType = typeof prevElement
  var nextType = typeof nextElement
  if (prevType === "string" || prevType === "number") {
    return nextType === "string" || nextType === "number"
  } else {
    return (
      nextType === "object" &&
      prevElement.type === nextElement.type &&
      prevElement.key === nextElement.key
    )
  }
}
可以看到逻辑是这样的:
- 前后两次元素都为
null返回true - 如果是
textComponent,那么直接更新 - 否则当为 DOM 元素或者 React 元素时,且 type 和 key 都相同时返回
true, 执行 update
ReactMount._renderNewRootComponent
这个方法是 _renderSubtreeIntoContainer 的核心,用来把一个新的组件挂载到 DOM 中。
  _renderNewRootComponent: function(
    nextElement,
    container,
    shouldReuseMarkup,
    context,
    callback,
  ) {
    // 通过 instantiateReactComponent 拿到 React Component 组件实例
    var componentInstance = instantiateReactComponent(nextElement, false);

    if (callback) {
      componentInstance._pendingCallbacks = [
        function() {
          validateCallback(callback);
          callback.call(
            componentInstance._renderedComponent.getPublicInstance(),
          );
        },
      ];
    }

    // The initial render is synchronous but any updates that happen during
    // rendering, in componentWillMount or componentDidMount, will be batched
    // according to the current batching strategy.
    ReactUpdates.batchedUpdates(
      batchedMountComponentIntoNode,
      componentInstance,
      container,
      shouldReuseMarkup,
      context,
    );

    var wrapperID = componentInstance._instance.rootID;
    instancesByReactRootID[wrapperID] = componentInstance;

    return componentInstance;
  },
instantiateReactComponent
根据传入的参数来生成不同的 React Component, 核心代码:
  if (node === null || node === false) {
    instance = ReactEmptyComponent.create(instantiateReactComponent);
  } else if (typeof node === 'object') {
    var element = node;
    var type = element.type;
    if (typeof type !== 'function' && typeof type !== 'string') {
      ...
    }

    // Special case string values
    if (typeof element.type === 'string') {
      instance = ReactHostComponent.createInternalComponent(element);
    } else if (isInternalComponentType(element.type)) {
      // This is temporarily available for custom components that are not string
      // representations. I.e. ART. Once those are updated to use the string
      // representation, we can drop this code path.
      instance = new element.type(element);

      // We renamed this. Allow the old name for compat. :(
      if (!instance.getHostNode) {
        instance.getHostNode = instance.getNativeNode;
      }
    } else {
      instance = new ReactCompositeComponentWrapper(element);
    }
  } else if (typeof node === 'string' || typeof node === 'number') {
    instance = ReactHostComponent.createInstanceForText(node);
  } else {
    invariant(false, 'Encountered invalid React node of type %s', typeof node);
  }
从代码中可以看到,根据 element.type 的不同,有三个方法来生成三种不同 React 组件实例,分别为:
- ReactHostComponent.createInternalComponent(element)
- new ReactCompositeComponentWrapper(element)
- ReactHostComponent.createInstanceForText(node);
可能读者会注意到,当 isInternalComponentType(element.type) 成立时, instance = new element.type(element); 的这段代码被我忽略了,那是因为这个是 React 封装的内部组件不是由字符串表达时的解决方法,我们是不用关心的。
我们来看上面的三个方法,其中两个方法都调用了 ReactHostComponent 模块。
ReactHostComponent
核心代码:
var ReactHostComponentInjection = {
  // This accepts a class that receives the tag string. This is a catch all
  // that can render any kind of tag.
  injectGenericComponentClass: function (componentClass) {
    genericComponentClass = componentClass
  },
  // This accepts a text component class that takes the text string to be
  // rendered as props.
  injectTextComponentClass: function (componentClass) {
    textComponentClass = componentClass
  },
}

function createInternalComponent(element) {
  invariant(
    genericComponentClass,
    "There is no registered component for the tag %s",
    element.type
  )
  return new genericComponentClass(element)
}

/**
 * @param {ReactText} text
 * @return {ReactComponent}
 */
function createInstanceForText(text) {
  return new textComponentClass(text)
}
就是提供了两个方法来创建组件,而其中两个组件 class 的实现是通过其他模块注入进来的,那到底是从哪里注入进来的呢。
经过一番查找,发现是在 ReactDOMStackInjection.js 中注入的,我们看一下代码:
var ReactComponentEnvironment = require("ReactComponentEnvironment")
var ReactComponentBrowserEnvironment = require("ReactComponentBrowserEnvironment")
var ReactDOMComponent = require("ReactDOMComponent")
var ReactDOMComponentTree = require("ReactDOMComponentTree")
var ReactDOMEmptyComponent = require("ReactDOMEmptyComponent")
var ReactDOMTextComponent = require("ReactDOMTextComponent")
var ReactDefaultBatchingStrategy = require("ReactDefaultBatchingStrategy")
var ReactEmptyComponent = require("ReactEmptyComponent")
var ReactGenericBatching = require("ReactGenericBatching")
var ReactHostComponent = require("ReactHostComponent")
var ReactReconcileTransaction = require("ReactReconcileTransaction")
var ReactUpdates = require("ReactUpdates")

var findDOMNode = require("findDOMNode")
var getHostComponentFromComposite = require("getHostComponentFromComposite")

ReactGenericBatching.injection.injectStackBatchedUpdates(
  ReactUpdates.batchedUpdates
)

ReactHostComponent.injection.injectGenericComponentClass(ReactDOMComponent)

ReactHostComponent.injection.injectTextComponentClass(ReactDOMTextComponent)

ReactEmptyComponent.injection.injectEmptyComponentFactory(
  function (instantiate) {
    return new ReactDOMEmptyComponent(instantiate)
  }
)

ReactUpdates.injection.injectReconcileTransaction(ReactReconcileTransaction)
ReactUpdates.injection.injectBatchingStrategy(ReactDefaultBatchingStrategy)

ReactComponentEnvironment.injection.injectEnvironment(
  ReactComponentBrowserEnvironment
)

findDOMNode._injectStack(function (inst) {
  inst = getHostComponentFromComposite(inst)
  return inst ? ReactDOMComponentTree.getNodeFromInstance(inst) : null
})
可以看到,这个模块通过 ReactHostComponent.injection 注入了 ReactDOMComponent 和 ReactDOMTextComponent. 同时也注入了一些其他模块,这个我们后面还会用到。
这里 ReactDOMComponent 和 ReactDOMTextComponent 才是真是的生成 DOM 标记的模块,它们的内容过多,但是代码比较简单了,这里就不细说了。总之调用这两个模块的 mountComponent 方法都会生成 DOM Markup. 不同的地方在于, ReactDOMComponent 会如下结构的 Markup
{
  node: node,
  children: [],
  html: null,
  text: null,
  toString
}
而 ReactDOMTextComponent 会直接生成要渲染在 DOM 里面的 String 类型的文本。
ReactCompositeComponent
最后一类组件应该是 ReactCompositeComponentWrapper, 但查看 instantiateReactComponent 里面的这两段代码:
var ReactCompositeComponentWrapper = function (element) {
  this.construct(element)
}

Object.assign(
  ReactCompositeComponentWrapper.prototype,
  ReactCompositeComponent,
  {
    _instantiateReactComponent: instantiateReactComponent,
  }
)
当调用 this.construct 的时候,还是调用到了 ReactCompositeComponent ,这个就是用户自定义的组件。
ReactUpdates.batchedUpdates
function batchedUpdates(callback, a, b, c, d, e) {
  ensureInjected()
  return batchingStrategy.batchedUpdates(callback, a, b, c, d, e)
}
可以看到 ReactUpdates 里面是 通过 batchingStrategy 调用 batchedUpdate. 而 batchingStrategy 也是前面说到的 ReactDOMStackInjection 来注入进去的。
ReactUpdates.injection.injectReconcileTransaction(ReactReconcileTransaction)
ReactUpdates.injection.injectBatchingStrategy(ReactDefaultBatchingStrategy)
ReactUpdates 共注入了两个模块,分别是 ReactReconcileTransaction 和 ReactDefaultBatchingStrategy.
先来看一下 ReactDefaultBatchingStrategy, ReactReconcileTransaction 后面碰到再说,来看一下它的代码:
var ReactUpdates = require("ReactUpdates")
var Transaction = require("Transaction")

var emptyFunction = require("fbjs/lib/emptyFunction")

var RESET_BATCHED_UPDATES = {
  initialize: emptyFunction,
  close: function () {
    ReactDefaultBatchingStrategy.isBatchingUpdates = false
  },
}

var FLUSH_BATCHED_UPDATES = {
  initialize: emptyFunction,
  close: ReactUpdates.flushBatchedUpdates.bind(ReactUpdates),
}

var TRANSACTION_WRAPPERS = [FLUSH_BATCHED_UPDATES, RESET_BATCHED_UPDATES]

function ReactDefaultBatchingStrategyTransaction() {
  this.reinitializeTransaction()
}

Object.assign(ReactDefaultBatchingStrategyTransaction.prototype, Transaction, {
  getTransactionWrappers: function () {
    return TRANSACTION_WRAPPERS
  },
})

var transaction = new ReactDefaultBatchingStrategyTransaction()

var ReactDefaultBatchingStrategy = {
  isBatchingUpdates: false,

  /**
   * Call the provided function in a context within which calls to `setState`
   * and friends are batched such that components aren't updated unnecessarily.
   */
  batchedUpdates: function (callback, a, b, c, d, e) {
    var alreadyBatchingUpdates = ReactDefaultBatchingStrategy.isBatchingUpdates

    ReactDefaultBatchingStrategy.isBatchingUpdates = true

    // The code is written this way to avoid extra allocations
    if (alreadyBatchingUpdates) {
      // 如果当前 updates 已经完成,那么直接调用 callback
      return callback(a, b, c, d, e)
    } else {
      // 通过事务的方式去调用 callback
      return transaction.perform(callback, null, a, b, c, d, e)
    }
  },
}
可以看到我们前面调用的 ReactUpdates.batchUpdates 实际上调用到了这里的 batchedUpdates, 里面的逻辑也很简单。
这里面用到了一个 transaction 方法,这里我理解为“事务”。也就是说当如果当前正在进行一次更新,那么就通过事务的方式去调用这个 callback.
transaction
transaction 在 React 源码里面使用非常广泛,作用是通过事务的方式去调用一个方法。
用一个或多个 wrapper 把方法包裹起来,在方法调用前和调用之后依次执行。事务会确保 wrapper 的 initialize 和 close 方法都会执行,无论要执行的方法执行成功或失败报错,看看它的源码解释就很明白了:
 * <pre>
 *                       wrappers (injected at creation time)
 *                                      +        +
 *                                      |        |
 *                    +-----------------|--------|--------------+
 *                    |                 v        |              |
 *                    |      +---------------+   |              |
 *                    |   +--|    wrapper1   |---|----+         |
 *                    |   |  +---------------+   v    |         |
 *                    |   |          +-------------+  |         |
 *                    |   |     +----|   wrapper2  |--------+   |
 *                    |   |     |    +-------------+  |     |   |
 *                    |   |     |                     |     |   |
 *                    |   v     v                     v     v   | wrapper
 *                    | +---+ +---+   +---------+   +---+ +---+ | invariants
 * perform(anyMethod) | |   | |   |   |         |   |   | |   | | maintained
 * +----------------->|-|---|-|---|-->|anyMethod|---|---|-|---|-|-------->
 *                    | |   | |   |   |         |   |   | |   | |
 *                    | |   | |   |   |         |   |   | |   | |
 *                    | |   | |   |   |         |   |   | |   | |
 *                    | +---+ +---+   +---------+   +---+ +---+ |
 *                    |  initialize                    close    |
 *                    +-----------------------------------------+
 * </pre>
这里我们再回到刚才的 ReactDefaultBatchingStrategy, 代码里面有两个 wrapper.
var RESET_BATCHED_UPDATES = {
  initialize: emptyFunction,
  close: function () {
    ReactDefaultBatchingStrategy.isBatchingUpdates = false
  },
}

var FLUSH_BATCHED_UPDATES = {
  initialize: emptyFunction,
  close: ReactUpdates.flushBatchedUpdates.bind(ReactUpdates),
}
它们的 initialize 方法都是一个空函数,close 方法分别是:
- 把当前的更新状态置为 false
flushBatchedUpdates这个方法比较复杂,这里不展开讲,主要是确保所有组件能够正确更新(flushBatchedUpdates->ReactUpdates.runBatchedUpdates->ReactCompositeComponent.performUpdateIfNecessary)
现在回到上面的代码:
ReactUpdates.batchedUpdates(
  batchedMountComponentIntoNode,
  componentInstance,
  container,
  shouldReuseMarkup,
  context
)
可以知道,这里是调用了 batchedMountComponentIntoNode 进行后续的工作。
function batchedMountComponentIntoNode(
  componentInstance,
  container,
  shouldReuseMarkup,
  context
) {
  var transaction = ReactUpdates.ReactReconcileTransaction.getPooled(
    /* useCreateElement */
    !shouldReuseMarkup
  )
  transaction.perform(
    mountComponentIntoNode,
    null,
    componentInstance,
    container,
    transaction,
    shouldReuseMarkup,
    context
  )
  ReactUpdates.ReactReconcileTransaction.release(transaction)
}
这里第一条赋值语句就用到了上面注入到 ReactUpdates 里面的另一个模块 ReactReconcileTransaction 即 React 的调度事务模块。
var SELECTION_RESTORATION = {
  initialize: ReactInputSelection.getSelectionInformation,
  close: ReactInputSelection.restoreSelection,
};

/**
 * Suppresses events (blur/focus) that could be inadvertently dispatched due to
 * high level DOM manipulations (like temporarily removing a text input from the
 * DOM).
 */
var EVENT_SUPPRESSION = {
  initialize: function() {
    var currentlyEnabled = ReactBrowserEventEmitter.isEnabled();
    ReactBrowserEventEmitter.setEnabled(false);
    return currentlyEnabled;
  },
  close: function(previouslyEnabled) {
    ReactBrowserEventEmitter.setEnabled(previouslyEnabled);
  },
};

/**
 * Provides a queue for collecting `componentDidMount` and
 * `componentDidUpdate` callbacks during the transaction.
 */
var ON_DOM_READY_QUEUEING = {
  initialize: function() {
    this.reactMountReady.reset();
  },
  close: function() {
    this.reactMountReady.notifyAll();
  },
};
...
var TRANSACTION_WRAPPERS = [
  SELECTION_RESTORATION,
  EVENT_SUPPRESSION,
  ON_DOM_READY_QUEUEING,
];
function ReactReconcileTransaction(useCreateElement) {
  this.reinitializeTransaction();
  this.renderToStaticMarkup = false;
  this.reactMountReady = CallbackQueue.getPooled();
  this.useCreateElement = useCreateElement;
}
...
var Mixin = {
  getTransactionWrappers: function() {
    return TRANSACTION_WRAPPERS;
  },
  ...
}
Object.assign(ReactReconcileTransaction.prototype, Transaction, Mixin);

PooledClass.addPoolingTo(ReactReconcileTransaction);
这里也是通过事务的方式去调用,它有三个 wrapper:
- Selection Restoration 在更新过程中尽可能不打扰用户的选中范围(selection range)
- Event Suppression 抑制一些不需要的事件分发,比如暂时性删除一个 input 元素而导致的 blur 事件
- On DOM Ready Queueing 在事务执行过程中,提供一个
componentDidMount和componentDidUpdate回调函数的队列
而后面的 getPooled 方法,是一个利用实例池来避免不必要的 GC 的方法,不过多解释。
接着用这个事务的方式去调用 mountComponentIntoNode, 详细的看一下这个方法。
mountComponentIntoNode
function mountComponentIntoNode(
  wrapperInstance,
  container,
  transaction,
  shouldReuseMarkup,
  context
) {
  var markup = ReactReconciler.mountComponent(
    wrapperInstance,
    transaction,
    null,
    ReactDOMContainerInfo(wrapperInstance, container),
    context,
    0 /* parentDebugID */
  )

  wrapperInstance._renderedComponent._topLevelWrapper = wrapperInstance
  ReactMount._mountImageIntoNode(
    markup,
    container,
    wrapperInstance,
    shouldReuseMarkup,
    transaction
  )
}
这里看到了重点变量 markup 的操作, 这个就是我们最终要往 DOM 里面渲染的对象。通过 ReactReconciler.mountComponent 方法来得到 markup. ReactReconciler.mountComponent 的源码如下:
  mountComponent: function(
    internalInstance,
    transaction,
    hostParent,
    hostContainerInfo,
    context,
    parentDebugID, // 0 in production and for roots
  ) {
    var markup = internalInstance.mountComponent(
      transaction,
      hostParent,
      hostContainerInfo,
      context,
      parentDebugID,
    );
    if (
      internalInstance._currentElement &&
      internalInstance._currentElement.ref != null
    ) {
      transaction.getReactMountReady().enqueue(attachRefs, internalInstance);
    }
    return markup;
  },
它又调用了 internalInstance.mountComponent, 这里的 internalInstance 其实就是前面说的通过 instantiateReactComponent 得到的 React Component 实例。
// _renderNewRootComponent
var componentInstance = instantiateReactComponent(nextElement, false)
这里的 nextElement 是要渲染的 React root 元素。
// _renderSubtreeIntoContainer
var nextWrappedElement = React.createElement(TopLevelWrapper, {
  child: nextElement,
})
TopLevelWrapper 的实现,需要注意它的 render 方法。
var TopLevelWrapper = function () {
  this.rootID = topLevelRootCounter++
}
TopLevelWrapper.prototype.isReactComponent = {}
TopLevelWrapper.prototype.render = function () {
  return this.props.child
}
TopLevelWrapper.isReactTopLevelWrapper = true
它的 render 方法里面返回的 this.props.child 就是 nextElement 也就是我们项目代码里面入口 ReactDOM.render(<App/>,document.getElementById('root')) 里面的 <App/>.
回到 ReactReconciler.mountComponent 里面的 internalInstance.mountComponent. 通过前面的讲到的 instantiateReactComponent 我们知道返回的组件有三类:
- ReactDOMComponent
- ReactDOMTextComponent
- ReactCompositeComponent
前两类很简单,都是 DOM 本身的元素,最终会渲染出来它们对应的 Markup. 而 ReactCompositeComponent 比较复杂,我们只看关键代码:
//ReactCompositeComponent.mountComponent
    var Component = this._currentElement.type;

    var updateQueue = transaction.getUpdateQueue();

    // Initialize the public class
    var doConstruct = shouldConstruct(Component);
    var inst = this._constructComponent(
      doConstruct,
      publicProps,
      publicContext,
      updateQueue,
    );
    var renderedElement;
    if (!doConstruct && (inst == null || inst.render == null)) {
      renderedElement = inst;
      inst = new StatelessComponent(Component);
      this._compositeType = ReactCompositeComponentTypes.StatelessFunctional;
    } else {
     。...
    }
      markup = this.performInitialMount(
        renderedElement,
        hostParent,
        hostContainerInfo,
        transaction,
        context,
      );
首先得到 inst , 得到 inst 的调用栈是这样的: this._constructComponent -> this._constructComponentWithoutOwner
// this._constructComponentWithoutOwner
...
   var Component = this._currentElement.type;

    if (doConstruct) {
      if (__DEV__) {
        return measureLifeCyclePerf(
          () => new Component(publicProps, publicContext, updateQueue),
          this._debugID,
          'ctor',
        );
      } else {
        return new Component(publicProps, publicContext, updateQueue);
      }
    }
...
根据 _currentElement.type 生成 Component 实例, currentElement.type 即就是继承自 React.Component 的 class 或者纯渲染组件 function.
然后声明 renderElement, 对于 stateless (函数声明的纯渲染组件)组件,renderElement = inst, 否则为 undefined.
接着来看 performInitialMount,
if (renderedElement === undefined) {
  renderedElement = this._renderValidatedComponent()
}

var nodeType = ReactNodeTypes.getType(renderedElement)
this._renderedNodeType = nodeType
var child = this._instantiateReactComponent(
  renderedElement,
  nodeType !== ReactNodeTypes.EMPTY /* shouldHaveDebugID */
)
this._renderedComponent = child

var markup = ReactReconciler.mountComponent(
  child,
  transaction,
  hostParent,
  hostContainerInfo,
  this._processChildContext(context),
  debugID
)
对于非 stateless 组件时,需要对 renderedElement 赋值。调用栈为: this._renderValidatedComponent -> this._renderValidatedComponentWithoutOwnerOrContext
  _renderValidatedComponentWithoutOwnerOrContext: function() {
    var inst = this._instance;
    var renderedElement;

    if (__DEV__) {
      renderedElement = measureLifeCyclePerf(
        () => inst.render(),
        this._debugID,
        'render',
      );
    } else {
      renderedElement = inst.render();
    }

    if (__DEV__) {
      // We allow auto-mocks to proceed as if they're returning null.
      if (renderedElement === undefined && inst.render._isMockFunction) {
        // This is probably bad practice. Consider warning here and
        // deprecating this convenience.
        renderedElement = null;
      }
    }

    return renderedElement;
  },
最终得到 renderedElement 也就是 inst.render() 后的结果。
再往下走 child = this._instantiateReactComponent(renderedElement) 和 markup = ReactReconciler.mountComponent(child,...) .
可以联想到,这里会不断的循环递归调用 ReactReconciler.mountComponent, 知道 child 不是 ReactCompositeComponent 为止,得到最终的 MarkUp. MarkUp 的数据结构可以在 DOMLazyTree 中找到:
// DOMLazyTree
{
  node: node,
  children: [],
  html: null,
  text: null,
  toString,
}
拿到了 MarkUp,就只剩下最后一步了,通过 ReactMount._mountImageIntoNode 来吧 MarkUp 挂载到实际 DOM 中。
ReactMount._mountImageIntoNode
  _mountImageIntoNode: function(
    markup,
    container,
    instance,
    shouldReuseMarkup,
    transaction,
  ) {
    invariant(
      isValidContainer(container),
      'mountComponentIntoNode(...): Target container is not valid.',
    );
    // 首次渲染,这里为 shouldReuseMarkup = false ,里面都是更新的逻辑
    if (shouldReuseMarkup) {
      ...
    }
    // 首次渲染,transaction.useCreateElement = true
    if (transaction.useCreateElement) {
      while (container.lastChild) {
        container.removeChild(container.lastChild);
      }
      DOMLazyTree.insertTreeBefore(container, markup, null);
    } else {
      setInnerHTML(container, markup);
      ReactDOMComponentTree.precacheNode(instance, container.firstChild);
    }
  },
逻辑很简单,有两种方式把 markup 渲染到 DOM 中:
- 清空给定的容器组件,然后把 markup 插入到给定的容器中
- 调用
setInnerHTML来把 markup 插入到给定容器中,并缓存虚拟 DOM 到实际的 DOM 节点上
对于初次渲染, 会执行第一种方法,清空容器组件,把 markup 挂载到实际的 DOM 中。调用栈:DOMLazyTree.insertTreeBefore -> insertTreeChildren
function insertTreeChildren(tree) {
  if (!enableLazy) {
    return
  }
  var node = tree.node
  var children = tree.children
  if (children.length) {
    for (var i = 0; i < children.length; i++) {
      insertTreeBefore(node, children[i], null)
    }
  } else if (tree.html != null) {
    setInnerHTML(node, tree.html)
  } else if (tree.text != null) {
    setTextContent(node, tree.text)
  }
}
递归的挂载所有子组件到 DOM 中。
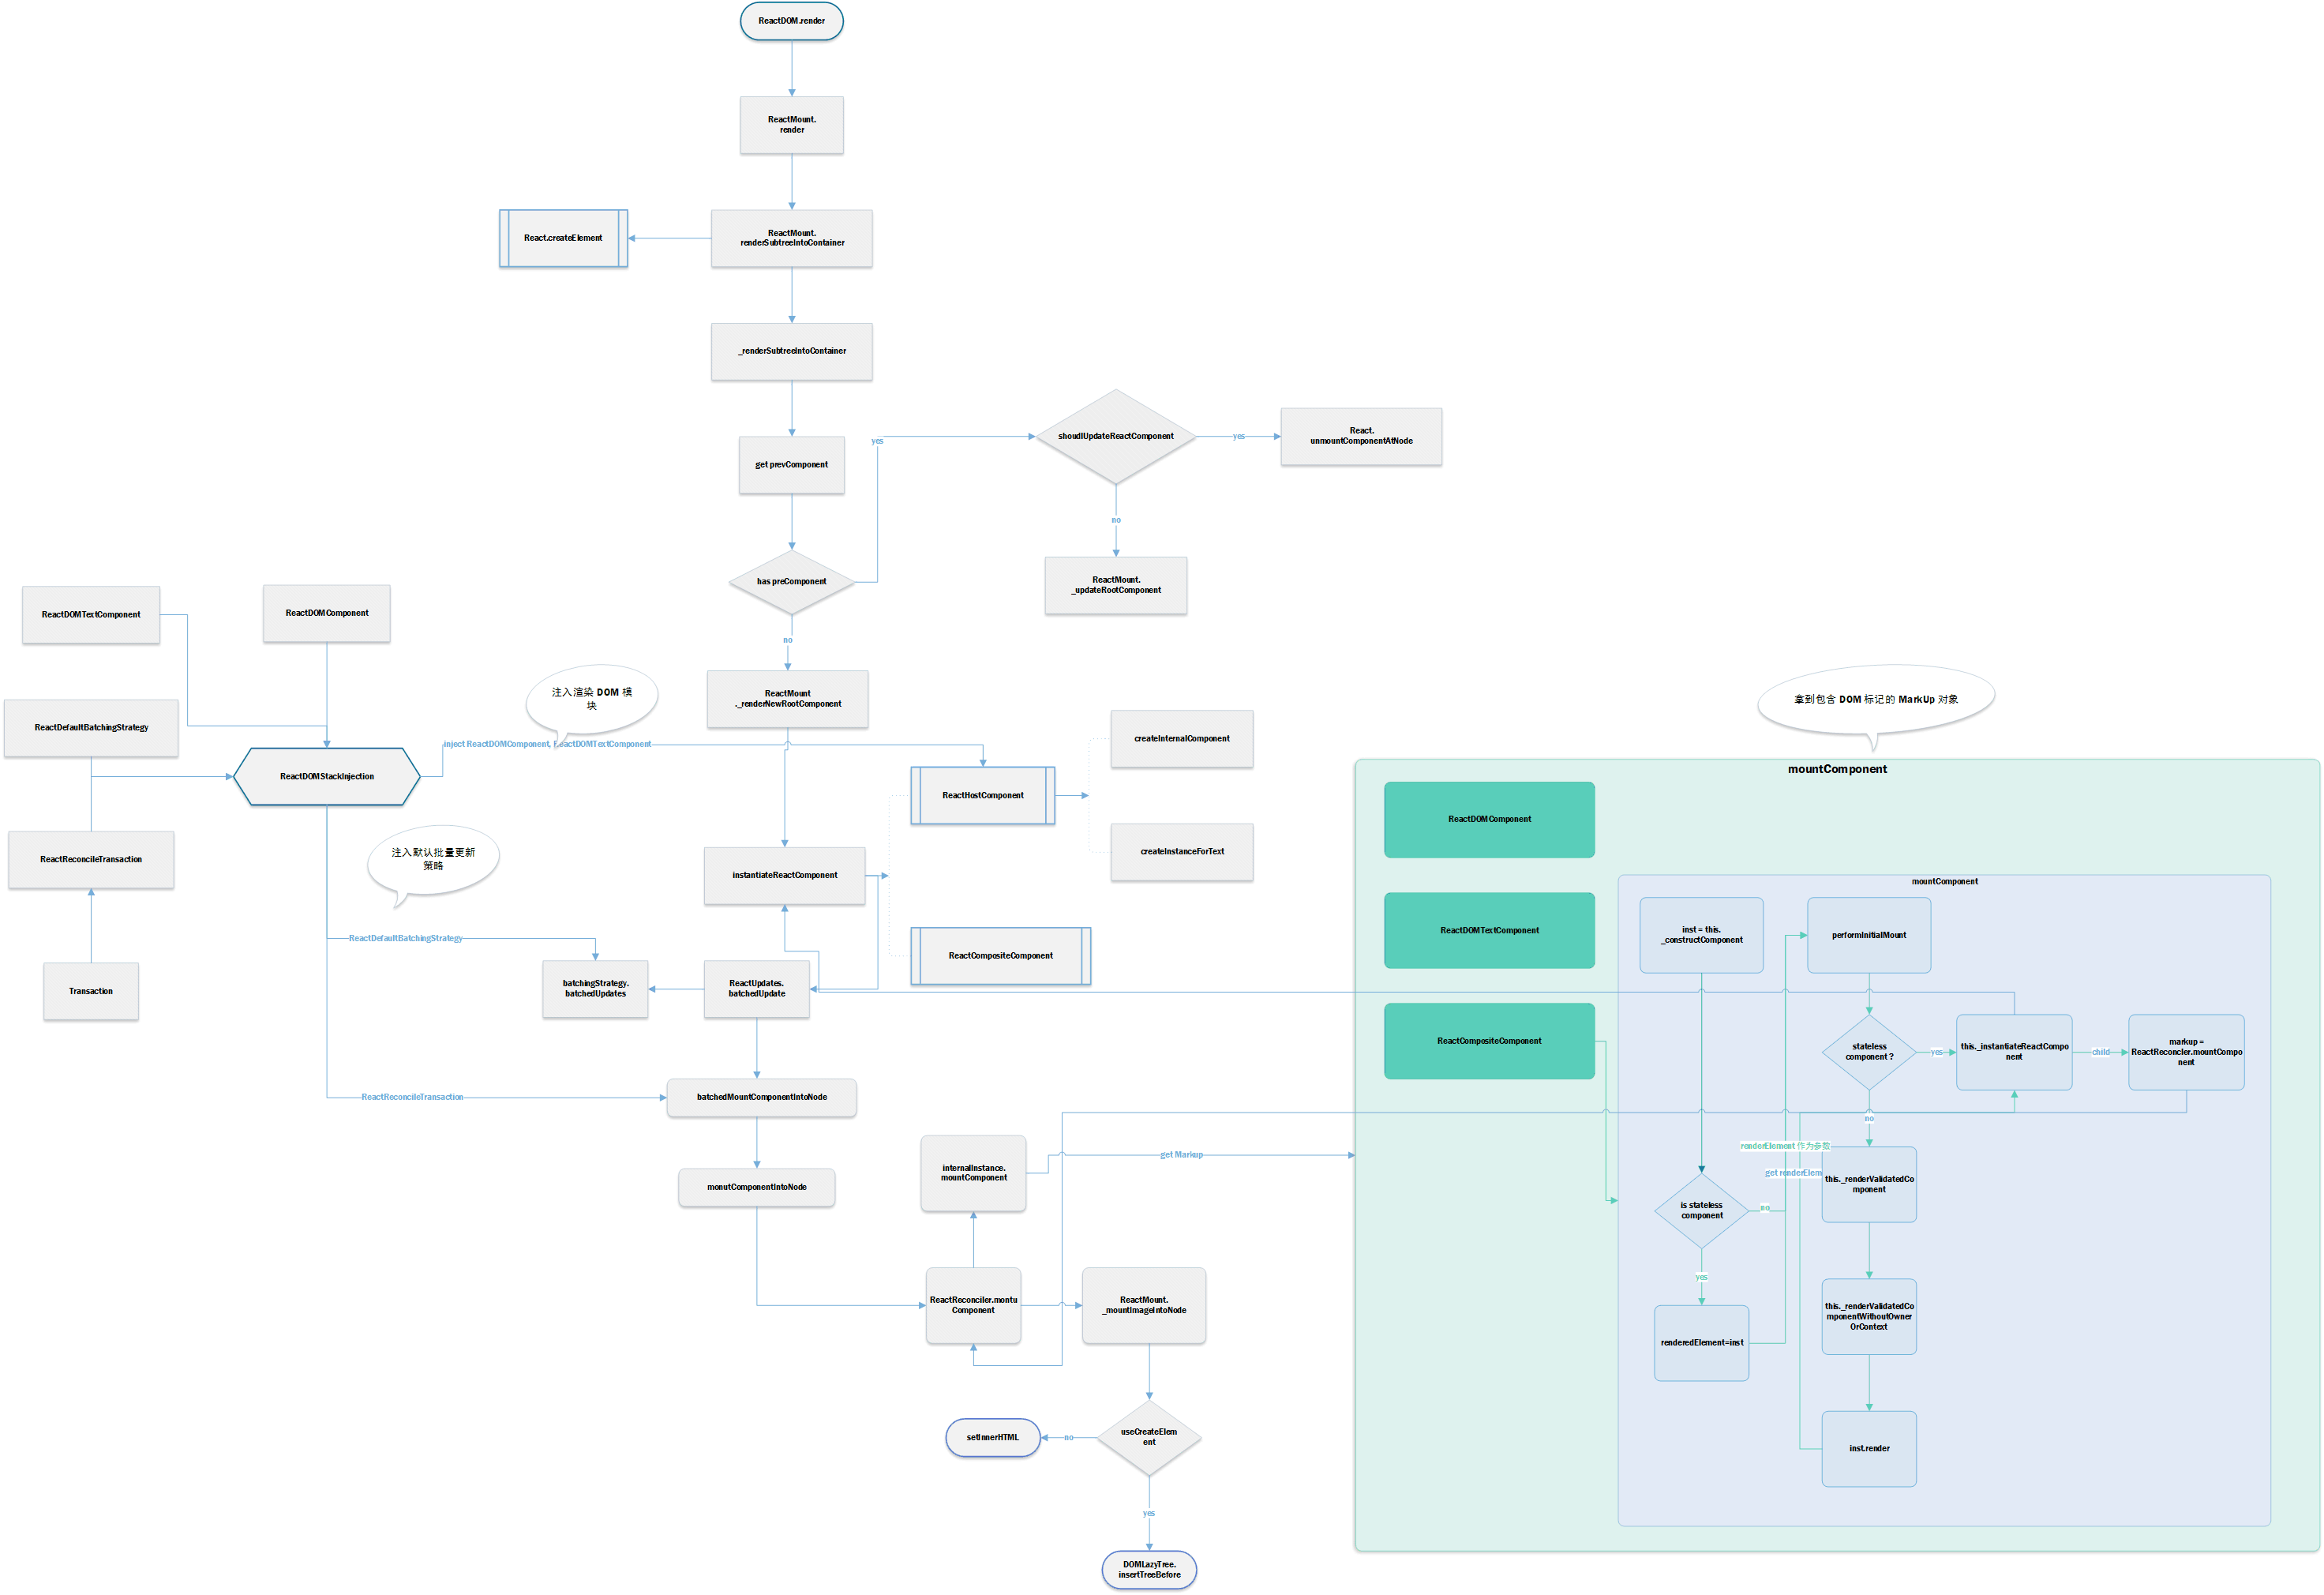
总结
那么到这里整个初次渲染的逻辑就算走完了,整体上可以看到 React 和 ReactDOM 的代码抽象程度非常高,以至于代码阅读起来非常的绕。本文也只限于整体的流程,没有深究细节,因为细节太多了。
最后整理了一个 ReactDOM.render 执行后流程关系图,能一定程度上帮助理解它的整过过程:
图很大,点击放大后也看不清,建议保存到本地后浏览,会看的清晰点。
相关文章
- {% post_link react-source-code-analyze-1 React 源码浅析之 - 入口文件 %}
- {% post_link react-source-code-analyze-2 React 源码浅析之 - ReactBaseClasses %}
- {% post_link react-source-code-analyze-3 React 源码浅析之 - ReactChildren %}
- {% post_link react-source-code-analyze-4 React 源码浅析之 - ReactElement %}
- {% post_link react-source-code-analyze-5 React 源码浅析之 - onlyChildren %}
本文章遵循: CC BY-NC-ND 4.0![]()
![]()
![]()
![]()
非商业转载请注明作者及出处,商业转载请联系 作者本人。
本文标题为:ReactDOM 是如何把组件渲染到 DOM 中的?
本文链接为:https://blog.kisnows.com/2017/09/21/how-react-render-component-to-dom